
Column 10 – Part 2
So you want to be a CAD Monkey? continued……
Menu bar
Layout space generates WYSIWYG (What You See Is What You Get) layout. The white background represents the paper (that you just specified) where your drawing will be printed. The dashed line inside the edge of the white area represents your printer’s margins (printable area). Finally the solid rectangle that surrounds your drawing is the outline of the Layout viewport. (A viewport is a CAD object that works like a window into your drawing from the Layout tab.)
To specify the scale of a drawing, double click the viewport. A contextual menu titled PropertiesNOTE will appear.
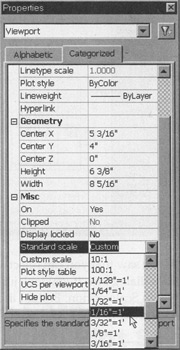
Following the example shown in the image, you can specify your drawing’s scale.
Suppose now that although the scale is appropriate the drawing is clipped by the edge of the viewport. Your solution can be twofold. You can make the viewport larger by clicking it once to select it with the cross-hairs and pull on any of the handle bars.
If this doesn’t work, take note that upon clicking once on the viewport the area within the viewport now becomes active Model space. In other words, even though you’re currently in Layout space, the viewport displays exactly what was done in Model space. You can pan around, zoom in and out, even alter the drawing (although this is not recommended because precision can be more difficult to maintain). In this second case, just be aware that if you need to zoom, the scale is no longer what you previously specified.
As you become more experienced with CAD and need to supply a document with greater detail–say multiple views of one drawing, for example, Layout space will be of greater importance.
For Example….
Say you’re like Mr. Rothe and you have drawn a new industrial product–a stapler. You want to show the product as a whole, but also would like to include a pair of details. You have several possible methods of attack. You could draw the stapler three times. You could also draw the item once, copy it twice and lay things out in Model space to plot. This all becomes sloppy. There is a more efficient way; use Layout space and create three (in this case) separate viewports.
Upon selecting a Layout tab the first time, you can specify the number of viewports. You can also edit the number of viewports in Layout space. To remove viewports, select those that are unwanted and erase them. (When doing so, don’t panic; remember that a viewport is merely a window to view what you have drawn in Model space. The model is still there.)
To add viewports, select View > Viewports > New viewports. A viewports dialog box appears that contains a set of predefined viewport layouts. Select the number of viewports you will need and press OK. You’ll be prompted to specify the layout of the viewports with the cross-hairs, but just press enter to select the default, <Fit>.
Once in sight, you can move and alter the viewports more easily. Mr. Rothe uses one viewport to show the entire stapler model. The other two he independently selects and zooms in to show different details. And look how he saves time: By using Layout space, Mr. Rothe can draw the stapler once, yet generate a drawing with multiple views of this new hallmark design.
When set to plot from Layout space, pull up the Properties dialog box again (if not already in view). At the bottom of the Categorized tab is the Hide plot command. Using the drop-down menu, select Yes. If you don’t, your viewport windows will remain on the plot thus yielding a boxed result. Following this method, Mr. Rothe creates a clean, efficient drawing that wins him the bid.
NOTE: Double clicking on any item within Model Space also generates a Properties dialog box. Within this box object’s properties can be viewed and altered.
Tips to get a move on
Zooming is critical in performing accurate drawings. You’ll find that you frequently zoom in and out to make sure things are precise. Although this can be accessed by any of the four previously mentioned techniques, if you find yourself CADing and don’t have a wheelmouse, go and buy one; scrolling forward with the wheel zooms in, scrolling back zooms you out. No matter what amount of CAD you do, you’ll quickly find that this is the way to go.
As you type commands, be privy to experimenting with word truncation. Oftentimes the first letter or two (sometimes more) may suffice. If you err, no worry. You can always undo. In last column’s line removal example typing “e” and pressing “space bar” or “enter” erases the line.
Function keys perform some very oft-used commands that can save you time hunting through menus or pressing multiple-key shortcuts.
F1 will be a favorite of yours till you get more comfortable with CAD. This Help Menu is quite extensive and provides helpful diagrammatic assistance.
F8 – operates CAD’s ORTHO function (made visible in CAD’s Status bar that sits right below the Command Window). This permits you to only draw lines at 90 degrees (i.e. orthogonally) to one another.
F9 – works CAD’s OSNAP (object snap) function. To relieve you from zooming in infinitely close to objects to be sure you’ve connected object’s termination points, turn this function on. CAD locks in on target points specified by those items checked in a pop-up menu. (To view this menu, right click OSNAP in the Status bar and follow the contextual menu.)
When selecting elements within a drawing, you’ll notice as you click and drag the mouse, a box appears. If you click again, the box disappears. Herein CAD again presents you with two options: If you click and drag down and to the right, the box is solid. This type of box will only select (i.e. place handle bars on drafted items) that are enclosed within the box. If you click and drag up and to the left, the box is dashed. In addition to items that the box encloses, this type of box will select anything it touches.
Thought for improvement
No matter how you get work done in CAD, the Command Window displays all actions undergone. (In fact, this is how I learned a few tricks from friends: pressing F2 opens a Command Window archive enabling Curious George to see how Koko did something step by step.)
~final
Here are some similar arcade posts
- Column 10 – Part 1
- Column 9 – Part 2
- Column 9 – Part 1
- Photoshop Shortcuts – The shortest way to Photoshop World Domination (Part 2)
- How do I crop something in Illustrator? How do I use Clipping Masks?
If you enjoyed this post, please consider to leave a comment or subscribe to the feed and get future articles delivered to your feed reader.


Comments
No comments yet.
Leave a comment
Your email address is never displayed and cannot be spammed. If your comments are excessively self-promotional you will be banned from commenting. Read our comment privacy policy.