
Artwork Bleed for Screen Printing Reproduction Arcade Artwork
If you have been following my blog, I have slowly been working on vectorizing every piece of the original Pengo artwork to have reproductions made for sale. I have another contact that is doing some vectorizing of a couple pieces of artwork, and he asked me if the Illustrator artwork pieces had to have any bleed on them for registration coverage when taking the pieces to the Screen Printing stage. I knew from working with Brian at Oleszak, that there needed to be some offset bleed on the shapes when making stencils, but I figured this was more for the home arcade game collector, who generally wouldn’t know much about registration for different colors of artwork. A “CYOA” kind of nicety.
So, I emailed Rich at This Old Game. I asked how much of a bleed he would add to individual shapes. 1/8″ bleed seemed too much to me for finer details, but for the larger details, only adding 1/16″ – 1/32″ didn’t seem hardly enough to make a difference. This is what he said;
Basically, to allow the color laps about center of the Black detail that it would cover. Also white is usually full coverage on the back of 2nd surface prints. On fine detail, I go in and just split the difference in specific spots where the thickness of the black may vary. But to answer your question, I do tend to add approx 1/8″ bleed unless that bleed doesn’t fit the artwork then I have to manually go in and split that difference. Any text I usually outline 5 to 10 pts.
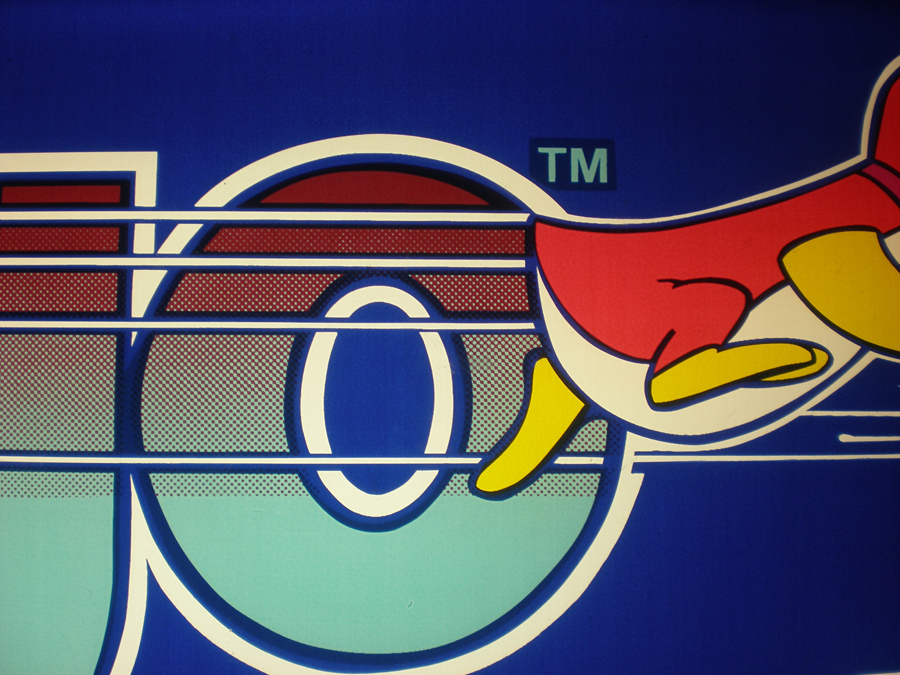
I got a file from him, demonstrating some of this, but I don’t completely understand all of the concepts for screen printing reproductions yet. If you don’t have any idea what I am talking about, here is a photo of my Pengo marquee. You can see the bleed for the “TM” text showing through, as well as some of the halftone patterns and other pieces of artwork that overlap to make sure there is enough coverage.
The main idea I got from the information he sent was, yes, add bleed to the artwork to help with registration of colors, and it is a judgement call based on the detail of the artwork. The finer details of the reproduction arcade artwork add 1/16″ to 1/32″ of an inch bleed, and on some of the bigger, thicker details add 1/8″. (Not to mention, even though I didn’t ask this, I am sure that I need to start separating my artwork in colored layers) I know that both Brian and Darin read what I write here when they have time, and I figured they could lend their expertise in the information, or even Rich if he stops by. My main question remaining is what Rich said above;
Also white is usually full coverage on the back of 2nd surface prints.
Rich is the absolute best in terms of response time, although his emails are sometimes hard to understand because of the way they are worded. Here is a tight crop of the final prepped file he used reproduce the Professor Pac-man overlays from my vector artwork.

This looks exactly like the “TM” above, except, if the text is yellow, why have the color “white”. Wouldn’t that bled color be yellow there, showing really fat lettering?
So, there is a lot of work to do, added work to the final vectorizing Pengo files that I thought I had finished. But, they need to be right. I haven’t added bleed to any of them, so I will have to go back through and do that. Here are some close up details of my start to adding bleed to the Pengo artwork. There is a before vector trace (Purple Outline), and an after vector trace with the additional bleed (Light Blue Outline). (And after I got into the file and tried it for myself, I found that even 1/32″ bleed would overlay some of the surrounding pieces of artwork, and that I had to go down as small as 1/64″ (.016 of an inch rounded) bleed to prevent overlap.)


Here are some similar arcade posts
- Pengo Sideart Color Separations
- Pengo Bezel Artwork Update
- Visual definition of ‘bleeds’ – arcade artwork
- Pengo Control Panel Color Separations
- Sega Pengo Bezel Vectoring Finished!
If you enjoyed this post, please consider to leave a comment or subscribe to the feed and get future articles delivered to your feed reader.
Comments
I’m not sure what the deal is with the white around the professor pac CPO lettering…I’m curious on that now. When I did the files for the Moon Patrol bezel Rich is working on, I did one layer for each color keeping in mind that it was reverse silkscreened from the back of the bezel. The black is accurate. For the color shapes, I just made sure they were bigger than the edge of the black surrounding them. I drew about half way through the black lines for that if you know what I mean. I’ve never silk screened before, so I just sort of “wung” it. Is that a word!? 🙂
See, I should have figured that out myself. So, the thick white outlines in the graphic I have above are just an illustration, to show the difference between the actual text and the added bleed. The white would actually print yellow on the screen print….
And the films themselves are all black, obviously. So, the image above is just for the illustrative eye, so we know what part of the artwork it is. But all films are in black, kind of like a mask in Photoshop, either it is printed artwork for that color, or it isn’t.
So, in what I wrote above, I could add a thicker 1/8″ bleed on smaller details. Hell, the lettering is smaller, and look how huge that bleed is. I just have to be thinking of how the artwork stacks when printed, which goes on first to determine how thick my bleed can be without any problems. Does that sound about right?
Oh, and thanks for the comment as I asked Rich. Like I said, you are the best at patience and communication in trying to explain it to us that don’t undertstand, but want to help you when giving you business, trying to make your job a little easier:)
As a designer, I used to groan in the low end design shop when someone would want to print something from Publisher. It has it’s place, but seriously, we all hate those “hacks” that jump in, talk the talk, but don’t know anything. I assume this is equatable here, sending you a “ready” to go file, but all it is is a bad vector trace, not separated by colors or with any bleed or anything…which is how you would have gotten my first inexperienced file for the Professor Pac-man stuff. (I think I separated it into color layers though, didn’t I?)
Bleeds are a common thing in the industry.. if you’ve ever gotten anything die cut such as business cards where the ink goes edge to edge with no gaps then you’ve had a bleed done. With CPO’s a bleed is much simpler because you generally have a primary first color such as black and other colors layed over it. Essentially what’s said above is absolutely true, bleeds help with registration. If you don’t have them, if your registration between colors is so much as a millimeter off you’ll get color gaps that look terrible. Of course, the more detailed and way you view the art determine just how liberal you can be with the bleed.. a backlit marquee you want to cut it as close as possible and still allow the screen printer to register it well, but a CPO you can pretty much go nuts 🙂
Thanks Brian for the comment.
All of my previous experience with bleed has to do with print documents, and the edge, so I am trying to translate any of that knowledge into the reproduction process. I know it would help a ton to see it done, and I am sure I could try to find a local printer that would let me view screening in process, the technique isn’t specific to arcade artwork.
I know on my Pengo marquee, the generous bleeds look a little sloppy, and I wonder why I notice that so much, if it is the thickness that the ink was originally applied, or if it was the final finishing coat on the back of the marquee that lets more light through, or what. I don’t seem to notice the bleed delineations on my Ms. Pac-man marquee.
As for what is the appropriate amount of bleed, I assume that I still have to leave that up to experience and some trial and error. It would be nice to be on site to see something I’ve done printed, but I don’t know that I’ll be in Oregon anytime soon (Rich), and I will be in Florida in a couple of weeks, but without a car….and I don’t actually know where you’re at Brian or if that would even make sense to meet up.
the main reason why the bleeds show more in the Pengo marquee is theres hardly any black. most designs like Ms pac the colors/bleeds are hidden behind the black detail which was just printed first.
I’ll take some closeup shots of my next screening setups to help demenstrate this.
On the screening inks themselves. most standrad inks are releativalty transparent this helps with illuminating like on a marquee and also helps give the colors the bright vibrant look when printing on a white substrate.
Also when printing on top of other colors example if I print a yellow on top of a blue it turns green. remember the sidert art issue on Agent X.
So Black is by nature the most opaque to help hide and prevent those problems.
You know, I hadn’t put that together before, the Pengo is pretty much blue, with other colors for Pengo and the lettering, but there isn’t really black in the marquee. Back analogy on my part I guess to choose Ms. Pac-man marquee, because it is so black heavy.
But standard screening inks are somewhat transparent huh? Even the ones that are used for the sideart and kickplate artwork? Or the standard inks that are used for printing on glass and plexi?
They are all pretty much somewhat transparent different colors/pigments do differ from color to color. even inks listed as opaque are only so so in coverage
but when surface screening on sideart for example the vinyl generally white helps gives those colors they’re vibrancy because they are somewhat trans. this is what helps make screened art really “pop” over inkjets.
Interesting. Screen printed arcade reproduction artwork pops more because of the color of the base vinyl…
Great post and read. Thanks lads. Having just started back vectoring again after many years .. has given me a push to fix up some of my first projects when I first started AI, and start applying color separation when compiling my projects.
I’ve got the basic color separation aspect down over the last few days, thanks to Jeffs info within his related posts. Just getting my head around the fastest processes to add bleed via ‘offset’, especially with compound paths in Illustrator.
A question for Rich, /B, Jeff. The ‘white’ screened final layer/sealer … does this double as a white color separation layer? I gather it does. If this is the case.. then white color separation in projects is always the last layer? Correct?
It is my understanding that you don’t need to have a ‘white’ layer, either a layer in Illustrator that is just blank labeled ‘white’, or a layer that has just a white square drawn in. I think this is kind of like post script halftones, the printer just adds this automatically.
But Rich, correct me if I’m wrong.
If it being reversed printed like most cpos, for example – yes it fills in any areas that would be shown as white as well.
Since most screen its are somewhat transparent this makes the colors more solid and help gives them there “POP” and in cases like marquees gives them a more uniform lighting In surface printing like say the Bezel for DK the White is done first.
Well yes you are correct Jeff
it is just a squared shape to the overall size of the print that is just layerd in it dosnt nessacirly need to be drawn and the printer would screen this full open area to size
and its proably just as easy to tape off a blank open screen to the size or hand cut a square piece of film to burn a screen for this since theres no drawn detail.
as a matter of fact when I did the Pengo and Paperboy Cpos
the last color to screen-White Layer was aprox 12×24 for both cpos so I was able to use that same screen for both : )
Thanks lads.
The brain is slowly putting together the puzzle 🙂
Much appreciated.
(Now off to finish tracing and separating the Jungle Hunt marquee with my new scan) 🙂
No problem. However, it doesn't seem like you'll need too much help, you're pretty much there with the general reproduction knowledge set. Email me with other questions, I can write an informational post…
Leave a comment
Your email address is never displayed and cannot be spammed. If your comments are excessively self-promotional you will be banned from commenting. Read our comment privacy policy.


January 8, 2008
A quick add note to the bleed/text. I inverted the colors in this example just to show the difference from the text and added bleed. the text itself was knocked-out when I printed the black the added color fill (shown in white) was the actual print/bleed in what ever color the text needed to be.
Yellow I think. Once the films are generated/printed its all just soild Blacks
the example I sent was a composite of the colors with bleeds laid on top of the Black print layer to demonstrate the varioations of the bleed size.
Rich