
How picky am I? Ms. Pac-man touchup
That is the question. I supposedly have two more days of warm weather to make a decision and act. Do I buy yet more items for this job and push my costs for tools and materials close to $200? or do I leave the artwork as is and apply the clear coat?
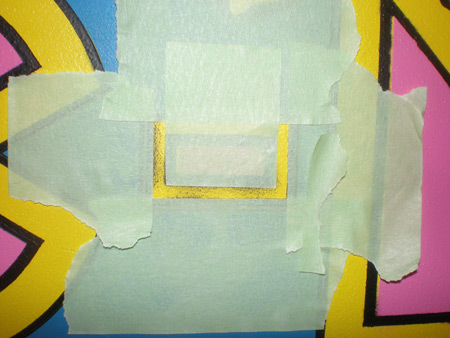
I am taking a stay, procrastinating if you will. I’ll try a small touchup area first to see how the Valspar mixture matches the yellow first.
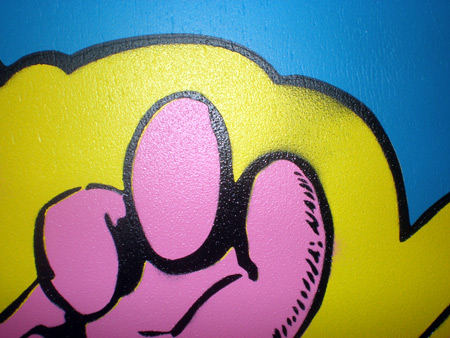
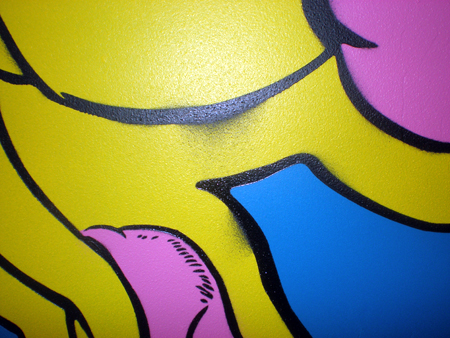
Detail photos of the overspray
I dread showing these, I tried my hardest, and I learned a lot and this is what I have. 12-15 spots like these, sometimes in areas where I don’t care, and sometimes in predominantly yellow areas on Ms. Pac-man that are hard to ignore.
So, do I go out and buy an airbrush and some sort of plastic material to cut mini template to do touchup? Can I use this same air compressor on an airbrush? Or do I need something else to push the paint? Also, I could either buy sheets of acetate or I guess cut up plastic folders would work too, whatever is cheaper and perform some spot touchup. Or I could leave it and finally be on the road to re-assembly.
I don’t understand why I couldn’t use cardboard instead of plastic, why it has to be plastic to cut the touchup shapes. If the airbrush spray is fine enough wouldn’t cardboard suffice? That would save that cost at least.
I anticipate that most of you would say touch it up. But leave a comment, let me know. And an answer that the Ms. Pac-man sideart would be hidden isn’t a consideration for me, so don’t say that.
Here are some similar arcade posts
- Ms. Pac-man black artwork – Live & in progress
- Ms. Pac-man Stencil File Missing Artwork?
- How Bally Stenciled Ms. Pac-man Cabinets
- Ms. Pac-man Pink Finished
- Fixing stenciled overspray on arcade artwork – What is working for me
If you enjoyed this post, please consider to leave a comment or subscribe to the feed and get future articles delivered to your feed reader.
Comments
I’d touch it up myself to, if the yellow matches perfectly. For very straight areas like your first pic, painters tape should work well. For areas near less perfect curved lines like in the other pics, I’d just try to touch up by hand with a small foam brush without making a stencil or masking it off.
Have you tried that blue 3M painters tape? I like it much better than regular masking tape.
@Jamie:
The green tape is painter’s tape, just the thicker 3/4″ ? variety from Harbor Freight. It may look like masking in the first photo…I take it.
We’ll see how that yellow matches today…back to a million coats to cover black which is even worse than the blue. I suppose I could paint primer first then the yellow?
Is the tape in that first pic green? It looks the same color as regular masking tape to me, probably because I’m red/green color blind. Now that I look at it again, it does look a bit green. I need new eyeballs.
The tape I use is this stuff:
http://tinyurl.com/35c7md
I would think if you are using a foam brush and you don’t thin the paint, it would cover OK, but I’m not sure.
I would definitely touch it up as otherwise you’ll stare at the imperfections every time you look at the machine. Btw thanks for documenting all of this online. I hope to restore a Ms Pac or Burgertime myself one day and your blog is loaded with tons of help.
-Timothy
Hey cool blog man. If you go the touch up route, first try to remove some the black overspray. Dip a q-tip in mineral spirits and gently rub the black overspray. Be carful though, you dont want to go through the yellow too much. After that you could probably paint the yellow with a thin soft brush. And after the yellow is nice and solid, take a good lining brush and sharpen the black line back over the yellow. Basically you want to do a thin feather/ drybrush coat. Once you clear coat it the brush strokes shouldn’t be noticeable.
Here’s my pac page:
http://eranderson.com/pac/
Looks awesome overall though!
“Basically you want to do a thin feather/ drybrush coat.”
That’s referring to the yellow, not the black line art, which you want to apply nice and smooth.
+1
on gnubus rubout overspray comment it works well
but are you kinding me pinheads would kill to get that overspray effect on their cabs
@Gunbu:
Will try to comment on all of your notes but this note about the mineral spirits is awesome. I just tried your suggestion, taking a q-tip, dipping it in mineral spirits and trying to get rid of some of the black overspray. This worked so so, the q-tip mostly got destroyed because of the slight texture on the yellow.
However, when I dipped the edge of a rag in mineral spirits and scrubbed with that, the black started to come off nicely. I got the thin overspray, and just like you said, the solid dark rough edge was all that left, and I have been able to take my detail brush and carefully touchup this edge and things look a ton better! Will be posting a bit about this in a minute with photos.
I hadn’t seen your site before, with the hand painted Ms. Pac-man cabinet. Thanks for adding that!
That is what is great about black, it IS forgiving. Touch up with a brush on the yellow and dont fret about moving into the black area. Then you can rend a nice line of black with your brush to cover the yellow that went over. You would pull your hair out out of frustration if you did it the other way around.
Great to hear you were able to make the touchups you wanted!! YAY!
But, for future reference, I wanted to put my two cents in about the overspray. You had mentioned using cardboard or acetate or something like those to protect from overspray – what most airbrush artists use is frisket film.
Frisket is available at any art store – it is a large sheet (usually 8×11) of clear, sticky, plastic film … you place it over your artwork and then use an exacto knife to LIGHTLY cut the film and expose the areas you want to paint. This method results in really tight crisp edges when you airbrush.
One additional note – to be safe, so I don’t pull up any of the paint underneath frisket film or masking tape, I always stick it to my skin first to remove a little bit of the stickiness before applying.
Cool Blog.
Glad it worked out! Your Ms. Pac is turning out great.
One thing I would like to do is add the copyright line, I’ll be watching to see how you do it.
I am in the process of handpainting my Ms. Pac man that I’m restoring. Can someone give me an idea of how to get the copyright line in there??? its too small to do by hand. love the blog! Also, can anyone explain how to get the lights on my coin door working? Its the only not functioning thing I have left besides the cosmetic stuff. I have bought new bulbs but still neither side is making the bulb come on.
@Gunbu
My copyright line was built into my stencil. Did you see this post? I think your comment came through here after I wrote this article.
http://www.rotheblog.com/arcade/ms-pac-man-copyright-in-stencil-file/
For you, there isn’t any reason why you couldn’t go to a sign shop and have them just cut out three copyright lines. I would guess it wouldn’t be too expensive. Otherwise you could always print out the copyright line from Joymonkey’s file, trace it onto Acetate, cut it out and apply it that way….But you have done your Ms. Pac-man artwork by hand so you probably have already thought of all of those ideas.
@Brewer
Same thing on the copyright line. You think it’s too small to do by hand? Meaning painting by hand? Instead of stenciling that piece?
As for the bulbs, I don’t have specific information on that just yet. I looked on the Pac-man repair page (Lawnmowerman) hosted here at Rotheblog, but didn’t see anything but what to buy for bulbs, which you already have covered. I will add your question to my topic list to research if possible. Let me know if you figure it out before then….it is probably a voltage issue or a connection issue, check your molex…
Thanks for the info guys. This is my first restoration so I actually didnt think of the acetate or even really know how to do that or how it would work. I haven’t started any detail painting yet but have completed the backside (all the blue) and just finished putting on my new control panel overlay. I am going to have a friend do the wiring for my new joystick because I’m not sure how to do that. I accidentally peeled off some of the paint from the underside of my original monitor bezel. anyone know where to find a good reproduction that is actually glass like the original? I also need to find a good marquee because the pink on mine is quite faded. I checked two bits but they are kinda pricey and everyone says their reproductions aren’t accurate. I was able to find a brand new original old new stock for my control panel overlay that has the accurate artwork. I am bidding on a new harness on ebay to see if maybe that is why my coin door lights don’t work. thanks for the posts!
I ain't even gonna touch mine. I got it at a kinda run down golf coarse where he had won it off a guy in a poker game. All i had to do was replace a fuse for the overhead light and that's it. Got it for 250 bucks…………..no shit, honestly. He didn't know what he had apparently.
$250 is pretty good, about average for today's market. But certainly, if it has even decent artwork, worth it to leave it….it is a ton of work to restore one of these Ms. Pac-mans
Leave a comment
Your email address is never displayed and cannot be spammed. If your comments are excessively self-promotional you will be banned from commenting. Read our comment privacy policy.


November 4, 2008
I’d touch it up, if you’re like me that’s the only part you’ll be seeing every time you look at it 🙂
As it’s a touchup and you don’t want to get that wrong, I’d go with frisket masking film.