
Tip – Mounting A Reproduction Galaga War Games Header
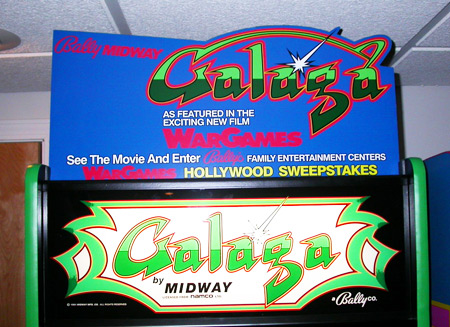
Looking for retro arcade game themed items to decorate your home gameroom? Last month Bill Johnston reproduced the Galaga War Games graphic, a unique piece of promotional arcade game artwork for the War Games movie. Bill had the Galaga headers digitally printed on vinyl and left the method of display up to the individual. There are plenty of choices for ways to mount the artwork, here is a tip on how to secure the header on top of your Galaga that will cost you less than a dollar and potentially take less than 20 minutes.
Foam Core is your friend
Bill looked at several ways to accomplish mounting the Galaga header such as a cardboard easel, trimming the bottom to the proper angle was one idea, another idea was to just hang it from the ceiling. But sometimes the simple ideas are the best, and with this tip you can mount the topper in less than 20 minutes.
You’ll need a couple of small squares of black foam core or gator foam – Bill suggests 3/16″ thick. Try to find some scraps because a piece of gator board, which is more expensive, can run you $40 for a 4 x 2 sheet. Cut two 2″ x 1″ pieces and two 1″ x 1″ pieces. If you get gator board, cut slowly with multiple cuts, you final pieces will be better. The bigger pieces will go towards the front and the smaller towards the back. (If you purchased white foam core you’ll want to paint them with a light coat of Painter’s Touch Flat Black.)
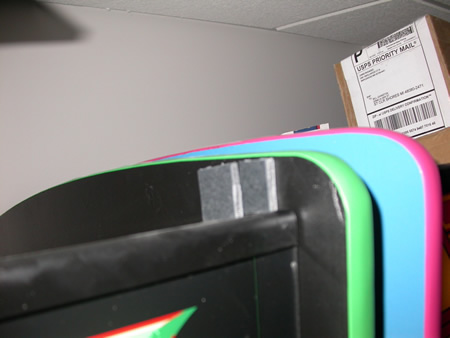
Use a couple of pieces of double face tape (The kind that doesn’t have a paper backing) and mount them right behind the marquee bracket on the top of your Galaga. The thickness of foam core or alligator board that you mounted the vinyl artwork to is the width of the space you will want to leave when mounting the small squares. Effectively you’re creating a nice “SLOT” on the top of your cabinet to secure your Galaga header artwork. Here are some photos.

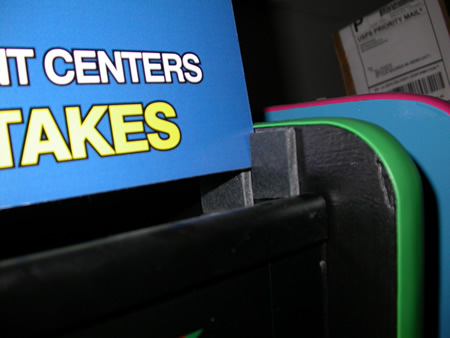
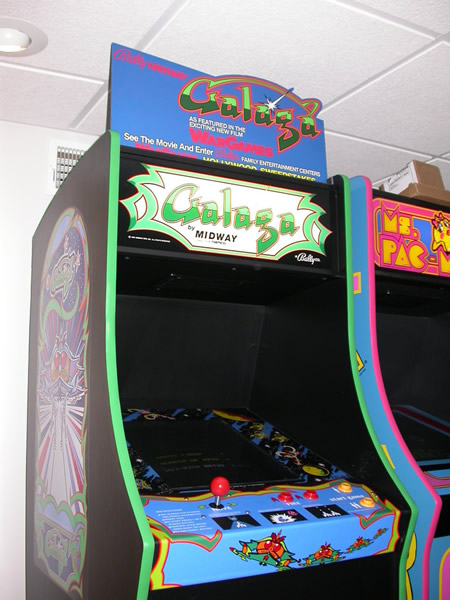
Not the prettiest solution but after everything is trimmed, mounted and the header is in place you don’t really notice the easy and inexpensive solution. Just be sure that you use a good double face tape or it could come loose and damage your header. Either way, looks pretty glorious when the mounting is done. Check out another photo.
Got better suggestions? Photos of what you did or want to add your thoughts? Leave a comment. There are about 40 of these floating around out there, many game collectors will need to figure out a way to mount their header in their gameroom that works for them.
Miss out on purchasing one of these bad boys? Leave a comment if you are interested, I can check and see if Bill has any of these Galaga repros left.
Here are some similar arcade posts
- Installing Mark Spaeth’s Jr. Pac-man Toggle Speed Chip Kit
- Sanding Pac-man cabinet, wiring Mr. Do!
- Custom die rules for arcade game artwork
- Dynamo Cabinet 19″ Monitor Mount Board Dimensions
- Space Invaders decorative tiles to push your gameroom over the edge
If you enjoyed this post, please consider to leave a comment or subscribe to the feed and get future articles delivered to your feed reader.
Comments
Look at the photos one more time. You are actually taking four 3/16″ thick square (2 one size and 2 another size) and double face taping them to top inner sides of the cabinet creating a small 3/16″ thick channel/opening for the header to “slide” into and supporting it upright.
Make sense?
Yep, I got the part about how to mount it to the cab, but did you apply the graphic to a cardboard backing of some sort first?
Oh, the graphic is mounted to 3/16″ Gator Foam which was a PITA to trim. I think I “MAY” do one more on black foam core.
Nice. The look kinda has a “MAPPY” feel to it. Bill was kind enough to let me purchase a smaller 3X5 sticker version to place on CPO or Bezel area. Great work Bill.
I could see more of these style headers with…say…arcade flyers and screenshots and brief histories on them…to showcase different cabs that are your fave. You’re onto something with this concept Bill. I wouldn’t be surprised if you get more requests.
Great post and nice work on reproducing these Bill.
I followed the above steps and installed mine today. Here’s the process I followed:
Materials purchased:
1 sheet of foam board $5.99
Double sided tape $3.49
I lined up the header using the left and bottom edges to minimize the amount of triming I would need to do. Once alligned, I used masking tape to hold it in place
I trimed the corners even with the printed header to be able to line it up correctly on the board
Working left to right, I pulled the backing away and used a plastic edge to smooth it out working a few inches at a time.
Removed the protective cover
Next, I used an exacto knife to cut away the excess foam board. This step was easier than I though as the board cut pretty easy even on the curves. I used a straight edge on the right side to help get a perfect cut.
Completely cut out
Installed on top of the cab using the approach recommended above
Here you can see the foam board squares attached to the cab with double sided tape (yes, this cab needs to be repainted -and it will be)
back
Really looks good and adds nicely to the game room authenticity. Now I’m going to go watch War Games!
My pictures didn’t show up. You can view them over at:
http://classicarcades.ning.com/forum/topics/mounting-a-galaga-war-games
@Joe
Not to bring up a really old topic…
I think I may have replied to this already…but the comments fields don’t allow for users to add in images, even if they are absolutely linked. All ‘img’ tags are stripped out.
I know I’ve added image from the admin, as an admin….but users don’t have that capability. Glad you linked to it over at CoinOpSpace.com though.
Leave a comment
Your email address is never displayed and cannot be spammed. If your comments are excessively self-promotional you will be banned from commenting. Read our comment privacy policy.


November 12, 2008
Wow, those look sweet. Where can I get one? 😉
In all seriousness I finally found my MIA exacto knife and might redo the Gator Foam squares.