
Using Custom Graphics Your Ning Profile – Part 1
I have spotlit some small details about why the Arcade Game Collecting Community is so much better than the klov forums. However, the real meat of why this social community is so much more powerful is the flexibility to create your own mini website! Your profile page is yours to do with what you want and tonight I am providing three custom banners that you can use in your profile page as well as the code you need to change to make them work. Check it out!
Ever wanted your own arcade game website? Now’s your chance – for free!
I took an hour or so to whip up three custom arcade game banners for your profile. These are free for you to use, and to make it even easier I am hosting them here at Rotheblog.com for now. You are free to download and host them yourself if you want. They are 945px wide, which is how wide your profile page is, so if you save them out just don’t change the dimensions and they should work fine.
I just grabbed a couple piece of vector artwork for some favorite games – Agent X, Centipede and Donkey Kong and made some banners. For simplicities sake, here are some text links directly to the banners;
They aren’t amazing when it comes to design, I have seen worse, but they are mainly for new members to get used to how to customize their profile page.
Let’s Get Started
Pretty easy to do actually.
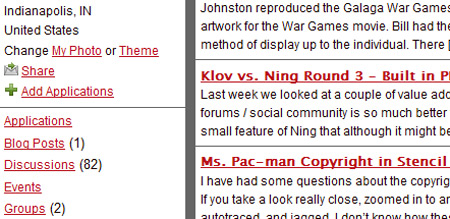
Step 1 – Click ‘My Profile’ at the top of the page
Step 2 – On the left you should see a thumbnail with navigation for all of your content – your photos, videos and blog. If you notice there is a link that says ‘theme’. Click that link.
Step 3 – Once you’ve entered your personalize theme area you will see a whole selection of premade themes at the top. At any time you can apply one of those themes. But, if you scroll down to the bottom you will see a split screen with a link named ‘Advanced’. Click ‘Advanced’
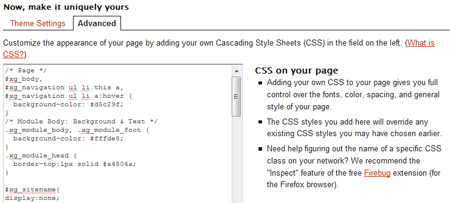
Step 4 – In the ‘Advanced’ section you can change a ton of stuff color wise and graphically if you know your CSS. It is almost limitless using the framework of HTML that is in place. If you know nothing about CSS, that is fine. Take the follow codes and paste them in at the bottom of the screen. I will give a short explanation of what they do.
#xg_masthead{
height:114px;
}
This will set the top portion to a fixed height. In this case I designed my banners at 130px which when you add in the top Ning bar you get a height of 114px visual area. You may need to make some small tweaks depending on whether the banner sits behind the navigation as a background or not. If that is the case, just lower the pixel height.
#xg_sitename{
display:none;
}
This hides the text for the community – ‘Classic Arcade Game Community’ and the tagline.
Now, you can also hide the Tagline for the website but a word of warning. The paragraph tag for the tagline also occupies space, so if you hide it height will be gone and your navigation will probably show at the top of the screen. If you decide to do this, modify the above line like so;
#xg_sitename, #xg_sitedesc{
display:none;
}
Then add padding to the top of the navigation div block based on how you have designed your banner. Change the padding to taste;
#xg_navigation{
padding:100px 0 0;
}
Only use the following code if you don’t like the main site background! I made a background that uses classic arcade game flyers, but you can always remove that background or link to an external image similar to the banners (which you’ll see below).
body, .xg_marginbg{
background-image:none;
background-color:#000;
}
This will set the main background graphic to nothing and the background color to black. Change the background color to taste and to match your banner.
Banner Codes
For each of the banners, here are the codes you will need. You only need one, so choose one banner and paste it in. If you paste more than one, the one that is pasted lower in your stylesheet will take precedence.
This code will replace the current banner image and background and replace it with the one that you have selected.
Agent X
#xg, .xg_headerbg{
background:url(http://www.rotheblog.com/images/ning/profiles/agentx.jpg) no-repeat 0 0;
}
Donkey Kong
#xg, .xg_headerbg{
background:url(http://www.rotheblog.com/images/ning/profiles/donkeykong.jpg) no-repeat 0 0;
}
Centipede
#xg, .xg_headerbg{
background:url(http://www.rotheblog.com/images/ning/profiles/centipede.jpg) no-repeat 0 0;
}
Pretty easy right? If you want to see more of what you can do, make sure to click on ‘Members’ and check out my Ning profile – ‘Jeff Rothe’ (Rotheblog.com). I customized ‘My Profile’ page to look very similar to my blog. I did some more advanced stuff, but I am more than willing to help anyone customize theirs if that means they will participate more in the community.
Questions?
This should give you some ideas. You can create your own banner, upload it to your own hosting and link to it. Design it how you like, improve a ton on these arcade game banners. If there is something that isn’t working right, maybe I left something out or something isn’t accurate in this short tutorials, let me know and I’ll make the correction.
Here are some similar arcade posts
- Ning vs. Klov Round 1 – Usernames
- Using Ning Tutorial – Import an RSS Feed
- Help promote CoinOpSpace.com!
- Ning vs. Klov Round 2 – RSS Feeds
- Turn off music playing automatically in Ning
If you enjoyed this post, please consider to leave a comment or subscribe to the feed and get future articles delivered to your feed reader.
Comments
I have a DK header now. What’s involved with creating my own graphic and uploading it? I’m sure there is something that explains this but not a lot of downtime.
@Joe
Looks Good.
@Bill
So, to design your own header, just make it 955px wide by 130px tall….height doesn’t matter too much actually, just adjust the CSS appropriately.
Then, in this code, if you want your own header, change it to an absolute link to your hosting space. You will need to ftp it to your own website, or some free online image hosting that won’t resize the banner down from 955px. (Not sure if places like Photobucket do that or not)
#xg, .xg_headerbg{
background:url(http://www.yourwebsitehere.com/myimagename.jpg) no-repeat 0 0;
}
Don’t forget to change it to a .gif or whatever, image type doesn’t matter. And, if you want the banner right on top of the nav, I actually changed the tutorial today to 114px tall, instead of 130px.
Leave a comment
Your email address is never displayed and cannot be spammed. If your comments are excessively self-promotional you will be banned from commenting. Read our comment privacy policy.


November 13, 2008
Followed your steps and now I have a nice Centipede header. Worked with no problems. Now I need to play around some more and see what I can do with the profile page.