
‘Avenging’ a converted Journey – Part 2
In part one, Jeff P. tracked down a Journey PCB, managed to troubleshoot it and get it working and put together a parts list to remake a harness for a Journey cabinet that any other collector would have considered a lost cause. In part 2, Jeff will finish up the final details, fabrication of the harness, setting up the tape deck and gathering the artwork so read on to find out how he did it all.
Time to finish fabricating the harness
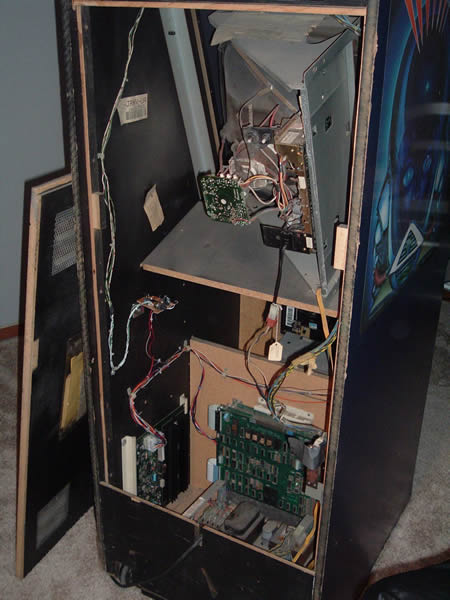
Now that all the testing was done, it was time to complete the full harness which involved a ton of crimping. By looking at the Journey schematic Jeff rewired every connection from scratch hoping to make the game as original as possible. Larry C. offered to sell Jeff a freshly rebuilt MCR power board and after made another order to Bob Roberts for molex connectors he had forgotten that were needed to connect to the MCR board.
After installing all of the wiring and the two boards there was still a problem with the audio/cassette amp board, or the lack of having one. Jeff decided to install a cheap PC speaker for the time being. ($10-$15 cheap range – purchased from Milwaukee PC) He pulled out the amp board, made sure it used 12 volts, traced the wires and soldered new connections for the power and the audio in/outs.
An unlikely savior – Radio Shack
Journey is nothing without the cassette deck playing the soundtrack as you play. Jeff paid a visit to Radio Shack and bought the very last cassette deck in stock ($40). Just about any cassette deck should work if you are trying this project at home, the more compact for mounting later the better. The cassette deck meant an order for a third round of connectors to be able to properly wire the deck up to the sound board. Here’s the old style deck as it sits now in the cabinet.
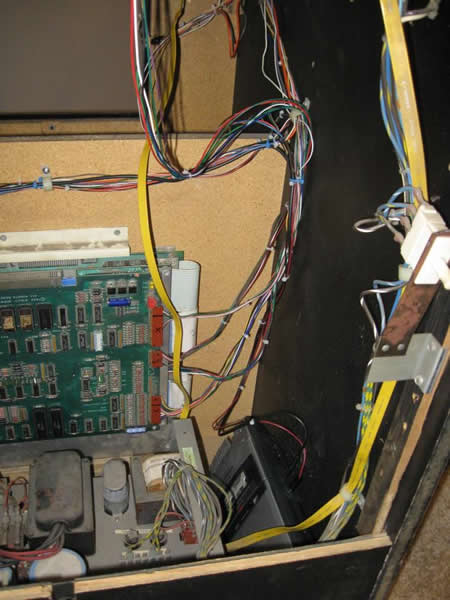
Jeff got home and took out the soldiering iron. It was time to finish soldering, wiring the harness and connectors, tying up the loose ends to see if the game powered up and played…with sound! The whole process of building and soldering this harness took 12-15 hours! So prepare yourself if you plan to try this at home.
There is no game without the controls
Depending on your conversion, you may have to find a replacement control panel or do some patch work on the original metal to get your Journey back to a playable condition. This was the case for Jeff’s Avengers conversion.
The control panel had some holes that were not needed and in Jeff’s case, he is an auto technician and has welding and grinding capabilities. You can see the before and after shots here showing the original 10 holes to accommodate all the fighting buttons that were then epoxy patched and reduced back down to the original 5 holes.
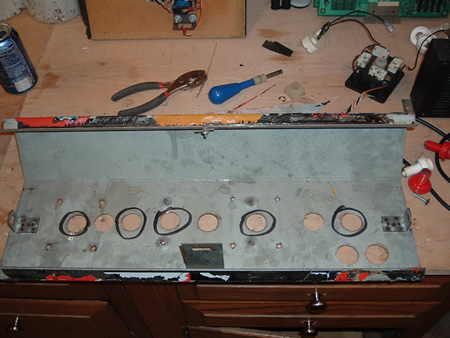
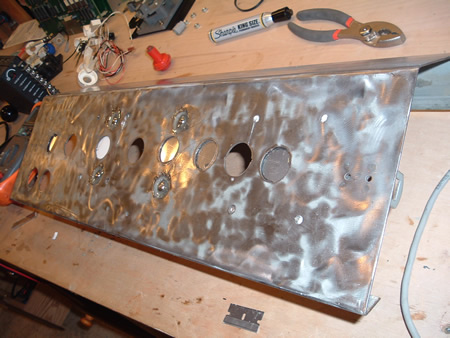
For testing the control panel was left as is, but before adding the new overlay later Jeff then filled in the low spots with Bondo and sanded those holes flush.
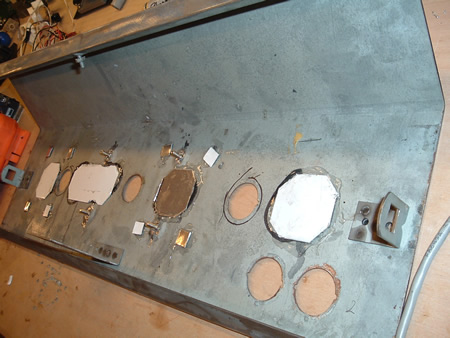
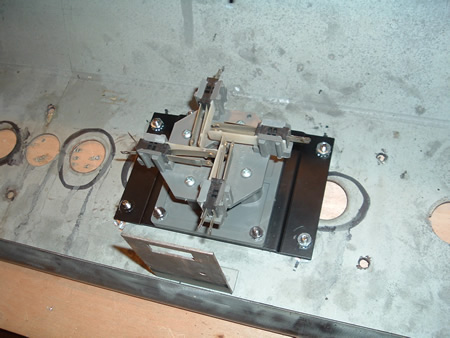
Jeff also had to use a metal adapter plate to mount a new Wico joystick to the underside of the control panel, so this truly was a completely rebuilt panel for this Journey. If you’ve got questions, Jeff probably did it.
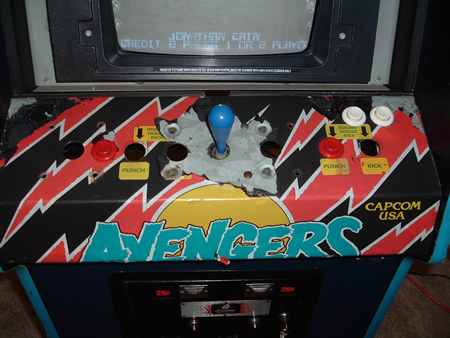
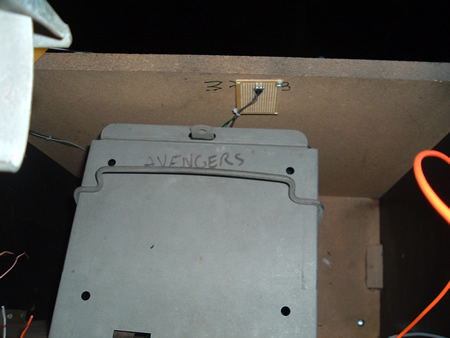
Journey lives – albeit without bezel artwork
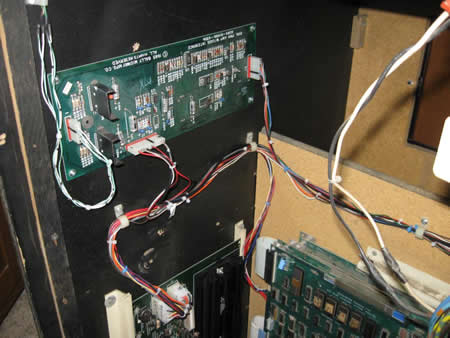
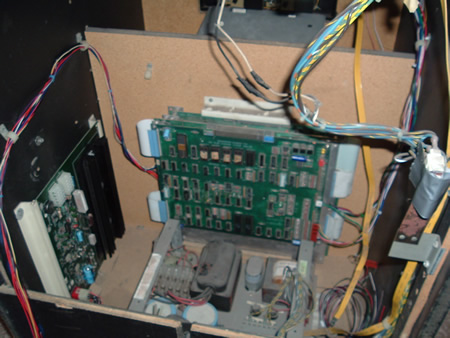
Jeff got all of the components (PCB, Sound Board, Control Panel, etc.) installed;

and checked the sound amp first;
When he powered it up there was sound!! And the people rejoiced! The amp works!! It’s not hard to get caught up in the momentum of excitement now, Jeff continued forward to wire up the cassette deck.
Here are some photos showing how everything looked once it was wired up.
Next step, put the machine in test mode. Like most midway games, the test mode switch is mounted on a bracket inside the coin door. However…if you ever undertake a project of this size, you will discover that items like this are missing. This was the case with the Journey, no test mode switch. In order to make the board go into test mode it was just twisting the un connected wires, pretty simple solution for now until an original midway switch is procured.
Jeff didn’t have a Journey cassette handy, instead using that mixed tape from his 8th grade girlfriend to test that things were working 🙂 JK.
The one tip here, make sure the sound is turned up on your speakers first otherwise you may think “Aw, what the heck now!” Jeff had a make shift micro pot for the moment while he finds the right one just for the sound;
Don’t just turn it up, crank it up. You’ve just fixed a Journey PCB, and rewiring the cabinet from scratch. You should be jamming like it’s 1999.
The last piece of the machine to restore now that everything is working – the artwork.
Jeff got a reproduction Journey marquee and control panel overlay from MameMarquees.com. The Journey overlay is a smooth vinyl inkjet print, not like the screened polycarbonate reproduction that (as of this writing) Brian Jones has in stock at GameStencils.com.
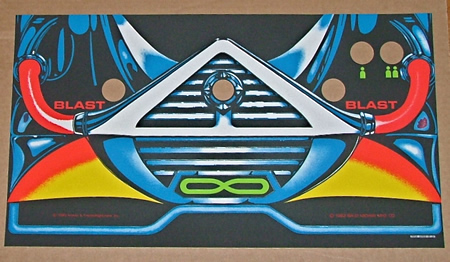
That leaves the bezel and the sideart. The side artwork, while not terrible, would be that much better with a new set 🙂 New digital prints of the Journey sideart are very close from ThisOldGame.com, and should be ready for purchase in the next several months.
What is left before the Journey restoration is ‘perfect’
I mentioned that bezel artwork right? Well, over Christmas Jeff got high resolution scans from Joe M. in Chicago (who also has a Journey), of the bezel artwork and right now Jeff is in the process of trying to figure out how to have a digital reproduction made. Rich Lint loves Journey (hence the sideart prints above) and is now looking at the scans to see if he can use them or if he will just scan his own Journey machine and print inkjet artwork from that. Jeff is so deep that he’ll probably end up stripping the cabinet and repainting it before he applies brand new sideart. This machine is going to look amazing! As pristine as you can look without owning the HUO Journey that was purchased last year in Chicago.
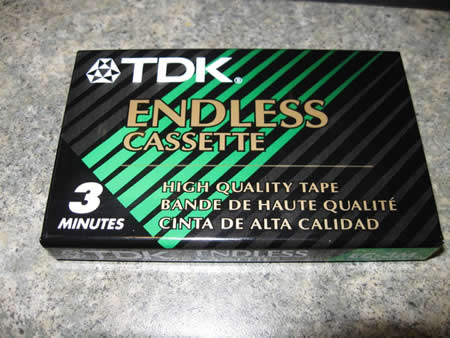
Jeff also got a pack of 3 minute looping cassettes which he plans to transfer a self made Journey wav file that best reproduces the music (Separate Ways) from the original game.
Those are the major items left to tackle, here is the shorter checklist so if you are struggling with a similar item in converting your Journey back, Jeff will probably have solved these issues by the time you read this;
- Make 3/4″ plywood semi-enclosed shelf to mount the cassette deck to the cabinet
- Find the proper 1k ohm pots for both volume controls (Journey has 2 pots – 1 for the game and 1 for the tape)
- Find an original / proper bracket and switches to reproduce the test switches.
Closing Remarks – Questions on your Journey project
Some items here weren’t covered in depth, but we have give you a good base on how to restore a converted Journey cabinet. If you have any questions or need further clarification / sources for specific parts leave a comment and we’ll connect you with what you need.
Here are some similar arcade posts
- ‘Avenging’ a converted Journey
- Journey Sound Mod (Part 1)
- Smokin’ – New photos of the Journey sideart reproduction progress
- The “Mad” Planets align, got game guts in the mail
- Taking off Land, Sea, Air overlay from Dig Dug
If you enjoyed this post, please consider to leave a comment or subscribe to the feed and get future articles delivered to your feed reader.
Comments
I had no idea. Sure was 😉
He requested the scan from you specifically? I asked Jeff if he had gotten them from you and he said at that point he didn’t know you had the stuff.
Hopefully with your new site you come up in the top of the results.
Hey Brian, I got the scan from the items purchased from classicarcadegrafix.com, so I had no idea it was your scan. If you would like for me to make a reference or a link to you on the item I can?
Jeff, just to note the overlay is made of vinyl with a textured polycarbonate laminate overtop, it is not just smooth vinyl.
Scott
Scott.
Is this how the Journey overlays are done now? The buyer gave me the description of the item he bought from you and he describes it as ‘smooth’….so maybe to him even with the textured finish it was still smoother than textured.
That is how I have always done the CPOs. I suppose anything is possible, there are different levels of “texture” but most people would not call textured polycarbonate “smooth”
Sometimes I will put a smooth laminate on CPOs that will be going under Plexiglas, but I don’t think this was done that way.
Scott
Hi Scott.. yea, I know where you got your art, and I know where they got it 🙂 No big deal, just sucks after spending the time and effort to screen print that to see it get swiped and sold (I know you didn’t swipe it, classicarcadegrafix did). I made a commitment to never print anything that someone else has screened for just this reason.
The textures you can get for overlaminate are all pretty smooth in comparison to true Suede lexan from 3M. Most arcade overlays from back in the day were either Velvet or Suede.. Journey and Tempest for example had the much more rough Suede while Food Fight and Centipede had Velvet. I have a variety of inkjet overlaminates myself that you can get but they are all smoother than the original Velvet lexan. Nobody I know of carries anything even close to Suede.
Hi Brian, if you would like it taken off the site, I can do that. I have not looked through my database, but I only recall printing one of these, so it would not be a big lose money wise for me if I pull it.
I will look into the deeper textured laminate, I get some of my laminate from drytac.com which has a pretty good selection of different laminate, though most are PVC (vinyl) laminate, not polycarbonate laminate.
Doh, I guess I gotta get out more, I did not realize you were running gamestencils.com and silked this. I can only take your word that it was originally yours. I will pull it, OR I can purchase it from you if I get an order? let me know?
Scott
Don’t worry about it Scott, really. I was mad when classicarcadegrafix swiped it long ago but now no big deal anymore. I guess I just had to get my swipe in on that one.
Yea, I silked it.. that’s why the scan exists (it’s my own fault, I let it loose out there). I’d appreciate the referral if you get a request in the future as I’ve done many a referral in your direction for multigame art 🙂
I emailed your info@mamemarquees addy about an hour ago 🙂 No way to send you something private here!
So…if I’ve got this straight…a number of years ago Brian you ran some silk screens of the Journey marquee…arcadegraphix scanned your reproduction and that was included in that library that people could buy for nearly $1,000.
Did you post about those marquees in RGVAC? I would find topics if I searched?
I wonder what Pete Mathis ever did with the Journey he procured some years ago. I should have asked him when I called him in early ’07.
Anyway… interesting article. I’m still amazed at how restorers will go to great lengths to authentically restore a machine, right down to the most minute detail.
Jeff- your last email to me arrived corrupted. Could you resend?
I’ll have to email Pete…Jeff might want to even know if Pete still has his if he’s finishing up details and needs another reference source considering Pete is in the southern MI area…
Wow! I hadn’t read this since it was first posted – I didn’t realize there was this much buzz about the CPO. For the record, I did a search for the CPO when I first got into the hobby, in fact I don’t know if I was even on KLOV at that time. I have purchased from both Brian and Scott through the years and am happy with both of their work. As far as the CPO goes, It seems smoother than some of the other CPOs I have purchased from Arcadeshop, Phoenix Arcade, etc. It does match the Millipede one I got from Mamemarquees, so im assuming its a different laminating procedure. Nothing you can see, but there is a “feel” difference to it.
All in all im happy with how my machine is turning out, and sorry if this writeup caused any issues between companies.
Thanks to BOTH of you (and you too Jeff Rothe) for all you keep bringing to the Arcade preservation community.
Leave a comment
Your email address is never displayed and cannot be spammed. If your comments are excessively self-promotional you will be banned from commenting. Read our comment privacy policy.


January 20, 2009
Nice of mamemarquees to print my scan huh 🙂