
Photoshop tutorial for punching text ‘effect’ out of an image
This down and dirty tutorial is mostly for Photoshop beginner’s. If you are trying to figure out how to take an image and make it into text, this will be a perfect how to. I have taken things one step further and then placed that text (arcade themed of course) into a Photoshop file that could be used for a custom WordPress website header / masthead.
Using masks in Photoshop to punch
I know there are a ton of tutorials online about how to punch out text using Photoshop. It’s knowing what search term to use – I used “photoshop punch text tutorial”. It will be something to that effect of ‘punching text’, but I actually had little luck myself…
Anyhoo. Here is the text we’ll be making at the top of this image, part of a masthead for a fictional Donkey Kong inspired website called ‘Jumping Barrels.com’.

It is hard to tell, but I have actually used the flyer from Donkey Kong as the image to use for my punch.
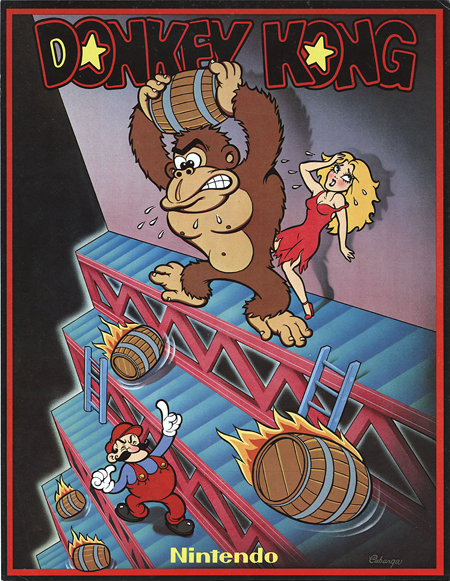 />
/>Image Credit: ArcadeFlyers.com
The steps to punching out any text
For this step by step, it is assumed the user has some familiarity of Photoshop or another similar layer based graphics editing package.
- Step 1: Select the image to punch and open in Photoshop
- Step 2: Open the layers palette if not already open (Window > Layers – or F7)
- Step 3: Double click the name of your selected image to make it an editable layer
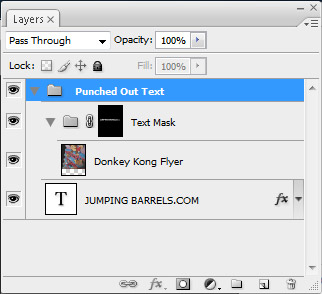
- Step 4: Create two folders – One named ‘Punched Out Text’ and one named ‘Text Mask’
- Step 5: Drag ‘Text Mask’ inside of ‘Punched Out Text’, effectively nesting it
- Step 6: Drag your chosen image into the ‘Text Mask’ layer
- Step 7: Type out the text in question with chosen font
- Step 8: Make sure text is on the bottom of the stacking order
- Step 9: Hold Ctrl and click with your cursor on the big “T” on that text layer (not the layer name). You are making a selection using the shapes of the letters in your text.
- Step 10: Click the folder named ‘Text Mask’ and then click the button ‘Add Layer Mask’
- Step 11: Drag image around inside folder to position to taste
- Step 12: Add layer effects to taste. I used a white stroke and a black outer glow.
Here is what your layer setup will look like when you’ve finished;
The reason I put every layer inside ‘Punched Out Text’ is just in case you want to use these graphics in another file for your custom WordPress layout. All you need to do at that point is right click that folder name and select ‘Duplicate Group’ and choose the destination file.
Author’s Note: Here is my opinion. Utilizing the graphical technique of punching text is an occurance I can probably count on one hand for how many times I used. It is a basic technique and for a savvy graphical consumer, they identify an easy flashy trick immediately which reflects the skill of the user.
Plus, if you use this technique, you can risk obscuring legibility of some of the most important text in your design project, which also detracts from the strength of your brand. You really have to use a thicker font, choose the right image, and maybe use some other text effects to make this treatment work. Use sparingly.
A good example of a good treatment of this effect comes to mind at ‘The Pinball Blog’. Nick used a large font size and the font itself is thick as well;

Quick Tutorial on Photoshop text effects – Questions?
I went quick, and assumed a lot. Tutorials can grow exponentially explaining every little piece. I assumed a certain familiarity in the layer palette in Photoshop and what the buttons do.
Here are some similar arcade posts
- How do I save my action files? How do I bring / import my actions into a newer version of Photoshop?
- How do I crop something in Illustrator? How do I use Clipping Masks?
- How do I use Photoshop to make someone look less fat?
- Sizing Your Arcade Artwork Scan
- Photoshop Shortcuts – The shortest way to Photoshop World Domination (Part 2)
If you enjoyed this post, please consider to leave a comment or subscribe to the feed and get future articles delivered to your feed reader.
Comments
This is MUCH easier to do in Illustrator. Just put your text over the object (copy it first) and hit cmd-7 to mask it. That’s it. If you want the strokes, then paste the text you copied behind the masked logo and do your strokes from there. Done and done. This type of (vector) text work really shouldn’t be done in Photoshop, especially when it has no raster effects.
Thanks for pointing this out. You are right, it is much easier to do this effect in Illustrator, and I would recommend anyone wanting to make this sort of effect learn that program. The user who wrote in asking specifically asked how to do it in Photoshop….
Leave a comment
Your email address is never displayed and cannot be spammed. If your comments are excessively self-promotional you will be banned from commenting. Read our comment privacy policy.


July 22, 2009
Nice writeup. I would love to start learning design techniques in both photoshop and illustrator. You do a great job with your design work. (And I love my logo you made!)