
Journey Sound Mod (Part 1)
This was some excellent content that was originally published on Coinopspace.com by Rich Lint. Rich Lint owns This Old Game, the best source to get quality reproduction artwork for classic arcade games.
Don’t Stop Believin’!
The first part of the Journey sound mod has been kid tested and mother approved.
Journey Sound Mod Part 1- Plug ‘N Play
Part 2 – Changing the setup to play random tracks and or PAUSING tracks so it will resume from its previous stopped point if your good enough to make it to additional bonus rounds.
Part 3 – Modding the interface board for stereo playback.
For those of you that might remember we were developing a replacement sound mod for the Journey Arcade tape player originally it would replace both the interface board and the tape player. But other projects and consumer demands of additional features put that project on a permanent hold.
So I came up with a way to replace the standard Journey tape player with a plug ‘n play solution.
Why? Well for starters that old cassette player sounds terrible. unless you have a thing for “tape hiss”, its mono, plays wavy, will continue to breakdown and eat tapes, the belts will wear out and continue to break. I can continue, but there’s a reason we no longer listen to music on these. It’s almost the equivalent of hearing your favorite song on AM radio, but worse! The wav trigger board is CD quality sound. What more do you need?
Things you will need for this mod
- Journey Arcade Game
- Original hardware (cassette interface board)
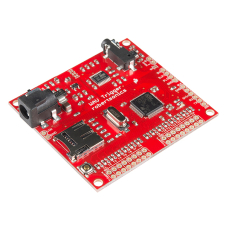
- Sparkfun wav trigger board
- Micro SD card with wav track- Link Coming Soon
- Mono to stereo adapter
- Polarity Reverser – (This one is a very tight fit, still researching this a little more.)
Step 1: Download Track file to Micro SD card
Step 2: Wire jumper in track holes 001
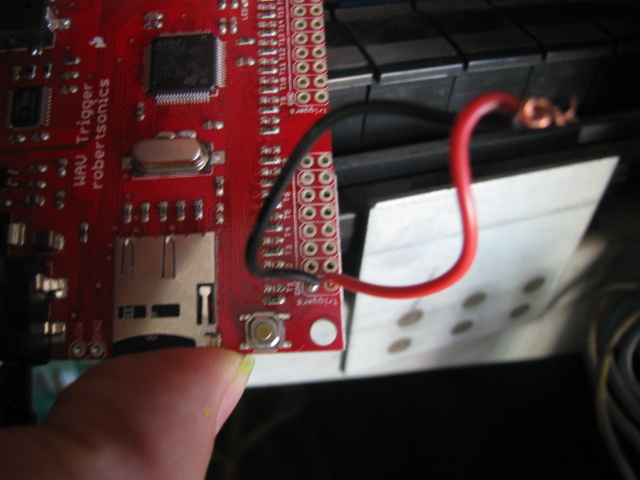
This is the same as having your cassette player pressed in the ON posistion.
In Part 2, I’m going to show soldering in a header so you could use a jumper for something a little cleaner looking and would also let you change that jumper to another track if you wanted to change things up from time to time.
This is not the same as the “Random tracks” which I’ll cover in Part 2. Thats done via software thats loaded onto the SD card with the track(s)
Step 3: You must change or adapt the power input jack from CENTER NEGATIVE (original) to CENTER POSITIVE.
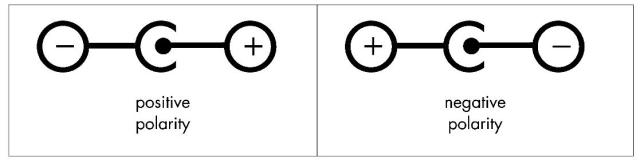
This can be done manually by simply reversing the wires on the original jack. The casing simply unscrews cut, swap, and re solder the 2 wires. Obviously not a permanent mod to the original and saves you a few bucks.
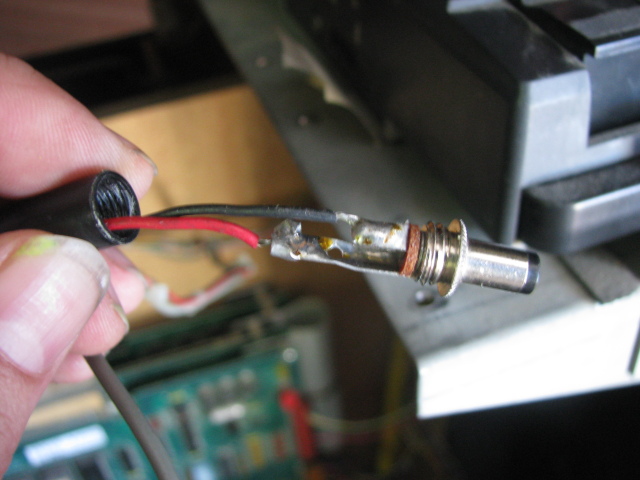
Or you can just pick up a polarity reverser jack. I need to double check the original size on these. the one I got on eBay works but is awful tight and Ill update this.
Step 4: Adapt the mono headphone jack to stereo. Once again this can be cut and changed to save you a few bucks but I found it just as easy to buy the adapter on eBay for $3 dollars shipped. Link posted above.
That’s it, plug it in and play it.
Part 1 of 3. Parts 2 & 3, release date TBD.
Here are some similar arcade posts
- ‘Avenging’ a converted Journey – Part 2
- ‘Avenging’ a converted Journey
- Rare HUO Bally Journey on ebay!
- Installing the 96 in 1 Multi Pac – Part 1
- What’s it worth? Bally Midway Journey Boards
If you enjoyed this post, please consider to leave a comment or subscribe to the feed and get future articles delivered to your feed reader.


Comments
No comments yet.
Leave a comment
Your email address is never displayed and cannot be spammed. If your comments are excessively self-promotional you will be banned from commenting. Read our comment privacy policy.