
Ms. Pac-man Yellow Finished
I’ll keep this short as I’ll go into more detail about the yellow stencil layer for my Ms. Pac-man when I continue the tutorial.
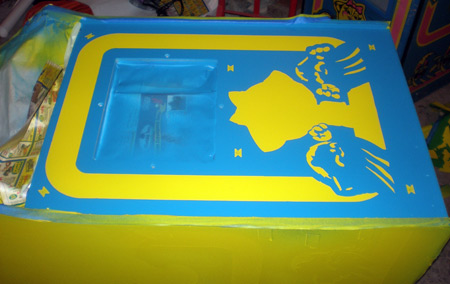
I spent just about all day (6+ Hours) working on this yellow artwork, and I am at the end of my rope. I had to have at least one side of the artwork to show, something to show for my day, so here is a photo of what the Ms. Pac kickplate looks like with the yellow laid down.
Killin brain cells with the exacto knife
Oh yeah, you read right. But before I go on, here is the photo;
So here’s the scoop. The yellow took a freaking ton of coats. I lost count after 6. I used the whole quart and still felt shaky about how ‘yellow’ was my artwork, mostly on the sides of the cabinet. Painting yellow over a dark color is miserable. It always felt like the blue was poking through, taunting me saying, “Ha ha green green, ha ha green green. Sook it!”
I did some waiting in between coats, as I progressively was running out of time and the paint application got thicker. I don’t know if that was my mistake, or what. But the fun part, the unveiling, where we peel back the stencil….oh, right, no that is going to stick to the stencil for sure.
I only waited 20 minutes after my last coat, figuring that was still in the ‘tacky’ timeframe of when you are supposed to peel back the stencil but I was wrong.
So, in order to even get this much to show you, I had to lightly go around and cut the stencil away from the sprayed artwork. Every single last line… I think I spent an hour on the kickplate alone, and I haven’t even started on the sides.
The photo looks generally nice. I think the blue seems a little off, and the yellow is just so bright everything seems a little wrong. That is just the colors. If you get in at the detail you’ll see some wispy edges of yellow were they frayed from slicing. There are some parts that will be covered up with black, but not everything.
Tonight it truly shifted over into the ‘labor of love’ category. I didn’t enjoy working on it, and I was really disappointed at the results. I am hoping when everything is done I’ll feel different. But when I was cutting off tiny sections, and having the yellow pull away like it was a sticker and not paint the stenciling felt very artificial. I liked how everything looked with the blue applied but the yellow didn’t feel authentic at all.
I don’t know what this does for my time frames. Tomorrow is a heavy homework day, and it will probably take me one day of freethinker to finish cutting out the yellow. Who knows. As the phrase goes, “I’m all in now”. I plan on finishing it, despite temps, whether that means heating the garage or what. I hope everything turns out ok.
Update October 22nd, 2008
2.5 hours later of cutting with an exacto knife I am ‘done’ as far as I know with the yellow. Here are the full results showing the Ms. Pac-man artwork yellow stencil on the side of the cabinet.

Here are some similar arcade posts
- Ms. Pac-man black artwork – Live & in progress
- Ms. Pac-man Pink Finished
- Stenciling a Ms. Pac-man – Part 7
- Ms. Pac-man Copyright in Stencil File
- How Bally Stenciled Ms. Pac-man Cabinets
If you enjoyed this post, please consider to leave a comment or subscribe to the feed and get future articles delivered to your feed reader.
Comments
Actually, I just reviewed my photos and it does look like there was blue behind the yellow. So, go figure. Anyways…nice work.
Looks good. My Moon Patrol had a base of blue…not quite as dark as Ms. Pac-Man, but the yellow on top seemed to cover pretty well. Maybe the paint was too thin?
I wonder why the paint stuck to your stencil. My peeled off well. Maybe the stencil material isn’t as good as the stuff Brian Jones sells?
Hopefully you won’t have that problem with the remaining stencils.
You are making me jealous…I’m itching to get back to work on my games now. I never got around to painting my Baby Pac-Man cabinet, so that is going to have to wait until warmer weather.
Ouch, sounds like a tough time. Good thing there’s not too many tiny little parts on the yellow layer or you’d be there for months with the x-acto.
@Donnie: The blue was put down first on the original cabs. Actually the yellow and pink were stencils (most likely made of brass) and the black was silkscreened. It’s why the yellow and pink tend to be a bit fuzzier, but the black is sharp.
The best way to repaint a Ms. Pac-Man cab is to do the same thing, to make a hard sencil so you can reapply it to do more coats. Then you wouldn’t have the problem with color showing through and wouldn’t have to worry about the paint drying to the stencil. You could just keep applying the stencil until the coat was as thick as you wanted.
Then the final black coat would be the sticky stencil to get the fine lines (and you can’t use a hard stencil for the black anyway because of open areas).
Making your own hard stencils is probably more of a pain, but they’re reusable, and would get around the headache mentioned above. A cheap solution is .05″ thick picture frame matte, which works well for this, as it won’t warp when painted, so it can be used multiple times. There are even better stencil materials out there made specifically for this if you’re willing to pay the price for them.
I suppose a tip is in order here I shoulda told you about earlier 🙁 When doing a dark to light color like yellow over blue on ms pac or red over brown on joust, shoot the area with a nice white primer first then all it will take is one shot of yellow.
@brian:
Ha ha, yeah well I suppose that would have been a good idea to lay down a primer base first, seems like something I should have thought of.
@JoyMonkey:
My assumption is that on the pink stencil I won’t have to put as many coats. Going directly onto yellow I should be able to lay the pink paint down quick and within an hour have painted a side and pulled the stencil off. Someone else mentioned it could have been how much I thinned the paint, I don’t think that is it, I think it really had to do with how many coats over the duration of time necessary.
@Donnie M.:
I actually have two photos I will try to post, maybe in a new post. One photo shows the bottom of a Pac-Land cabinet where Bally used a scrap Ms. Pac-man board. It shows that the blue was a stencil, leaving the areas for the yellow and the pink blank / primer exposed. It also shows they stenciled it on a huge flat board and then cut it out.
@asmblr:
Ah, this is the debate isn’t it? And I say debate because I would only believe this opinion if Brian Jones had written it. I am not arguing how the original cabinet was stenciled, but Prok has said many times over how cutout matte board or any related material won’t work for this purpose. The overspray would be much more than what the original had because the adhersion to the cabinet would not be tight.
And if there were better re-useable / multi use materials available for arcade stencils, he’d have them at Gamestencils.com. Shipping is costly for 6 – 6 foot stencils plus the 3 for the kickplate, and unless the cost was fairly comparable, why would I need a re-useable set unless I was doing 5+ machines for resale? For one machine, vinyl is the best option unless I am told otherwise. Check out the linked post on re-useable stencils for more information.
@audiomidiman:
Thanks, I appreciate the acknowledgment that someone else beyond me can appreciate this a little bit be, albeit from afar. I am finding that not only was it alot of work, but now that yellow artwork is a little raised. Ack.
But as long as the next person who uses the Joymonkey stencils can learn from me, then all of this will be worthwhile.
Leave a comment
Your email address is never displayed and cannot be spammed. If your comments are excessively self-promotional you will be banned from commenting. Read our comment privacy policy.


October 21, 2008
I was afraid of that yellow against the blue and the build-up multiple coats would create. I noticed when sanded the original artwork off that the colors had no blue behind them, only white primer. I’m thinking now that perhaps at manufacture, they painted yellow and pink first, then blue and lastly black.