
Stenciling a Ms. Pac-man – Part 4
Finally! Part 4, it’s a miracle! Part 1-3 of the stencil a Ms. Pac-man tutorial was based on the work by a arcade game collector out West by the name of Donnie. However, from here on out the how-to’s will be written using the progress I have made on restoring my own Ms. Pac-man.
I am going to try to break the tutorials into smaller pieces, so let’s get started. At this point you have stripped, sanded, primed and painted the Glidden Blue on your Ms. Pac-man. The next step is to start to apply the vinyl stencils. It’s more time consuming than you might think.
Slow and steady goes the stencil application
We are only going to cover a couple of things in this part of the tutorial.
- Some of my questions about how to apply a stencil that may help you
- The importance of measurements in artwork placement
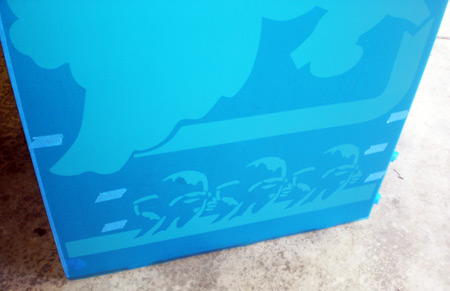
I just assumed that after I applied my last coat of the Glidden Blue I would be able to apply my stencils right away and paint my first coat of yellow in much less than 2 hours. I was wrong. In the end I think I spent much more than double that for all three sides, partly because it was my first stenciling attempt. Mileage may vary. As a teaser of part 5 here is a photo showing what one side stencil looked like after application.
Truth is though, properly applying each stencil takes a little bit of time. I hadn’t yet reviewed Brian Jones stencil application instructions from his website, but in my thought process here were couple of areas that were of concern for me before I started applying the yellow stencil artwork;
- Registration marks – With the premask and backing I couldn’t tell if the registration marks were actually cut out on the first stencil – The yellow
- If registration marks weren’t cut, should I cut them? – I started to wonder what the best solution was. Should I lightly cut them on the cabinet after the yellow was done? Or do I lay the pink artwork stencil right over top of the yellow since the vinyl inside would actually stick right to empty cabinet and not create a ‘double thickness’
- How wet the paint should be for removal – Brian’s instructions said that the paint should be ‘at least tacky’ but it didn’t specify whether it was crucial or not to remove the stencils right as they were tacky, or if they could be dried
- Do I use the ‘wet method’ that I keep hearing about? – I wasn’t sure how I was positioning the stencils on the cab.
After this internal discussion I spent about a half hour reading and re-reading the short instructions put together online by Brian Jones to figure out what I needed to do. Those instructions helped answer my questions and by looking over the vinyl in context with the cabinet I got the ‘big idea’ sense of what I was doing.
The answers to the above questions
Most importantly, if I read those instructions first, I might not even have this post. But maybe this will help some of you.
- The registration marks were cut, even though I couldn’t see them with the premask still on the artwork. They were indicated by little R’s all over the vinyl for the black and pink stencils, but not on the yellow so I assumed they weren’t there.
- The paint should really be tacky. This is absolutely crucial as I found out later the hard way. Part of the problem is that latex paint is a plastic base. I am writing the end of this Ms. Pac-man tutorial now that my cabinet is done. Here is some more information back in October about finalizing the yellow on my Ms. Pac-man cabinet.
- After I finally digested Brian Jones’ instructions I realized that the ‘hinge method’ was going to be my best route, and the wet method was really meant for cabinets laying on their side for positioning fully printed vinyl artwork, not stencils.
Closing Remarks – Measurements / Taping
This was a short post, and something I thought I would have done closer to Thanksgiving. However, in typing this up, I realized that the important portion of measuring artwork placement on your cabinet before you strip off the artwork needed to be added back into an earlier portion of the tutorial. Go back and review Part 1 of stenciling your Ms. Pac-man with the updated photos at the very beginning.
The next part of the tutorial will basically show you the same things that are in Brian Jones stenciling document, taping the yellow stencil to your blue Ms. Pac-man cabinet, using the hinge to apply the top half and then the bottom, and possible pitfalls.
I won’t go into a tremendous amount of depth since it is already written in those instructions. However, you’ll need this stencil in context to your Ms. Pac-man and seeing it specifically for the yellow will be helpful.
Here are some similar arcade posts
- Stenciling a Ms. Pac-man – Part 6
- How Bally Stenciled Ms. Pac-man Cabinets
- Stenciling a Ms. Pac-man – Part 7
- Stenciling a Ms. Pac-man – Part 5
- Ms. Pac-man Pink Finished
If you enjoyed this post, please consider to leave a comment or subscribe to the feed and get future articles delivered to your feed reader.


Comments
Leave a comment
Your email address is never displayed and cannot be spammed. If your comments are excessively self-promotional you will be banned from commenting. Read our comment privacy policy.
Pingbacks / Trackbacks
» Stencil Ms. Pac-man Cabinet – Part 4 | Rotheblog - Arcade Game Blog »Free Games
Pingback on December 7, 2008