
Tracing stenciled arcade artwork with vellum
The problem with reproducing arcade cabinet artwork always starts with proximity to the game. Scanning a cabinet is a ton of work, and when combining the stitching in Photoshop of all of the pieces, you might be looking at 6-12 hours on that task alone. The nice thing with stenciled artwork is that the design is usually highly refined and more simplistic, which means it is easier to do a tracing to get the artwork to a workable format. Here are some visuals.
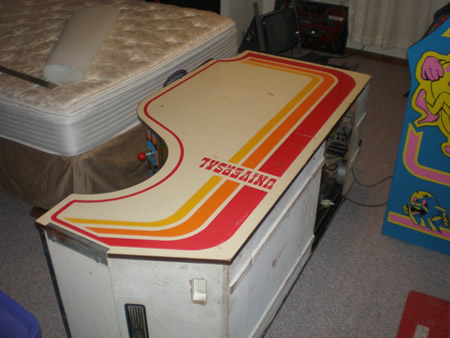
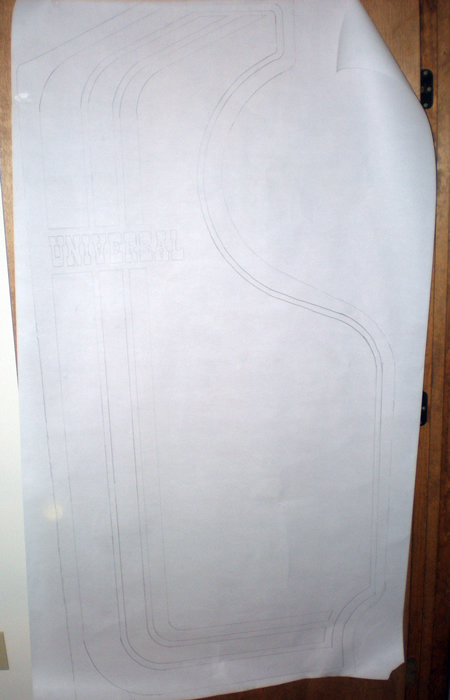
Classic Universal generic cabinet – Good tracing candidate
The original Mr. Do! cabinet was housed in that generic Universal cabinet with the red, yellow and orange stripes. I don’t want to spend a night scanning a cabinet, stitching the artwork just to get authentic stripe sizes. I am just going to flip the cabinet on its side and trace it instead.
Note: Before you think it. Mr. Do! isn’t exactly your regular cabinet with stenciled artwork. Mr. Do! was either printed on a vinyl and then laminated, or was printed right on the laminate and then some sort of glossy finish was applied. Tracing this cabinet for stencils wouldn’t technically be authentic, but we need to get the artwork digital regardless and someday (read middle of next year) I will figure out a solution for the glossy finish.
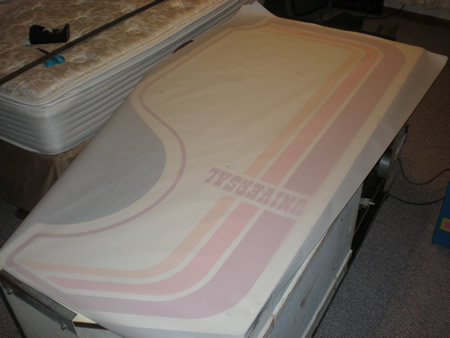
I had already talked about using vellum for tracing earlier in the year when I highlighted the Scramble stencil artwork. But, to do it again…start by flipping the cabinet on its side. This ‘tutorial’ is more of a demonstration, I am sure most people know how to trace.
The vellum sheets I got from Thisoldgame.com came with plenty of extra length. I cut down the vellum close to the height of the cabinet so that I could tape it down to anchor it to keep the tracing from moving.
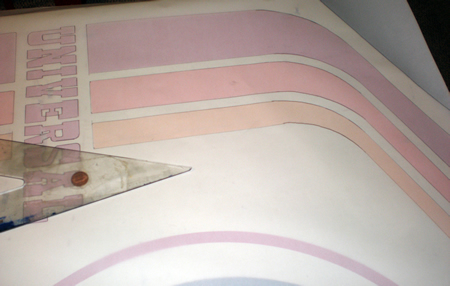
The vellum is cloudy, but not so transparent so it is hard to see where you have drawn your lines. I was lucky to borrow a large drywaller piece of aluminum from work that we use to cut fabric and use that as my straight edge. I also used a small triangle for the smaller straight lines. Here you can see some of my progress on the stripes, as well as the logo. I will probably reference an already vectorized Universal logo for adding to this pattern at the Illustrator stage, so I wasn’t worried about minutia level detail on tracing the lettering. All corners on the lettering of the Universal logo have a small corner radius, probably 1/16″ or smaller.
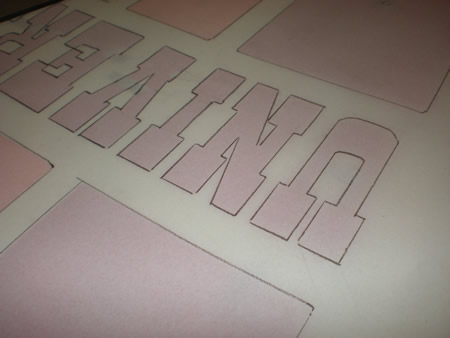
Beyond that, go through and trace all of the artwork. I actually went ahead and generally etched in the shape of the cabinet so we know the general placement of the artwork on the side. Make sure before you untape to gently lift up a side to really see what you have drawn and what you might have missed.
Here is what my final looks like;

I can’t stress this enough, but just because I am doing the tracing of the Universal sideart patten does not mean this is reproduced. It is there in case it makes sense to make some stencils, but without the glossy finish figured out, having this artwork as vector is premature.
What’s next for vellum traced cabinet artwork?
At this point I would suggest making a note of the colors of each piece of artwork. Maybe write a little ‘R’ (Red) in each shape, or whatever color. This is good to reference back later if a project gets shuffled, or if artwork is made into a stencil it is easy to know which color is which.
Then a grid will be drawn, and those sections scanned to make it easier to piece back as one side of artwork. I’ll either do that myself or send it off to Rich to do himself. We’d all like to see this happen a little more often, and it is so easy that any collector can do it and expand the available library of arcade game stencils. It would only take a couple of hours, depending on artwork complexity, and certainly shouldn’t take many months to accomplish. Rich had already talked about this process for stencils for Stern’s Scramble at Coinopspace.com.
Got a stenciled cabinet? Help us out. Sinistar cockpit comes to mind 😉
Here are some similar arcade posts
- Tracing arcade game sideart to make stencils
- Stencils to restore your Williams Bubbles arcade game coming soon?
- Stencils to restore your Stern Scramble arcade game
- Stenciling a Ms. Pac-man – Part 5
- How Bally Stenciled Ms. Pac-man Cabinets
If you enjoyed this post, please consider to leave a comment or subscribe to the feed and get future articles delivered to your feed reader.
Comments
Nice Job there Jeff__I usally cut the vellum in the shape of the cab instead of drawing it__and if you draw a grid square it to the cab and draw in 8×11 squares on the BACK side__so when scanned they apear lighter and are only used for straight refernce when stitching together.__My best guess it was orginally screened on vinyl like Atari cabs then laminated with a gloss clear vinyl laminate similar to bad inlkjets of today for extra proctection____UNiversal cabs are wierd maybe its just me I never remember seeing one of these in a "real" arcade only laundry mats, and 7-11s or maybe that was just a west coast thing : )
I don’t suppose you’ve scanned these vellums tracings since I sent them, have you Rich? Next time I’ll do the grid on back and cut to shape for sure.
Any continuation of this artwork project? I found a Mr. Do in Universal cab but it’s a former Space Panic with no sideart. I would really love to be able to accurately restencil the sides and kickplate with the Universal cab colors.
As always, excellent tut!
There wasn’t any confirmation when I did this Mr. Do! vellum tracing that stencils would ever be made.
But found out the other day, actually, that Rich at This Old Game did go ahead and put together a kit for this artwork. Visit the Universal cabinet artwork page for purchasing information.
Leave a comment
Your email address is never displayed and cannot be spammed. If your comments are excessively self-promotional you will be banned from commenting. Read our comment privacy policy.


August 14, 2009
Nice as usual Jeff. I’ve got a Cosmic Guerilla I’m restoring later in my project list. Sideart is under 25 years of paint, but looks rather good on a test strip.
However … this method may help me if I need to redo the sideart once its fully stripped (big gouge down one side of cab for eg).
Thanks m8.