
Wizard Of Wor
Wizard of Wor, Dig Dug and Tetris Sold!
For a month or so I had been responding to the common Craigslist ad looking to “buy” games. Usually people put out these ads looking for freebies, but I knew it couldn’t harm me any to try to sell some of my non working games. I wanted to try to reduce as many distractions as possible to focus on studying, and fixing up the Midway Wizard of Wor, Atari Dig Dug, and Dynamo cabinet Tetris were time suckers to say the least.
The Tetris was the only one I was seriously considering keeping in my game room, but the black cabinet was so ugly. The original intention was to resell these once they were working to help pay for gas, or take down the paid cost on one of my other games. But the motivation for selling a game to make a small amount of money waned for me. I got my holy grail, the Jr. Pac-man. I had originally wanted to use the money I made to help pay for my trip out to PA to pick it up. But thanks to DanOfEarth, that wasn’t an issue anymore.
Finally, last Tuesday I found some people who weren’t looking for free games, and were interested in the three I had to sell. I just wanted my itemized costs back in total for the games, and the price was more than fair, great if you intended to keep one of the games. Dig Dug is too slow of a pace for me, Wizard of Wor holds no interest for me other than the fact that it is a two player game, and Tetris, again, ugly cabinet with no sideart.
Here are some photos of the games being taken away.
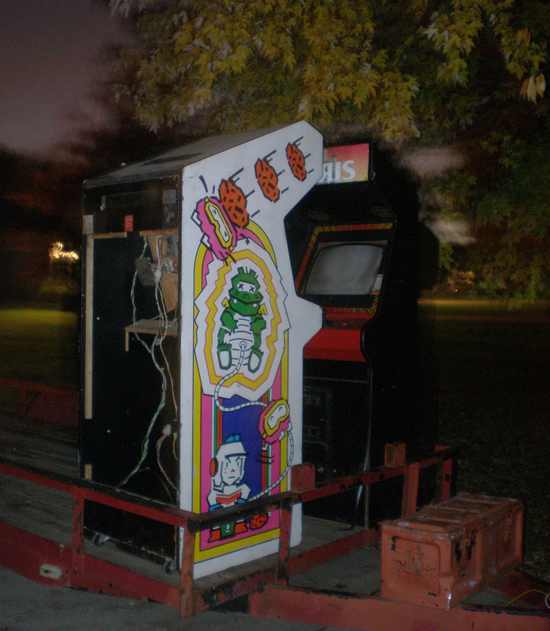

I made a whopping $10 on my sale after all of my costs were added up, but I learned a lot. I originally bought the Dig Dug as a Land Sea and Air Squad, painted solid black on the sides. It was my first game that I brought back from the brink of oblivion, and restored in some sense of the word. It was a lot of fun, bargaining for the deals, but it was a lot of work, and without knowing much about electronics, it was hard work for me to constantly figure out all of the problems I was having with any given game.
In the end things worked out great. I didn’t lose anything but time, and that is debatable when compared to what I learned and the contacts I made hunting down the arcade parts. The games found a good home where they should be reused in a family fun center, and I can park in my garage again:) Just in time for winter. Not to mention I can keep the other two cabs in case I need a fix, my empty Atari Food Fight and Atari Xevious.
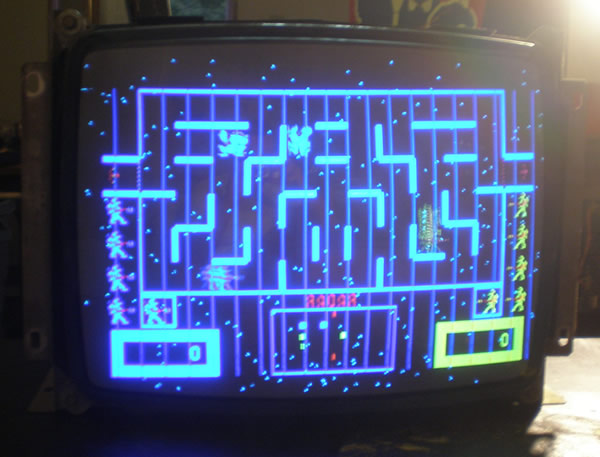
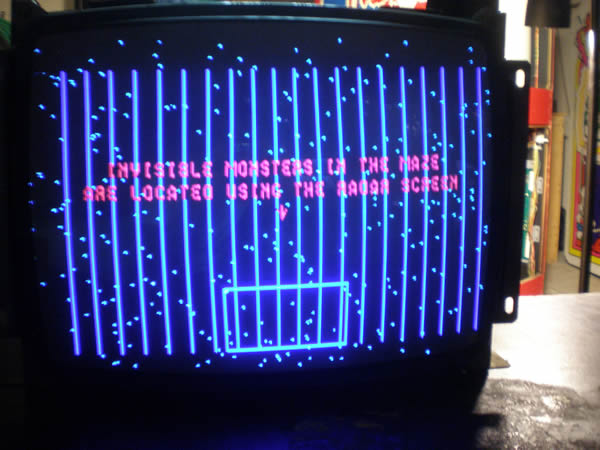
Wizard of Wor problem was a sync issue
I couldn’t believe it a little bit myself, for how bad those lines were, but that is exactly what it was. Once I started messing around with both vertical and horizontal sync, I got the picture back square and almost stationary. Except, no matter how fine of an adjustment I make, the screen still rolls. The lines are gone, so Mark’s fix worked just fine, but I can’t fix the vertical sync.
I made sure the card was seated, and adjusted everything but it still slowly rolls. I just replace the caps in that, what, a month ago, so those shouldn’t be an issue. I suppose the connection could be bad. Not sure what to do, need to have time to research a solution, but I suppose I could finalize one of my other two almost working monitors and swap them in. But then, I would still have this one that I would have to fix at some point….
Or I could just sell it. It mostly works and would just need a touch of tlc. I don’t know how desirable a 19K4600 Wells Gardner monitor is…
Wizard Of Wor RAM Boards back
I got them earlier in the week, on Wednesday actually, but didn’t put them in until tonight. I had some time to kill while waiting for the buyer to arrive for the Space Invaders Deluxe, so I put them in the machine and tested it. I was so excited at the possibility of having that game fully working too and ready to sell.
Well, I got lines on the screen. I have no idea what that means, it is weird, fast horizontally moving lines. I wanted to check voltages before putting the boards in, and I got a pinout for the game, but wasn’t really sure because of the weird connections in the game if I should check them at the connection to the cage or at the connection to the one board.

I hope that wasn’t a mistake. I am going to email the guy that repaired them, he’ll probably know the problem, he is really knowledgeable. It almost looks like a sync issue, which is an easy enough fix if that were true. But it looks a little more serious than that.
Wizard of Wor RAM boards in the mail
I have been talking with Mark Spaeth for a month or so now. He said that he could easily, and for an affordable price, fix my RAM boards for the Wizard Of Wor. I was pretty pumped, and finally got those WOW boards in the mail on Saturday.
I still don’t know if the sound is having issues or not. That will be the next piece of the arcade game to troubleshoot.

Finished putting Wells Gardner Monitor back together
I went out and got a new ratchet so I could more easily put the Wells Gardner monitor parts back together and get the monitor plugged back up to the Wizard Of Wor game. I was glad that I had the extra arcade game cabs so that they could serve as a work bench.
The Wells Gardner monitor was a difficult cap kit replacement to work on, so I was glad that everything powered up just fine when I turned the Wizard of Wor game on. But, unfortunately when the monitor lit up, it still had the lines going through the opening screen and gameplay. The cap kit didn’t fix my game issue, and now I have to go back to the drawing board.
19K4635 Wells Gardner Monitor – Difficult to do a cap kit
It was cool outside last night, and I was feeling motivated, so I started the cap kit on the Wells Gardner 19K4600 model monitor.
Let me tell you, I thought doing a cap kit on this monitor was for an advanced user, not for the faint of heart.
I had the hardest time figuring out how to get at the bottom of the chassis board. I finally figured out that you need to unscrew the cross beams from both sides of the frame. Then, pull the sides apart and get the chassis out. There are a number of different connectors that you need to unplug, one or two from the neckboard, and a couple from the 19K4635 chassis. But even unplugging them all doesn’t matter.
Underneath the chassis board is a metal plate, held on by four screws. You have to take those screws off and then you have the plate hanging off the chassis board. There is some sort of discharge? copper spool that is soldered from the plate to the chassis board that unless you want to solder it all, you can’t take it off.
So, it was on big balancing act. Most of the caps are on the cards that plug into the chassis. One large cap, a 1000 u 35V? on the one card, and a ton of caps on the other card.
I found that on this monitor, most of the time, the size of the caps were downgraded significantly. I don’t know if this indicates how long it has been since a cap kit has been done or not, but there was a ton of dust on the chassis so I don’t think it has been for awhile.
I had found my cap kit list for this 19K4635 Wells Gardner monitor at Ionpool, and chose the Zanen Kit #201A. I don’t know why I chose this one over the WICO, I don’t know the difference. But I am glad I did, the Zanen version had more caps.
But I did find that I needed three other caps that I will have to go back for. Those three are;
- 1000u 35V
- 4.7u 25V
- 22u 16V

