
Discreet 3DS Max
How do I trace an image in 3ds Max? How do I create an Image plane?
Information was readily available for this topic, as I got into this right away when I thought that I would have to draw the outline of a globe for my most recent project in 3ds Max.
Basically, what you are looking to do, is get an image into 3ds Max that you can then trace. What you need to do actually, is make what is known as a material, with your image on it. Then you need to make a simple plane, or flat paper like object, that you apply that material to and you have your image to trace on.
For this example I am using art by Adam Hughes. It isn’t line art, but what I was using was. This was the only tip I had for pure lineart. Find the best line between the best detail without looking chunky and then thickness of the line you are making in your lineart. 3ds Max will make you nice Illustrator line art, when make into a material, into pixelated little jaggies. I couldn’t find a way around that. For me, it was making the map outline in Illustrator at a 2px thickness.
Let’s get Started.
Ok. On to making your image plane. I am assuming here that you know what primitive shapes are and of course, how to open the program.
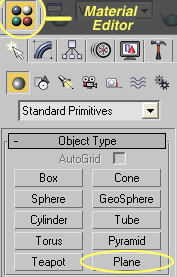
Step 1: Go to your “Create” tabbed pallette on the right side, make sure “Standard Primitives” is selected and you will see “Plane” in the lower right as one of your button options. Click that.
Step 2: Draw a plane. The amount of segements, and overall density of polygon information is not important here because you are just using this image plane as a springboard to make something else.
Step 3: Open your materials editor. It is the little button in the upper right that looks like four spheres, or you can get to it from your menus in this fashio; Rendering > Materials Editor. In your default shortcuts, it would open by pressing “M”.
Here is an illustration of all of the different parts you will need here in a couple of these steps. Refer to as needed.
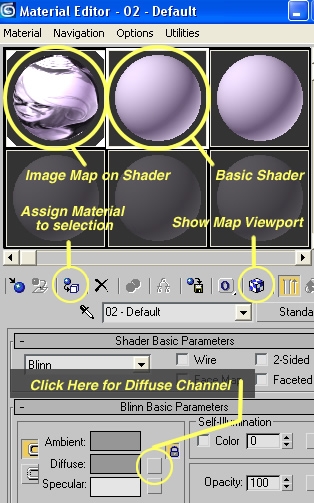
Step 4: You will see a bunch of spheres. These are your sample slot materials. This all looks a little overwhelming, but don’t worry about it too much here, we will just scratch the surface. Click on a sphere, and then below in your “Blinn Basic Parameters” rollout, you will see an option called “Difuse” with a little blank gray square button next to it. Click this button. This is the diffuse channel. At the very basic level, it is the basic material for a “Blinn” material. It would be your color, or in this case, your image map for the surface of your shader.
Step 5: This will open your “Material / Map Browser”. At the very top is the option you need entitled “Bitmap”. Double click this. The rest of your options are for the effect you want to go for on your objects, from a mirror surface, to a refraction surface for lighting effects, to an actual surface like smoke or brick or something.
Step 6: In the dialogue box that opens, navigate to where the image is located on your computer and double click to select it. Your Material Browser will close, and you will see your image wrapped around on of the spheres. You will also notice now that that once blank box next to diffuse now has an “M” in it. This means that you have a Map applied to it, just for your reminder.
Step 7: Drag that sphere out on to your image plane to apply it to the plane. Your other option is to click a little button that looks like a sphere pointing to a cube. This option will only be available to you if your have your target object selected. If you roll your cursor over to find it, the title will say “Assign Material to Selection”.
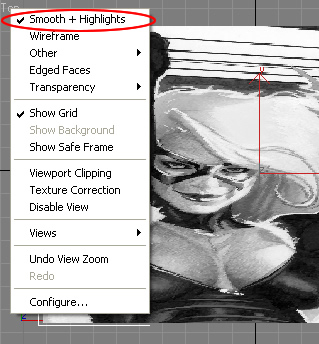
Step 8: View your image on your image plane. Click the little button that looks like a checkered cube that says “Show Map in Viewport”, then you can go to your viewport name, in this case for me it is “Top”, right click, and choose “Smooth + Highlights”. Hopefully this should show up allright for you. There are many different viewport names, from left, right, perspective, user. Just right click to make sure your basic rendering is turned on so your can see your image plane.
Here you can see part of my image plane rendered out. You can also see above, the material and what it looks like after the image is applied to the basic shader before you assign that shader to your plane.
That’s it! I hope I didn’t loose you. I hope at a later date I can get into what to do next with tracing, but this is a good place to end for now.
What is a 3ds Max Gizmo? How do I turn on, or turn off a Gizmo in 3ds Max?
When I first started in 3ds Max, I started hearing about “gizmo” this and “gizmo” that. I have found even in After Effects, this is a popular term when talking about transformation tools. Gizmo to me seems like an afterthought of what they decided to name something late into the development process.
Basically, a gizmo is a little helper for when you are transforming (rotate, scale, move) an object in your viewing plane, or orthagonal view.
In 3ds Max, there are three views, X = Horizontal, Z = Vertical, and Y = Forward and Back in dimension space. This may be hard if you are new to a 3d modeling program, but a 3 dimension space is what this type of program is all about, hence 3d.
So, when you choose one of your transform tools, (again scale, rotate, move or something else) a little 3d dimensional crosshairs comes up to help you know which direction you are applying your transform in. Each direction has it’s own color, X = Red, Z = Blue, and Y = Green.
Without getting into an in depth explanation of how gizmos work, I just want to say that they are extremely helpful for making a shape change to the way you want it. I had some problems one day because when I was using my transform tools, the gizmos weren’t showing up. I had to go hunting to try to figure out how to turn my gizmos back on.
So, to turn on your gizmos, if they aren’t already.
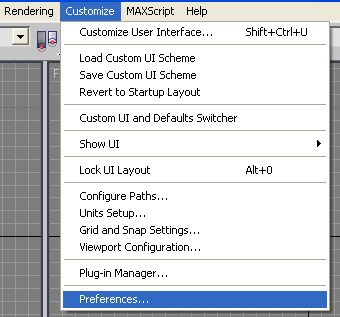
Step 1: Go to Customize > Preferences
Step 2: In the preference dialog box you will see many tabs. Click on “Gizmos”
Step 3: Click “On” to turn your gizmos back on. You can see the option here in the upper left.

Simple, but yet when you are in such a complex program, finding something out simple like this, without knowing where to go can be very hard.
Changing shortcuts / Customize shortcuts in 3DS Max

I have mentioned in passing that I have been trying desperately to get a firm hold on 3DS Max for the last 3-4 weeks. It is a dense program, and I attribute that to the fact that Autodesk (Discreet) is also CAD, which to me is all about architecture and engineering and not user friendly GUI’s. This program is very dense, and would be hard to organize, but seriously, it can be so overwhelming. This is the hardest program I have ever had to learn on my own.
That said, one of my largest crutches when it comes to programs like this is shortcuts. I can only learn as fast as I can manuver, and I wanted to move quickly, with keys that I knew from other programs, so for the first week I lived in the Shortcuts menu.
But you ask, as I did what seems a simple question, How do I change those shortcuts?
Step 1: Open 3DS Max
Step 2: From your main menus choose Customize > Customize User Interface
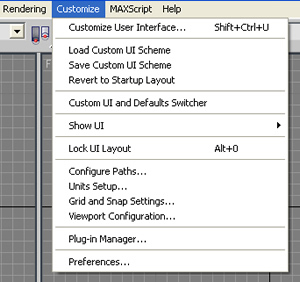
Step 3: Choose your option.
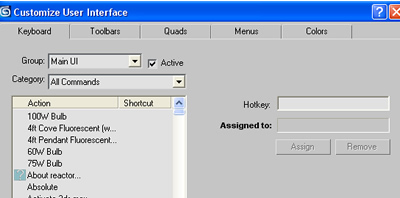
This may not be inherent at first, but you will get the hang of it soon enough. The best tip I can give a new user is hover over the button in the interface that you want to change, and then view it in the list to change it.
For example, the “Move” tool is actually called Select and Move, so scroll through the list, find it, change the shortcut and then, very important, save your shortcuts. I have had problems where they seem to get reset, maybe this is a stupid user error, but I have no idea why they wouldn’t be there anymore after using them for awhile and then closing the program.
Hopefully this is a good start. I know it doesn’t introduce anything, but I can’t teach the whole interface, instead I hope to highlight the stuff that Autodesk does not make very obvious.

