
Illustrator
Amazing Arcade Themed Illustration
Looking through my feeds today for some design ideas I came across a post that had an awesome piece of arcade themed artwork in it! Check out this Space Invaders, Pac-man and much more-piece below. Oh, and to me this one doesn’t even scratch the surface of some of the work of this Guilherme Marconi! Makes me feel awestruck inspired and silly all at once.
Saving a corrupted Illustrator file!
Late yesterday I had a freak out moment. I was working on a file and was exporting it and the colors were off. Usually this means that my color space is not what I am expecting. Sure enough, exporting to a jpg the color space should be RGB, and it was set to CMYK. I changed the space in the “color” palette,saved the file and thought nothing of it.
I went to open it back up later and got this wonderful message; “Can’t open the illustration. Could not complete the requested operation.” I didn’t worry too much, sometimes I’ll get a similar message when my system’s memory has been maxed, and programs just start shutting down or working funny. But after I even rebooted I was still getting the same message and starting to freak that I had lost my work.
If you look anywhere online, designers suggest you to save stages. I hadn’t ever adopted this practice because of resources (space) and time (managing all the different versions). So, I didn’t have an earlier revision, so what do I do? I can open the file as raster just fine in Photoshop, and I can see the file in preview in Illustrator.
What I ended up figured out was, because I could see the file and open it other places, that the corruption wasn’t too bad. I may be able to save the file, it may have just been a linked file that had caused a problem.
So, I opened the Illustrator file in Adobe Acrobat, and saved it back out as an .eps. I opened it in Illustrator and I had my artwork back! Pretty psyched about that, and hopefully I learned a lesson to save some multiple copies or stage revisions.
If you have a corrupt Illustrator file giving you the “Can’t open the illustration” message, try that and I hope it works for you.
Can’t get my Illustrator crop marks to go away!
This was a problem I was having this morning. I had an Illustrator file that I hadn’t built originally that I had edit and adjust the document size on, and a there were some corresponding crop marks with the original document dimensions.
I was used to using a filter to make crop marks, so I looked through the file to find locked artwork paths for the crop marks, but to no avail. I didn’t realize that there was an object now where you can easily make, preserve, and re-use crop marks.
All I had to do to unlock and edit those pesky crop marks that I couldn’t resize was;
Object > Crop Area > Release
This release the marks back to the original artwork and allowed me to resize them for the document area. Then I just did the opposite from the same menu;
Object > Crop Area > Make
And I was good to go again. They wouldn’t have even mattered, but, when you make these cropmarks and export a document as a raster image, it would use the cropmarks as the cropping area. Novel idea. So I had to resize them before I could the adjusted Illustrator file.
How do I create a rectangle by entering in specific dimensions?
In Illustrator, you have a something called the “Rectangle Tool”. So, let’s walk through how you can draw a rectangle with specific dimensions.Choose File > New – This will create a new canvas to work on. You can name the document here if you want. I am just going to call my document “Rectangle Test”.
Then choose your dimensions. For this exercise you can just choose the standard letter size canvas from the Artboard Setup > Size menu. Hit enter to accept this information and let’s get started.
On the left side of the screen you should see your Illustrator Tool pallette. It will look like this.

As you will notice, the fourth icon down on the right side of the toolbar looks like a little square. This is your “Rectangle Tool”. Click this with your mouse, and then click once anywhere on the canvas. You will then get a dialog box that looks like this;
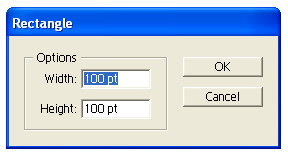
This is where you can enter a specific size for a vector rectangle. For this example I just used my default settings as you see in the photo of 100 x 100 points.
How do I crop something in Illustrator? How do I use Clipping Masks?
This is a question I have gotten, and never gotten an acceptable answer. Because Illustrator is a vector program, where you create illustrations using complex shapes and colors, it isn’t really meant to edit a raster image like Photoshop would. Photoshop has the capability to crop an image to any size, but to achieve something of the same nature in Illustrator, you need to use what is known as a “Clipping Mask”.
Basically, what a “Clipping Mask” is, is a window to see an image through. You mask off the area you don’t want to see, and show through the area that you want to focus on.
This is how you make a mask. First, follow the steps below for making a new canvas. Now, let’s import a raster image, a .jpeg, a .tif, whatever type you into Illustrator.
Go to File > Place. Now choose an image from your computer to put into Illustrator.
You will now have what looks like an upsidedown 90 degree angle. This is the basically the upper corner of your image, and you need to set where you want this upper corner to set on your canvas. You do this by clicking once anywhere on the canvas, and the image will appear.
Now, like below, we are going to draw a rectangle on the canvas. Either you can click once and set the dimensions of your square, or you can select your “Rectangle Tool” and draw it by hand. When you select the tool, you will have a small cross-hairs. Click on the canvas once, hold, and drag your square out until it is the size you want. When you are satisfied with the dimensions, release your mouse.
Hopefully you have drawn the rectangle over the section of the image that you want to show through, but if not, just select the rectangle and move it. You move the rectangle by using the tool that is the solid black pointer. Click that tool, then click the rectangle, and move it to the desired position.
When you select the rectangle to move it, you will notice that it highlights the border in blue and has small little squares all around the perimeter. These are so you can scale the rectangle if you neeed. In order to make your mask, you will have to have the rectangle selected, then Hold Shift, and click the image also.
Now to make your mask.
Go up to Object > Clipping Path > Make, as you see in this screenshot below. This will show your mask.

This article is not exhaustive. You can release, or revert back to what you had in the beginning by releasing your mask with the menu option in the same area.
But what we are going to cover now is how to rasterize the dimensions of your masked image.
The bounding box, or blue highlighted box, will always retain the original dimensions of an image of a mask, no matter how small of an area you mask off. But, if you are satisfied with the mask, and know you won’t change what you have done later (Maybe your client is really great and won’t change their mind) then you can rasterize your mask. This will make you image not editable anymore, so make sure you don’t need to change it.
Select your image again with your black pointer selection tool and then go to Object > Rasterize. This will bring up a dialog box with a bunch of options.
For this example, you don’t need to change anything in particular. Just make sure that your color model is set to CMYK, and that your resolution is set to 300DPI. Click ok, and now your image is rasterized, and you won’t be able to go back and edit it.
Like I mentioned, you will still have the original bounding box. If you only want the actual size of the image to highlight when you click on it, then you will need to use the crop tool in a photo editing program like Photoshop, and then Place the image into your Illustrator file first.
I sincerely hopes this helps.
Effects differences from version Illustrator 9 to Illustrator 10.
Today I learned that the filters options from 9-10 changed. The gaussian blur, which is a seems to be a default filter in 9, is apparently an SVG extension in 10, and if any vector art that contains a blur is attempted to be moved, an “action terminated” dialog box will appear.

