
Photoshop
Photoshop tutorial for punching text ‘effect’ out of an image
This down and dirty tutorial is mostly for Photoshop beginner’s. If you are trying to figure out how to take an image and make it into text, this will be a perfect how to. I have taken things one step further and then placed that text (arcade themed of course) into a Photoshop file that could be used for a custom WordPress website header / masthead. (more…)
Editing layered Fireworks pngs in Photoshop
It’s been over four years now since Adobe bought Macromedia and all of their flagship products like Dreamweaver, Flash and Fireworks. We have seen two new versions of the Adobe Creative Suite since then. The first one did some basic integration between the programs, the second release of CS more tightly integrated all of the software. So why in the heck can’t the almighty Photoshop open up layered .png files that were originally created in Fireworks? (more…)
How do I use Photoshop to make someone look less fat?
How do you slim someone down in Photoshop you ask?
This was a challenge that was posed to me the other day, and I wasn’t sure of the answer myself. I hadn’t ever tried to take a photo of someone with clothes on, in a group of other people, and make them look a little less fat. The camera adds 10 lbs and all that rot.
Well, I did some searching. Tutorials in Photoshop on “slim”, “fat”, and “weight”. I found a tutorial that spoke about making someone look more fat, but the principal was the same. They suggested a lot of patience, some skill, and use the liquify tool.
The liquify tool is under the “Filter” menu in Photoshop. You can also access it by this shortcut;
Ctrl + Shift + X = Liquify Tool
The idea is to drag the existing person’s boundaries inwards to make them smaller. Now, my subject was on a darker background, with darker clothes. So, I think I got lucky with this challenge. The darker colors would mask more inconsistencies and “drag” lines when working with this tool.
But basically, make the brush size large enough to try to avoid getting blurring drag lines and start pushing pixels in.
Here is a snippet of that other tutorial that I found. It is a multipage document…
A good place to start is the face. The best tool for enlarging the contours of a face is the liquify tool. The brush size is important. A larger brush will create less ‘drag lines’ but naturally will give you less control than a smaller one. You’ll have to experiment a bit here to choose the right size for your job but my rule of thumb is to use the largest size brush that will still give you the control you need.
Set the brush just inside the outer line of the flesh contour and carefully pull the flesh outward to the amount desired. You’ll have to repeat that around the entire area you want to enlarge and adjust brush sizes accordingly. Patience and care are virtues here.
If you want to find the full tutorial, I am not going to provide a full link, but search on Worth1000.com for a tutorial called “Fattening Folks” and you should find some more pages of walk through as well as visual examples of what you may get when slimming or adding fat to people in Photoshop.
Shortcut to switch through Photoshop tools
I had a friend of mine ask me the other day how to rotate through a grouping of Photoshop tools without having to use their mouse every time.
This is pretty easy, and it can save you a lot of time. Let’s take the Dodge, Burn, and Sponge tool grouping within the Tools palette.
The shortcut to start using the last selected tool from from that group is the “O” key. Now, let’s say you hit the “O” key, and up came the dodge tool, but you need the burn tool. To rotate through the grouping of tools using a shortcut, just hold the modifier key, in this case “Shift” which hitting “O”.
So, rotate through a grouping of tools is easy. Hit the shortcut key to get to the group first, and then hold “Shift” with the key to rotate through them, in this case “Shift + O”.
How do I quickly change all of the names of my digital photos? How do I easily rename my digital photography?
Everyone can use this tip. Or least, it is good to know about, and then when you purchase Adobe Photoshop and stop screwing around with all that crappy free software, you will know how to use this.
Digital Cameras are about as cheap as a car payment these days, and everyone has got one. There is a whole new business cropping up for organizing, printing, and sharing these photos in online services and software. Never before have we had instant photos like this, and now that we have it, we want more, and want to know the best way to organize them.
The place to start is to change the crappy names that the camera gives them, something like DSC0000317 or whatever combo of letter and numbers your camera abitrarily decides to name your photos.
In steps Adobe Photoshop CS. Until now, I didn’t get the point of the Adobe File Browser, which is now a whole seperate program in Adobe CS2 called Bridge. In the File Browser in Photoshop, you can batch process rename all of your images to whatever you want. If you don’t know what a batch process is, it’s basically an automated little mini program you make to do a repetitive task for you, and making your life easier in the process.
Let’s get started.
In the photo below, you will notice that I took a screenshot of the file browser in Photoshop, in one of the thumbnail modes for a series of photos I took with my cheap digital camera. As you can see, they are named terribly, and I would like to name them better to help me search for the more easily later on.
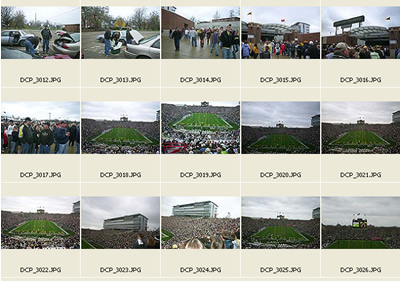
These are some photos I took at the IU vs. Purdue football game blowout last year. Let’s start to rename them now that you have seen a little snapshot of the file browser.
Step 1: Go up to your menus in the upper left, and choose Automate > Batch Rename
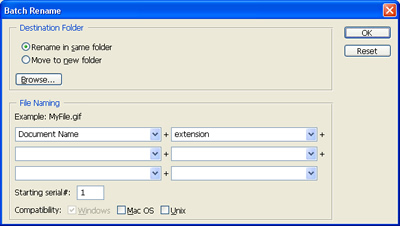
Step 2: You will see the below screen. The default option that you first see is to Rename in same folder. You also have the option to choose Move to new folder, with a browse button to find that destination. I am going to keep them in the same folder, and so should you for this example.
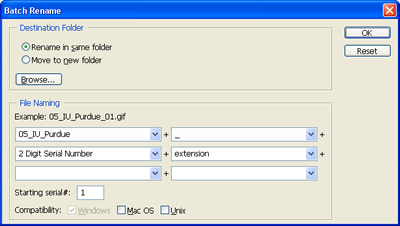
Step 3: Here is the scariest screen. This is very pragmatic if you have a technical kind of brain. Fortunately, Adobe steps you through this process fairly easily. As you change options here, you will see what your file will rename to.
In this case, I want my files to be named 05_IU_Purdue and I want them to increment with a two digit serial number. You will see each box has a dropdown of scary options. But don’t worry, over time you will adjust to these.
I happen to like underscores for my files, for Unix server type reasons, so in the second box I add an underscore to seperate my serial number incrementation, and then I end my file in a lowercase extension. The extension used will be the same as the type of file you have currently.
Take a look at my screenshot now with all of my information filled in.
Step 4: After you have all of your own appropriate information filled in, hit “OK’ in the upper right and watch Photoshop work.
Now, I am aware that this option in some form was already available in Photoshop under File > Automate. But what I like about this, is that it cuts out one step. You will go to the folder you want to edit your images in, instead of selecting it from a file finder in the old way. This makes it much more visible and that is easier for me.
It would take me a lot longer to explain every option in the drop down menus, but most of them are pretty tell tale. Serial number is for just a regular number, and when you see one of the options in uppercase, that means that your output will also be in uppercase. Just watch your naming strategy at the top of the drop downs if you aren’t sure.
So now get busy, and take this power to rename all those old photos that are laying around, cluttering up your desktop.
How do I change the background matte color when working in Photoshop? How do I change the gray color in the gutter area of Photoshop?

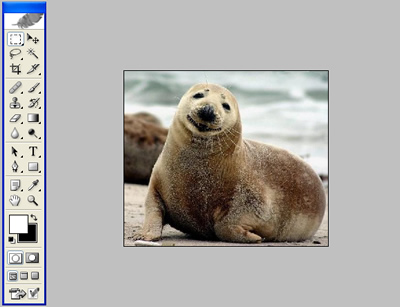
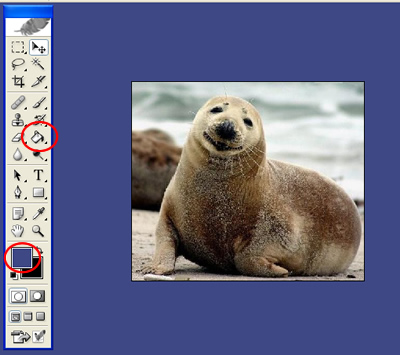
Although I have never really cared before today, I did learn that you can change that ever so dull gray color that is around a image when you are working on it in Photoshop. If you don’t know what I am talking about, look at the image below, and that huge gray sea surrounding my working area.
To change this, follow these two simple steps;
Step 1: Grab your paint bucket tool and change the color in the color squares from white to whatever you want the gray color to be instead.
Step 2: Zoom out so you can see plenty of gray space. Shift Click anywhere in the gray space to dump the new color in there instead. I am going to use a blue color to illustrate my purpose.
Normally, with the paint bucket all you have to do is click, the shift click is like a safety for you, the user, so that you don’t change the color accidentally.
I assume you know a little bit about Photoshop, but if you don’t know where your paint bucket and color selector tools are in your toolbar, I have circled them for you in the final example.
How do I save my action files? How do I bring / import my actions into a newer version of Photoshop?
This is a really simple task that you may find yourself doing when you upgrade your version of Photoshop. Unlike brushes and other custom settings, you actually have to import custom actions after you place them in the correct folder on your hard drive.
To preserve your actions, these are the steps you take. Let’s first export them out of your old version of Photoshop.
Step 1: Open Photoshop, and make sure that your “Actions” pallette is open. Window > Actions. Or by default the shortcut is setup to Alt + F9.
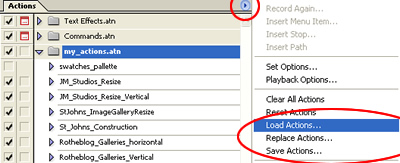
Step 2: Click on the folder that has your actions you want to save. You should see a little triangle up in the upper right of the pallette, click that, and scroll down until you see “Save Actions…”.
Step 3: Save actions. Also, you may want to note what folder they are located in. You can either save them in the default folder with the rest of your actions, and if you are like me, you will then copy those to a different location to be backed up later in case you lose your system.
Here is a small illustration showing you what the actions pallette looks like, the small triangle I was talking about, and your save and load options.
My actions are located in this directory. You will want to note the structure, because you will be copying these actions into a similar directory for your new version of Photoshop. Program Files > Adobe > Photoshop 7.0 > Presets > Photoshop Actions.
Ok. Now let’s import them back into the same, or a different version of Photoshop.
Step 1: Open Photoshop again, and again, make sure that your “Actions” pallette is open. Window > Actions.
Step 2: Click that small triangle in the upper right like you did before, and choose “Load Actions”.
Step 3: Navigate to find the file we just saved out (It should be a file you named with a .atn Photoshop extension on it), and choose “Load”.
You should now see your actions in your pallette available for use in your new version of Photoshop.

