
Photoshop
Basic Photoshop Tutorials added.
I brought over the two tutorials I had from my opinion section written by guest columnists on Rothecreations.com.
8-Bit Color Channel vs. 16-Bit Color Channel
Someone at work came to me with a problem yesterday where they were getting an error message in Illustrator about not being able to read a 16-Bit image.
I had never had this error message, and when I hopped into Photoshop, I found that this .tif image was set to 16-Bit color. I changed it to 8-Bit Color Channel and everything seemed to work just fine.
16 Bit Color Channels are basically more information per channel. For example, for RGB, that would mean you would have a 16-Bit greyscale and then 48-Bit Color RGB Image (16 per Channel of Red Green and Blue x 3). It is more information and if I would have to guess without doing too much research, is something similar to RAW. It contains more data than most users need, but at least they can utilize it if need be.
Photoshop can edit in 16-Bit image mode to some degree. None of the layers options work, but most of the basic tools do. So, you may want to work in 8-Bit until you have the image where you need it then convert it to 16-Bit Channel.
Photoshop Shortcuts – The shortest way to Photoshop World Domination (Part 2)
Temporary Functions
There is also a set of shortcuts that perform temporary functions. That is, you can be using any tool, hit a temporary shortcut, perform the function, let go of the keys and you’re back to using your original tool. (These won’t work if you are typing text using the type tool. You’ll have to get out of the tool first and then use them.)
Space Bar –
Holding this down gives you the hand tool temporarily.
Command-Space –
This lets you use the zoom tool. It’s really useful when you’re doing some heavy-duty clone-stamp work or detailed brush-work. You can have the tool set at whatever configuration, hold down Command-Space, zoom to a part you need to focus on, then let go and you still have your brush or stamp or whatever.
Command –
Temporarily changes whatever tool you’re using to the move tool.
Command-Option –
Still gives you the move tool, but when you drag whatever you’re dragging, you’ll make a copy of it instead.
Command + or –
Zooms in and out without changing tools. You probably knew this one.
Brush Adjustments
If you use any brush or brush-like tools in Photoshop (clone stamp, burning/dodging, eraser, etc…), these shortcuts can save you many fractions-of-seconds that add up to a lot of saved time.
[ or ]
– Will make your brush tool smaller or bigger, respectively.
Shift
[ or ] – This adjusts the hardness of your
selected brush in 25% increments.
Any number key
– When using a brush tool, hitting the number keys will affect the tool’s opacity. If you hit 3, the opacity will be 30%. 0 is 100%. If you type two numbers in succession, like 3 and 8, the opacity will then be that number (in our case 38%).
Option key
– This temporarily turns the brush tool to a source-tool. Like when using the paint brush, it turns into an eye-dropper that affects the foreground color.
X
– Alternates the background and foreground colors. This is really useful when doing complex selections in quick mask mode or using layer masks.
D – Sets the foreground color to black and background color to white. Another shortcut that is really useful for quick masks and layer masks.
One final master trade secret that isn’t a key press…
I think I’m starting to take up way too much of Jeff’s site, so I better wrap it up. However I have one last, super-juicy tip-
It’s not a shortcut per se, but it is a simple procedure that can save a lot of time in a fairly common Photoshop problem. Whenever you scan
something, like a photo or a drawing, there is almost always a bit of a tilt. You can sit there going to Image>Rotate and enter in micro-increments to try to get it just right- but that takes way too much time. Here is a real cool tip for just that situation.
Under the eyedropper tool, two tools deep, is the measuring tool. (For those of you paying attention, you would have to tap the I (eye) key three times to access it without using the toolbox itself.) You can use it to measure angles with a click, drag and second click.
Using the measuring tool, draw a line on an edge in your graphic that you would want to be leveled out horizontally or vertically, but is just a bit off (like the bottom edge of a scanned photo). It will probably give you a measurement of 2.38 degrees or something funky like that. If you go to Image>Rotate>Arbitrary now, Photoshop will automatically put the value in that box to ‘right’ the measured angle. In our example, -2.38 degrees. Hit OK, and poof- a level photo without the guess work!
In closing, I’d like to say that this is by no stretch of the imagination an exhaustive list. Deke McClelland has a 42 page appendix on shortcuts in his Photoshop Bible. These were simply the ones that I found most useful in my work, and figured other people would find them helpful as well.
~final
Photoshop Shortcuts – The shortest way to Photoshop World Domination (Part 1)
Guest Columnist!!
I enticed another one of my good friends to speak his piece. This is really old, but to let everyone know if you don’t already, Chip and I met in orientation and this is how it went.
He said, “Hey, I ran cross country” and then our tag along friend Brian Wilson said, “Hey, it’s not cheating if it’s your dog”. We looked at each other and laughed, as we ostracized Brian like an annoying ex-girlfriend and realized that it was the best of times.
On to the article already you bozo.
If you are heavy into Photoshop, this article will be for you. I learned three news tips in this short article, and most of the stuff he mentions on part two is stuff I have learned in the last month and a half. Needless to say, it is a great article and without further adu and pools of freshman, at his first girls volleyball game, drool….
“The Shortest Way to Photoshop World Domination”
In the last column, our friend Jen Beyer told all of us good kiddies how to make a super-nifty contact sheet using an automated-yet-obscure feature of Adobe’s flagship product, Photoshop. So when I was asked to contribute a column, I wanted to help readers use Photoshop in a better, more efficient way. So how do I do that?
The answer: Shortcuts.
That is, the useful little tricks that save you a second here, a half second there, or two seconds somewhere else. If you work in the application heavily, or foresee yourself doing so sometime down the line, these are things that can add up to a lot of time saved.
Also, the quicker you can get something to execute, or to switch a setting, or choose a new tool- the more Photoshop takes on the usefulness of a true art tool. You think of a change and it’s done. If you are a Photoshop veteran, some of this will seem quite obvious. I still encourage you to read it through, there might be something mentioned you didn’t know about.
(Let me first thank Ben Willmore and Deke McClelland, whose fine books have taught me a lot of this.)
–Note to user–
These have all been learned and tested using Photoshop versions 6 & 7 on the Macintosh platform. If you use Windows, simply substitute
these keys in the instructions:
Command (aka open-Apple) -> Control
Option -> Alt
Tool Selection-
Do you still have that folded piece of shiny card stock that came with Photoshop? It had pictures of the tools pallette with alphabet
letters notations. Didn’t think so. (Arrrr… There be pirates on the ‘net there be, arrr…)
When working in Photoshop, one can switch between tools by just typing one key on their keyboard, and save themselves the small amount of
time it takes to select the tool with their mouse. You can find out what each of them are by just hovering the mouse over any tool, and after a
few seconds the tool will appear with a letter in parenthesis next to it. That letter is the shortcut to that tool or the group of tools in that
toolbox slot.
Some of the most useful are:
M – Marquee
V – Move
L – Lasso
W – Magic Wand
C – Crop
B – Brush
E – Eraser
S – Clone Stamp
T – Type
I – Eye Dropper
There are others, but in my experience these are the ones used the most. Most of these tools have other tools associated with them
(like the elliptical marquee tool under the marquee tool).
If you go to Edit>Preferences (or Photoshop>Preferences in Photoshop 7 in Mac OS X), and under General, un-check the box that
says “Use Shift Key for Tool Switch”. Now, to switch through various sub-tools, you just have to repeatedly hit a tool’s
key (e.g. tapping the M key twice to access the elliptical marquee).
Automated Adobe Photoshop Functions & Actions Part 2
- Once that is done, you can kick back, and click the “OK” button and sip some coffee while Photoshop creates page after page of little image thumbnails.
- While you are consuming caffeine, Photoshop is actually opening each image within the designated folder, re-sizing it according to your wishes, and placing on a sheet. This can take some time, but is always far easier than doing it yourself. You can always hit the “escape” key to exit the function at any time.
- Each contact sheet becomes its own document, and Photoshop adds photos until there is no more room on the sheet, then it will create a new document and begin filling that one. All of the documents are left open in Photoshop, until you do something with them.
- Save, print, view or just enjoy these little works of art.
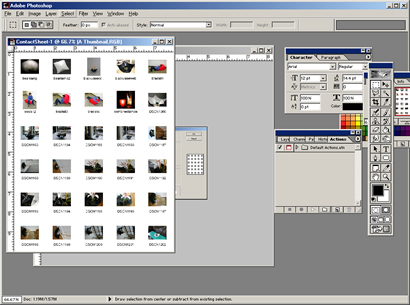
A Photoshop screen capture showing a completed contact sheet.
Easy huh? Those of you who have not gotten into digital photography will find little use for this function, but those of who have, know just how cool it can be. The world is your oyster now!
Some other things you may want to know:
- Photoshop uses your file names as titles small titles under each one of your thumbnails. This is great if you have a digital camera and are too lazy to try to sort though all of your images, and try to remember that image #111048754762937 is the one that you want to use.
- Don’t do this with 40 other applications running, or if your computer sucks. It will crash.
- Don’t do this with a set of photos bigger than about 200. Whether your computer sucks or not, it will crash.
- Any photo format (Jpegs, Tiffs, Gifs, etc), Vector drawings, PDF’s, and other Photoshop documents can all be processed in a contact sheet. If you can open it in Photoshop, it will work with this automatic process.
Other things you can do
This is just one of the pre-made automatic functions that Photoshop has, there are several more in the “Automate” menu. You can even make your own functions, using what is called a “Batch Process.” You know, for all of those times you want to rotate all your images 45 degrees and put a lens flair on all them, so you can tell your friends that you are a “real” photographer.
I’d love to get into batch processing, but I feel as though I’ve rambled long enough. It may very well be another part of this series as a related topic, if I’m ever allowed to write again. Contact sheets are a baby step into the automatic functions of Photoshop. So, hopefully you found this helpful, and will use it to spend more time doing cool stuff with computer art or design.
About the Author
Jen Beyer is an experienced exhibit designer that has worked with renouned museums around the country. She now runs her own company, Good Design Group, building set exhibits for companies such as Andrew J. Blackbird Museum, Punxsutawney, Harbor Springs Area Historical Society Museum.
Check out some of her work at their website above, or you can e-mail her at: jen@gooddesigngroup.com.
Automated Adobe Photoshop Functions & Actions Part 1
Guest Columnist!!Please, give a warm welcome to our guest columnist for the month, Jen Beyer. We don’t go as far back as we should, be we act like we go further back than some of my friends, so with that said, she is going to teach you all about contact sheets and automated processes in Photoshop.
How to Look Like a Computer-Nerd
Allow me to introduce myself…
For those of you who don’t know me, I just took my first “real” job, leaving college life behind and joining the steady-earning world. A vast majority of what I do involves computers. My technical job title is that of “exhibit designer,” however, that requires a great deal of interpretation.
You see, I have never designed an exhibit in my life, I came from the design-school life of consumer products: magic, injection-molded whoozits that are supposed to change the world with one swipe of the consumer’s credit card.
Instead, I was drawn to the world of museums by the opportunity to educate thousands of unsuspecting visitors who are tricked into “having fun” whilst learning about the topic at hand; it involves cheap, underhanded tricks, and is all in all, downright evil, but always more fun than one can imagine. I’ve also found myself in the role of department computer guru. Being the youngest on our staff by 13 years, it has been up to me to inject some new life into the IT environment at my job.
My beef with the computer illiterate….
I have never bought into the notion that some people are unable to learn how to effectively use a computer. I have, however, been fully
convinced that one can do little, to train people to become “computer artists.” Only those truly passionate about the work at hand will sit at a machine for hours on end, getting just the right curves and colors.
Many people of the “old” design generation think that a computer is in some way cheating, taking away the artistry of the arts. When placed in the wrong hands this is true, but just like a paint brush, markers, pencils, whatever, good art comes with mastery of the tools. In my office, there are three designers and two of us “get it.” The third comes nowhere near being able to open his e-mail. So alas, I am constantly dumped upon to do the mundane computer tasks that are unable to accomplished by those who are somehow afraid of technology.
I, like a normal, computer literate person, find the best ways to make these things as painless as possible. I like drawing things on the computer, rendering things, modeling things, tweaking things, laying out pages; doing the things that designers do best.
However, I’m often asked to process hundreds of digital images taken for a project, and by “process,” I mean, put them into a format that the computer phobic can understand. Because labeling them in a folder designated for the project on a network-accessible drive would be the most convenient way for all involved, but my co-workers have adamantly refused to view photos on screen. Instead, they demand that all of them be printed, killing numerous trees, and wasting toner, so they can view them from comfort of their own desks.
Don’t get me wrong, I really enjoy the people that I work with, they are all very talented, nice individuals, and had the overall level of technical literacy been much higher, I would probably not have gotten the job. So, as ungrateful as I may seem, my overall attitude is as follows: technophobes; STAY IN YOUR CAVES. Those of us that can use computers are eternally grateful, although often annoyed with your likes.
A helpful trick for those of you who are not computer illiterate….
So, without further ado, I’m going to explain the processes I use to cut time on things that suck, so I can do things that don’t suck. One of the biggest helpers I have found is the automated functions and batch processing commands in Photoshop.
Have you ever wondered how to neatly consolidate more than one digital image onto a sheet so you can share them, look at them, or keep a record of them? If so, read on, if not, well, read it anyway, because I spent several hours of my life writing this, so the least you can do is indulge me. I’m
going to do this in step-by-step form so everyone can follow along…
So, you want to try your hand at automated Photoshop functions?
- Don’t even think about opening those 40 images you shot of your friends 21st birthday, and re-sizing each one to fit on an 8.5×11 sheet of paper. My absolute thanks to those of you who HAVE thought of doing this instead of printing each one out individually — go hug a tree.
- Put all your photo files into one folder somewhere. This can be within any drive on your computer. If you can’t get them into one folder, suck it up, and read your “Computers for Dummies” book to learn how to do so.
- Open Photoshop; yes, only Photoshop. You have it, you love it, now learn see what else it can do. If you have anything older than Photoshop 5—upgrade, because everyone else is two versions ahead of you anyway.
- Go to the file menu, and roll over the “Automate” menu. From there choose something with the words “Contact Sheet” in it. Depending on what release of Photoshop you have it may say other things too, but trust me, if it says those two magic words, you’re on the right
track. - From there you’ll get a menu that walks you through customizing your very own contact sheets. You can choose what paper size you’d like them on, how many images, per page, what resolution each image is, and what font you’d like the titles in. All of this stuff is up to you. Re-read the small rant about “computer artists” if you have trouble making decisions, and remember, the computer is your paintbrush.
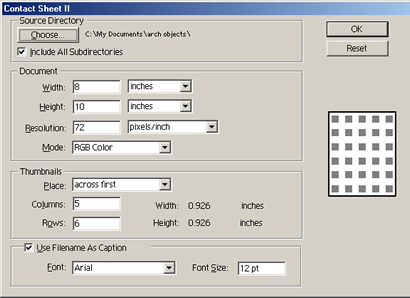 (The screen of options for the contact sheet command.)
 - After you’ve chosen what you’d like your contact sheet to look like, you need to choose a directory from which to create the thumbnails.
This is why we needed all of our photos in the same place. You do this by clicking on the “Choose” button in the open window. Then, browse to the folder where you’ve stashed your photographic goods.

