
Wordpress
Tutorial for setting up custom permalink structure in WordPress
Changing the permalink structure of my posts had been on my to do list for my WordPress based Rotheblog for quite some time, if not a month after I launched the redesign. I knew my apache server was configured with mod_rewrite available, so I didn’t have to worry about my server not supporting permalinking.
Short Sidebar
Don’t know if your server supports permalinks?
In your .htaccess file put this line of code;
RewriteEngine On
If the engine is not turned on, usually you will get a 505 error screen under certain configurations of Apache. If you don’t get an error, the engine is probably on.
I thought you might be able to figure this out by using phpinfo();, but that was the designer in me not understanding that that function is for php and you are looking for an apache config in httpd.conf.
I had tried setting permalinks up once before, updating my permalink structure in the admin control panel interface, but unsure what to do next as my website links were broken. I thought maybe I had to give my .htaccess certain permissions to allow the system to write the rules to it, but I didn’t make time to explore it in depth. WordPress should update that .htaccess file for you when you change the structure, but double check. Download the file yourself and look.
Turned out today, I tried again without exploring much more in depth, and got permalinking to work. I was nervous, not completely understanding the mod_rewrite engine, that any dynamic links pointing to my site would now be broken. But, the rewrite works on those links, no matter where they are.
Originally, my links were the default, and looked like this;
I added these rules to my Options > Permalinks > Custom Field
/%post_id%/%postname%
This will use the unique post id and then add it to the slug name of the post, which is dynamically generated from the title of the post. (Or it can be entered manually) My links will now look something like this;
www.rotheblog.com/1611/enabling-setup-permalinks-structure-wordpress
Then, all I did was download my empty .htaccess file from the server, and add these rules to it, and publish;
# BEGIN WordPress
RewriteEngine On
RewriteBase /
RewriteCond %{REQUEST_FILENAME} !-f
RewriteCond %{REQUEST_FILENAME} !-d
RewriteRule . /index.php [L]
# END WordPress
I found that these two sites were all I needed to setup my permalinking structure
Now, I can have those keyword rich search engine friendly link titles available to use to my advantage.
For those of you who zoned out in the first sentence and are asking, “How does this affect me?” It doesn’t. It just means that my blog should be a touch easier to find in Google now that the link structure isn’t a variable name anymore.
Questions? Having issues yourself on how to setup your own permalinking structure? Leave a comment and I will help you out as best I can. If I can do it, so can anyone else.
Moving a WordPress website
Wow, what a morning.
In a matter of minutes, I tried to do two things in WordPress, one upgrade and one switching of a site to a new folder and…I broke both sites.
I read the instructions in the codex for moving a website to a new folder. (Taken from the WordPress website –
http://codex.wordpress.org/Moving_WordPress)
Here are the step-by-step instructions:
- Create the new location using one of these two options:
- If you will be moving your WordPress core files to a new directory, create the new directory.
- If you want to move WordPress to your root directory, make sure all index.php, .htaccess, and other files that might be copied over are backed up and/or moved, and that the root directory is ready for the new WordPress files.
- Login to your blog.
- Go to the Administration > Options > General panel.
- In the box for WordPress address (URI): change the address to the new location of your main WordPress core files.
- In the box for Blog address (URI): change the address to the new location, which should match the WordPress address (URI).
- Click Update Options.
- Logout of your blog.
- (Do not try to open/view your blog now!)
- WordPress 2.0 only: Delete the folder wp-content/cache.
- Move your WordPress core files to the new location. This includes the files found within the original directory, such as http://example.com/wordpress, and all the sub-directories, to the new location.
Well, I followed the instructions. I applied changes and I got a 404 error page saying that wp-login.php didn’t exist.
So, I just figured that since the directory was pointing to a new place now, it wouldn’t be finding the files. But the instructions said nothing about a 404 error message that would give no indication of whether the changes were actually applied or not. Not to mention, the instructions didn’t remind you to make the directory and make a copy of the files first, before applying any changes. That was my mistake.
So, for an hour while I copied the files on the server, I had no idea if what I just did was going to work or not.
Forunately, it did. I felt better. But then, there was the upgrade on the other blog.
How do I get rid of / disable the sidebar in WordPress? Templates, of course.
This was the question I was grappling with yesterday. Since the site is database driven, how do you make one specific page act differently than the rest? I needed the whole width real estate on the church’s blog for a calendar, but I wanted the sidebar on every other page, just not that one.
Well, in most templating systems, you have different templates you apply to different pages. It just seemed to be downplayed when you are considering using Word Press as your CMS.
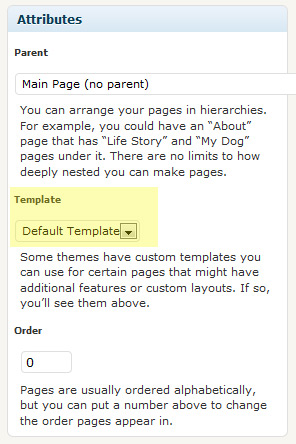
I happened to stumble across this option when searching for a solution. To assign a page a different template than the default, you look to the drop down menu called “Page Template” under Attributes that has a list of available templates. But how do you add templates to that list?
Well, you create a new file in your theme folder, name the file what you want, and include this comment designation at the top, inside PHP tags, so that WordPress parses it and knows that it should be used as a page template. (You may want to use the existing page template as a start);
/*
Template Name: (Name)
*/
Where (Name) is the name you enter that you want to use when choosing it as your option. Works like a charm. You may have to change some of your CSS to make the new page work if you have a sidebar in your other templates, but other than that it’s pretty simple. If you ftp your file to the server and you don’t see the new template in the menu, then check your PHP code formatting, WordPress obviously isn’t seeing it as a template file.
Upgrading Rotheblog to WordPress 2.3
Wow, what a crazy amount of trial and error, mostly because I forgot the “De-activate” plugins step.
So, I followed all of the backup processes but the plugins piece. I didn’t realize this until after I was thinking about what could be causing my problems.
Here the first post I piggy-backed onto which was a little off topic, pertaining to RC 1, and the post I started in the WordPress forums.
Needless to say, it got me more comfortable moving around in PHPMyAdmin, dropping tables, doing double installs of WordPress, exporting sql files and modifying them in PSPad (Preserving breaking spaces). I had found in comparisons of the base installs that some of the tables got removed completely in the new install, and new ones were added. Then I found out all about the totally new schema for WordPress on the back end, reading some posts.
You running plugins that might query THAT table? As Ryan Boren stated: “The big schema change is the dropping of the categories, post2cat, and link2cat changes in favor of the new terms, term_taxonomy, and term_relationship tables. Any plugin that queries against the old table will break horribly.”
I assume that the re-organization mostly has to do with speeding up WordPress 2.3 and supporting the new tagging feature in 2.3. I could read all about it in the changelog on the WordPress website I am sure, but I am not that hardcore yet and I may not completely grasp it anyway.
In the end, once I did things right, reuploaded what I had, going back to version 2.2 of WordPress, de-activating plugins and dropping and re-importing all of my tables I got up database update to work. I got rid of my “You don’t have permission to access page” error, I think I got that error because of a partially bad install, and things were back up and running.
I couldn’t tell you how exciting it was to have my data back up, and working. I was getting pretty scared there for a little bit with 1400 posts on the line.
Div tags disappearing in my WordPress Code View
I was having this issue, and I finally took the time to figure out why and what to do about it today. I searched the support forums and this is the post that I found that solved all of my problems.
Tiny MCE as configured in WordPress 2.1 wipes away divs and replaces them with p tags.
This can be fixed by doing the following:
1-Open your TinyMCE config file in an editor. The file is located at:
wp-includes/js/tinymce/tiny_mce_config.php2-Replace Line 25 with the following but on a single line:
$valid_elements = ‘#p[*],-div[*],-strong/-b[*],-em/-i[*],-font[*],-ul[*],-ol[*],-li[*],*[*]’;
3-Save the file back to your active WordPress installation, overwriting the existing tiny_mce_config.php file.
4-In WordPress admin, the editor will now allow divs.
You may have to refresh your editor page.
As always, copy your original tiny_mce_config.php file to a safe place for backup before editing the original.
I had noticed that any div’s I put in the code view of WordPress were converted to “p” tags. With this change I should be able to more easily add in my graphical movie reviews, the last major section of my blog left to transfer.
WP-Sticky Plugin for WordPress
This was the problem I was having. I couldn’t figure out how to keep certain posts at the top of a section of posts in a category. There were some categories that I had what I would consider an “introduction” that I wanted to always be on top. This kind of breaks the format of a blog, but this is how I like things.
I did some searching on category related plugins, but the wp-sticky plugin is really what I was looking for.
When you go to write a new post, on the right column of options, you will see a new section called “Post Sticky Status”. There are three options;
- Announcement
- Sticky
- Normal
This is what each of these options mean.
- “Normal” post is just what you write every day, it falls into the chronological order of your posts for that category.
- “Sticky” post is a post that will be on the top of your group of posts for that day, breaking the chronological order but not permanently. When you post tomorrow, that sticky post will be bumped down the page.
- “Announcement” post will permanently stay at the top of the page.
An announcement post is what I was looking for, something to break the chronological order and always be on top. But I like the option to sticky a post as well, to order a set of posts by day.
Great plugin for this need, easy to use. If you are looking for a WordPress plugin to change the order of your posts and always keep a post on top of a page, WP-Sticky is your plugin.
~Edit
After I wrote this post, I noticed that the “Announcement” option was also taking over the heirarchy of my posts on my homepage, not category specific. There is an option to set it to only categories though, here is what you do;
Options > Sticky
“Categories Only” = Yes
By default, “Categories Only” is set to “No”. Just set it to “Yes”, and you should be able to control the hierarchy only within categories.
Single and Double Quotes – Copy and Paste from Dreamweaver to WordPress
Last week when I was having the major issues with bad characters that was causing my server to overload, I guessed that it was because of corrupted characters.
But I know after tonight, it has to do with single and double quotes that I copied and pasted out of Dreamweaver.
The quotes aren’t the same in “Design” view as they are when you paste them into a “Write Post” textarea in WordPress. Now, you might be able to copy the HTML encoding for quotes, but this is not what I was doing.
So, want to max, overload, and crash your server with WordPress? Copy and paste out of Dreamweaver into WordPress. Even set on “Linux” characters translation, it doesn’t matter.
With so much copy and pasting, I will just have to watch it. But it truly is a smart idea to post into Notepad, or PSPad first out of any software, even one as robust and one you wouldn’t think would create bad characters like Dreamweaver.

