
Acquiring more pieces to the Mad Planets puzzle
I love getting packages in the mail, especially when you generally know when they’re coming but not when. We were away from home over the weekend, but when I got home there was a package sitting at home waiting for me with some more pieces for my Mad Planets, pieces I wasn’t sure I could get but then became available this week and now they’re in hand. (more…)
Screen printing / color seperations diagram of Defender marquee
After my post yesterday on “Artwork Bleed for Screen Printing Reproduction Arcade Artwork” I got some awesome feedback from industry experts like Rich at This Old Game, and Brian at Oleszak Creative. As I still grasp at understand some of the ideas in screening arcade game marquees, I thought it might be best to draw up a little illustration to show how I am picturing how a typical marquee would be printed in an exploded view.
Putting accuracy of the artwork found on Local Arcade aside (view my breakdown of the Midway Pac-man sideart artwork inaccuracies), I went out and grabbed the Defender marquee for demonstration purposes.
Defender marquee vector file at Local Arcade – (http://www.localarcade.com/arcade_art/r29.search.htm).
Assuming the colors in this file are correct, and taking each color of Defender marquee artwork and separating them into layers, I would have six layers total, a black, a blue, a yellow, and orange and a red.
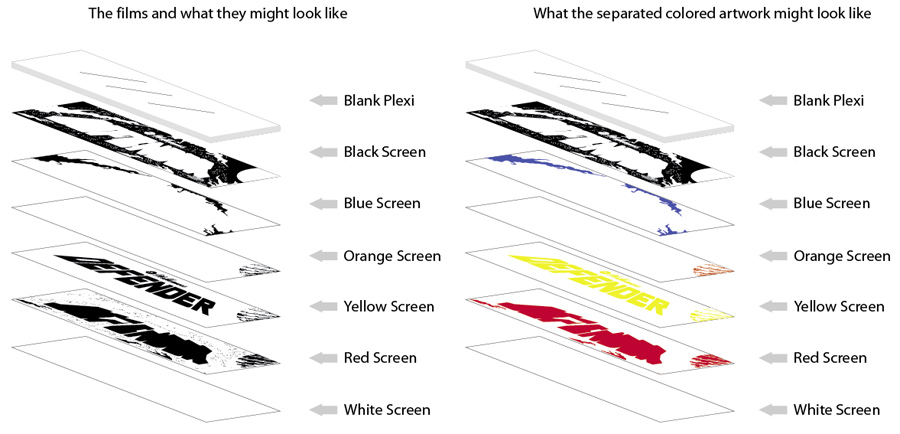
As you can see from the illustration above, this is my understanding and how I picture the screen printing order, with the black being printed first (to trap all of the other colors below it, and to hide the bleed) , the blue second, the orange third, the yellow fourth and the finally the red with a white sealing coat over the back. In the illustration, I have shown the Defender artwork in a fashion so you would be able to recognize it, but in reality, the films would be printed in reverse, and if you looked straight down at the marquee, you would also see the printing in reverse. In fact, the Defender marquee artwork might looks something like this;

Plus, this isn’t a really good illustration to show bleed amounts, but I wanted to check to make sure I had the bigger screen printing concepts correct. (I don’t know the detailed history of my games enough to know if the Williams Defender marquee was on glass, or plexi. Probably glass.)
Some good resources that are written simply and helped me get a better understanding on this topic.
- eHow : How to Design a Multiple-Color Stencil for Silk Screen Printing
- YouTube – Screen printing multiple color print video 1
- YouTube – Screen printing multiple color print video 2
Worth a note, I am not starting from scratch on my experience and knowledge base on this topic. I silk screened a couple of shirts way back in 8th grade. How much that counts, not a lot. But it does give me some familiarity with inks, and frames for the screens. But we never “burned” our films, and we never messed with more than one color or registration. These are the areas where I am shaky. A quick (10 minute) search didn’t bring up any visual tutorials on bleeds in screen printing. I didn’t think there would be resources specifically for arcade reproduction artwork screen printing, but thought there would be something else. I must not have searched with the right terms.
So, I need feedback. Is my thinking wrong? Is there a white sealing layer, and what is that actually called? Do you have any good links, or even better yet, and great visual image based tutorials on screen printing that focus specifically on multiple colors, registrations, and bleeds? Leave a comment.
Want a copy of the Illustrator (CS) file I worked on above? Download it here (.zip – 2MB). Edit it and send it back to me if you want, show me where I am wrong. (I just whipped this up quickly, not wanting to spend hours doing accurate separations for artwork I never intended to have printed, so remember this file is for illustrative purposes to help me understand screen printing and films.)
Standing Sega Pengo Marquee
Since 2005, there has been a vector file version of the standing Sega Pengo marquee on Arcade Art Library (localarcade.com). The author is “rockworm”, and I don’t recognize that name on any other forum. Right away, I question the accuracy of the file. “Rockworm” hasn’t added another file over the last two years, so it is hard to know if he just printed out a copy on an inkjet and therefore the Pengo artwork didn’t have to be exact, or what the final use was. So before I assumed I could use the artwork in my Pengo reproductions, I decided that I should do some close up comparisons of the Pengo artwork to the original marquee scan. Here is what I found;
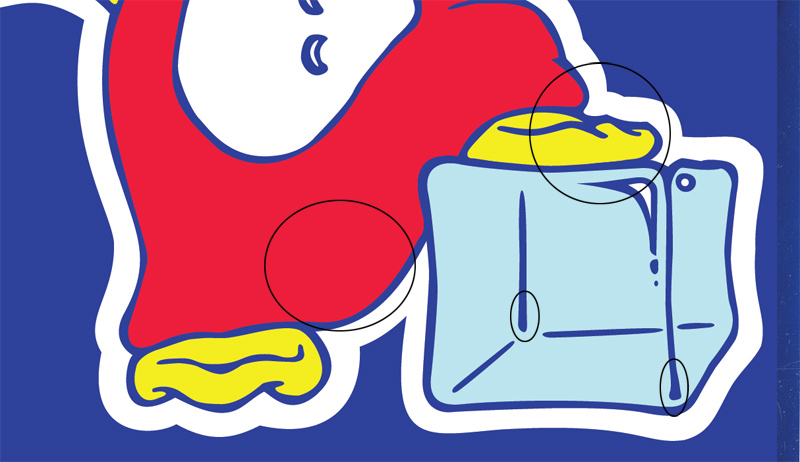
You can see some differences in the line shapes in the Pengo marquee vector drawing detail (first image) vs. the Pengo marquee scan. Some lines have been smoothed out and some angles aren’t the same. And let’s not forget, the most important idea is the attention to detail. If you look closely, there is a piece missing completely. What else is wrong with this vector Pengo marquee file? It is hard to trust the integrity when there are pieces of the Pengo artwork missing. The accuracy is close, don’t get me wrong, but it isn’t perfect.
So, at the very least, I have already redrawn the standing Pengo character on this marquee. I will check the lettering for accuracy, maybe I can reuse that artwork. I will post progress hopefully in the next day or two since the Pengo bezel is complete.
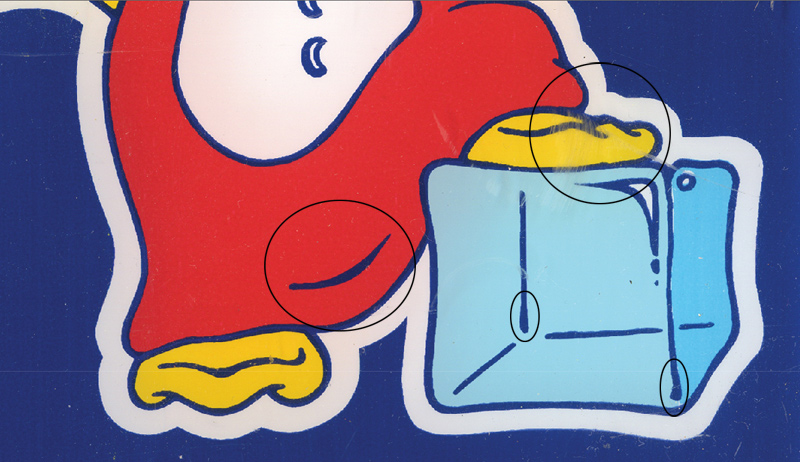
Back to the shapes of the original lines. When I think about restoring this old artwork, I try to think about the original process the art director at Sega would have gone through. To make this artwork into a screen to print onto different materials he would have had to have drawn it, and then transferred it to film. In my mind, the original Pengo artwork shouldn’t have the most crisp lines, there would be some variances in line thickness because it was a hand drawn line, not computer generated. So, when looking at a small zoomed in portion of the original Arcade Art Library artwork;

I see the vector lines resolved and reduced. The accuracy of the original Pengo shapes is off, and even though the details will be so small when printed only a true expert would know the difference, I like to detail it out here because these Pengo reproductions are for everyone, not just me. Not to mention, some portions look like they could have been run through an auto trace function because of how sharp some of the edges are.
Here is that same portion that I redrew. Note that the detail here is the side of the ice block Pengo is resting on, and in my drawing the side is a darker blue just like the original artwork. The file on AAL doesn’t have this.

When looking at the original artwork, I don’t trace every jagged edge, I make a judgement call. If the Pengo artwork seems like it should have a smooth line, then I add it in, but sometimes, the bumpiness of the line is what makes the artwork more authentic in my mind.
Agree? Know a little bit more about the original game manufacturer’s art making process? Know who “rockworm” is? Leave a comment and give us your insights.
Jr. Pac-man vector marquee progress
Taken me longer than I thought, but I got through another vector piece of the oversize Jr. Pac-man marquee. I was going to go to the billboard behind Jr. Pac, but decided to Jr. himself.
The next piece of the vectorization process for the Jr. Pac-man marquee header will probably be the lamps, or something simple, like the blue ghost. The detail on Jr. was about what I figured, it wasn’t a breeze, but it wasn’t too hard to trace the lines either. It just took time.
I still hope to be the one person to have a whole set of artwork and produce it as a Jr. Pac-man kit to make your own machine, specifically for converting a Mappy into a Jr. Pac-man. But only time will tell.
Jr. Pac-man marquee vectoring started!
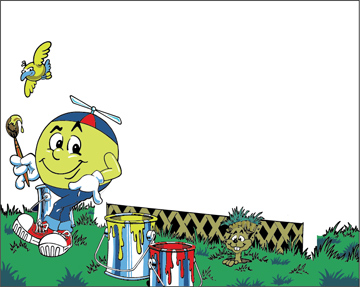
The Jr. Pac-man marquee is much more than started, I am about three days worth of work in (Visit KLOV for my forum topic). I did the little ground hog first with the bird, then the paint cans and then the grass. I feel like I have done some of the more complicated stuff on the marquee first, or at least I hope so. This Jr. Pac-man piece of vector artwork has been a lot of work so far.
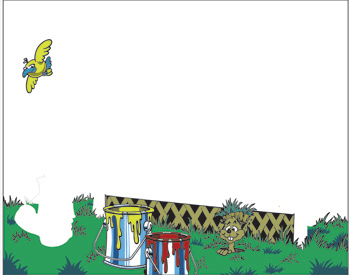
(This is the oversize marquee for the original game, like I have, not the condensed version that was in the conversion kits.)
The parts that have been a challenge so far has been, the color variations in the grass and the faded red on the paint bucket. My red was so faded that I could barely seen the manilla color differentiations on the white can. I did a best guess for now, and will check my work later. It is easy enough to change in this format.
I hope to do a little more later this week, but we’ll see. The end of the week is shaping up to be busy for a change.
Jr. Pac-man Marquee Finished Scanning
I got my new Epson scanner (birthday present) last night, so I finished scanning in the Jr. Pac-man oversize marquee to start vectoring. I was missing a slice down the middle where my makeshift printer scanner was not cutting it.
The Jr. Pac-man marquee has pretty complex artwork, I realized last night. Lots of detail and it will take a lot of work. My scan of the marquee artwork is decent, but not great. I hope that the vector artwork turns out better than the scan looks. The Jr. Pac-man marquee scan doesn’t even look good enough to post a copy of it here.
Started scanning Jr. Pac-man marquee
I got my Jr. Pac-man game last week Thursday, and while I am waiting to pay and complete my transaction, I thought I would take the time to start scanning the marquee.
My scanner took a crap, so I had to scan the pieces of the Jr. Pac-man marquee that I could with the printer / scanner combo that a friend just gave us. But because of the control panel, I can’t scan all of the oversize marquee flat, so I will have to wait to get the middle sections scanned meaning I will have to wait to start the artwork vectorizing process.

