
Visual definition of ‘bleeds’ – arcade artwork
A handful of arcade game collectors possess some graphic design knowledge and understand the basic theory of reproducing cabinet artwork; scan the artwork, stitch it in Photoshop, and then trace the vector lines and shapes in Illustrator. But not too many know about one of the most important details of reproduction artwork preparation – including the step to add bleeds to your shapes to compensate for small shifts in registration. Don’t understand how bleeds work? That is what we’re going to illustrate in this post.
I should make a short note first. You will only use bleeds if you are having screen prints made of your reproduction artwork. If you are planning on having inkjet or offset full color process prints made of your artwork, then you don’t need to add bleeds to your vector artwork. Those two process are a composite, and will make your printing process more simple, albeit less authentic.
Take a closeup look at most classic arcade game artwork
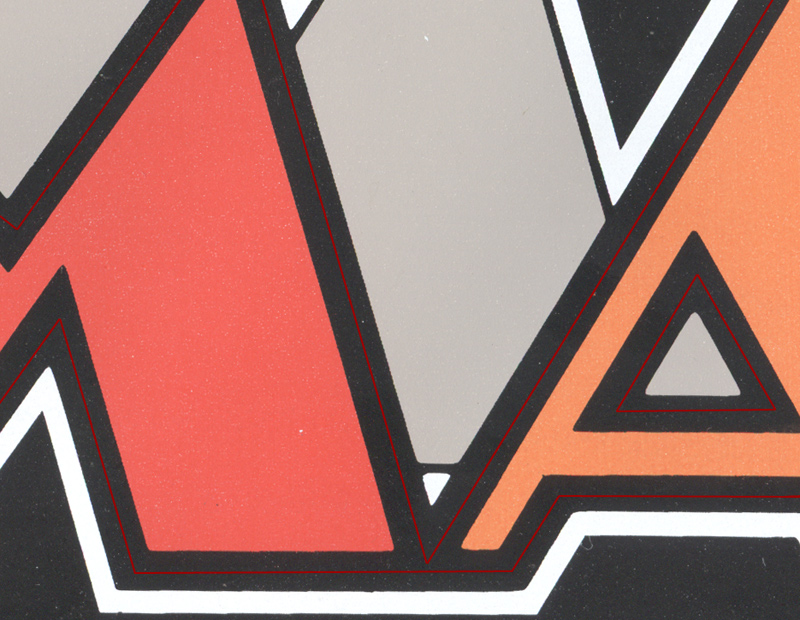
If you get really close to your arcade cabinet artwork you’ll see how the original game manufacturer produced artwork. For this illustration I am going to use a small piece that I scanned from my newly acquired Mappy cocktail underlay artwork.
It might be hard to see in the scan of the underlay, but if you look close you can see a faint grey line / ridge right in the middle of the thick black lines.

If you can’t see that ridge, I have taken the liberty to draw a red line showing the location of that ridge. This ridge is the bleed, in this case, it’s where the orange stop underneath the black and goes right to the center of the black line. In person it is very easy to see, and you can even slightly feel the bleed on this particular piece of Mappy artwork. Click the photo for a larger view and then you can quickly click ‘Next’ and ‘Previous’ to easily see the bleed ridge.
What is the purpose of adding a bleed?
Registration, my good lad. Here’s the general idea of registration taken from Wikipedia;
When printing an image that has more than one color, depending on the method of printing, it is necessary to print the image one separate time for each separate color. Each one is called a “color run,” and they can be pulled from the same surface, inked differently, or from a completely different surface. So that the final image is consistent, and so each of the colors line up correctly, a system of registration is necessary. Different printing devices have different methods of creating separate color runs.
This system of registration is needed, and bleeds are just a piece of that process. You wouldn’t want spaces between your black and red when there shouldn’t be, would you? Well, maybe you wouldn’t care about a touch of sloppy joe artwork and strange alignment if you were Stern 😉
If you know Illustrator, you can think of a bleed being a simple shape that is a little bit bigger than the original. A standard added bleed is anywhere from 1/16″ of an inch to as big as 1/4″, but the latter is not as common and rarely goes larger than that when printing arcade artwork. It really depends on whether there are fine details or not. By adding this extra space, you won’t have to worry about another color showing through because the color will overlap the backside of the previous color.
Still confused? It’s hard to explain, but here’s a registration illustration.
In this image you can see a faint blue outline with tiny dots (control points for changing the shape) all over it. This is a path in Illustrator, and right now is it ‘selected’, ready to be edited by a designer.

If you look closely, you can see that the blue of the Jr. Pac-man bird beak looks bigger than what is actually showing. This is because that blue shape is behind the black layer and has a 1/8″ bleed added to it. In this instance, we don’t want white showing through or any other subsequent color printed behind the bird.
This is what a slight mis-registration in colors might look like if you don’t add a bleed.

You see a faint white outline where the yellow is down too far. This is a tiny mis-registration that unless it was a blown up view like the image above, you might not even notice it. You would be able to see the mis-registration even more with a darker color. How about the same artwork, with a touch more mis-registration, but this time the Jr. Pac-man bird is red.

Slight variances in mis-registration are common. Remember, we’re talking about 1/16th to 1/32nd of a mis-registration, a pretty tiny measurement. A printer is only human, and that is why he compensates with a bleed.
I still don’t understand bleeds and printing registration
How about one more example. In this closeup of the bird’s beak, I set the black outline to be slightly transparent, about 85%.

You can now see the edge of the blue and the yellow (selected) and how the black overlaps these colors. This is why you might see a tiny ridge because the ink is doubly thick in the portion where the black is laid over the other color.
This is just a short intro to bleeds on screen printed arcade artwork
If you want to know more about how the different colors are printed and laid out on a piece of material, check out my post on ‘Screen printing / color seperations diagram of Defender marquee’. This will give you a visual stacking diagram of printing for an arcade marquee.
Want to do the bleeds for your arcade artwork yourself but aren’t sure how in Illustrator? I plan to go over a ‘bleed howto’ in more detail in a later tutorial, but the basic concepts are the same as my ‘Make a classic arcade logo in 5 minutes‘ tutorial. You’ll be using ‘Offset Path’ to add the bleed and ‘Send to Back’ for the stacking order of your separated artwork (black on top of blue, on top of red, etc etc. – also depending on mixing of two colors to get another)
Thoughts? Questions?
Did I leave anything out concerning screen printing that may be over simplified or not included at all? Curious how to do this in another piece of software like Freehand, Corel, or GIMP? Leave me a comment.
Here are some similar arcade posts
- Artwork Bleed for Screen Printing Reproduction Arcade Artwork
- Screen printing / color seperations diagram of Defender marquee
- Dig Dug Cabaret Control Panel Overlay Artwork
- Pengo Control Panel Color Separations
- Progress on Bump N Jump Control Panel Overlays at This Old Game
If you enjoyed this post, please consider to leave a comment or subscribe to the feed and get future articles delivered to your feed reader.


Comments
Leave a comment
Your email address is never displayed and cannot be spammed. If your comments are excessively self-promotional you will be banned from commenting. Read our comment privacy policy.
Pingbacks / Trackbacks
pac man game original
Pingback on May 18, 2008above the line definition
Pingback on May 18, 2008Thick Black Theory. | 7Wins.eu
Pingback on June 14, 2009xulfiqar | Pearltrees
Pingback on March 29, 2012