
Scanning Arcade Game Sideart
For all of the great arcade websites that exist for collectors to interact and collaborate, I have not come across many articles that I would consider a “primer” series stepping a potential future collector through the process of having arcade artwork reproduced. There are a lot of small nuances and skills that go into a run of reproduction artwork and we are going to try to cover all of the main points in this series.
Part 1: Scanning Arcade Game Sideart
Here are the topics we are going to cover concerning scanning;
- How to scan your arcade cabinet
- Why even scan your arcade sideart?
- What is the best resolution for scanning arcade sideart?
- What file format should I use for my scanned artwork?
- How long will it take to scan cabinet artwork?
- Final related artwork tips
This is part of an article series that we are calling Arcade Artwork: From Screen to Screen. Keep following Rotheblog as we walk you through all of the pieces of having a piece of arcade artwork reproduced.
Did you read the other Arcade Reproduction articles?
No? Well you might want to check out the arcade artwork parts you missed.
- Primer 1: Researching past arcade reproductions
- Primer 2: Getting committed buying collectors for your reproduction project
- Part 1: Scanning Arcade Game Sideart Upright
- Part 2: Scanning Arcade Game Sideart Laying Flat (Coming Soon)
- Part 3: Stitching Scanned Arcade Artwork in Photoshop (Coming Soon)
- Part 4: Sizing Your Arcade Artwork Scan
This tutorial was originally written and published by Zorg over at a French gaming community called Gamoover.net.
I have polished this translation of the cabinet scanning tutorial from the attempted French to English translation from Google. If you see any errors you would like corrected, please drop me a line.
I thought it was crucial to incorporate this tutorial into our Computer Screen to Silk Screen article series. Zorg’s tutorial is great for those of you with limited space for moving your arcade games but I will still be writing another article with photos showing a more simplified process of scanning your arcade game artwork. For my tutorial I am going to assume that you can lay your games flat, which will make the whole scanning process even easier.
How to scan your arcade cabinet
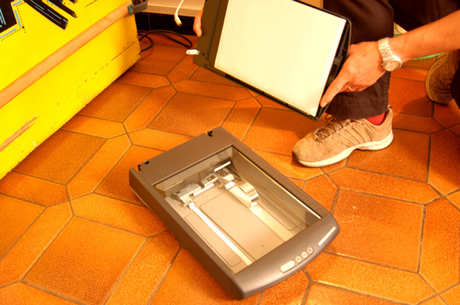
There are several possible solutions to scan arcade game sideart. The easiest solution is to tip your arcade game cabinet flat on its side and use a flatbed scanner to scan the artwork in segments.
However, this is not always possible for various reasons such as;
- Lack of space to lay the arcade cabinet flat
- Collectors have concerns about damaging beautiful existing side artwork or worse
- The scanner you own doesn’t work flipped over
- Many other unforeseen reasons why someone wouldn’t want to lay the arcade game on its side
- A scanner capable of operating upside down (Make sure to get a fast scanner because it may operate slower when flipped over and scanning your arcade cabinet can take a lot of time)
The important part is whether or not you can completely remove the hood of the scanner that normally covers the bed. If you can’t easily remove the hood from your scanner, try a hacksaw;)
Disclaimer: The editor of this tutorial cannot be held responsible for damage to your scanner in the very unlikely event that you actually followed the advice to cut off the hood with a hacksaw.
- You will also need a 4×3 dowl or a ruler, or any other object that is long enough that it will stretch over both sides of your cabinet. Usually an object 40 inches long is quite sufficient.
- You will need some spring pliers, clamps, or a strap to hold the dowel on the cabinet.
- A computer (ideally a notebook)
- You will also ned the cable connections and power cords (preferably extended cables if you are working in a remote area. There isn’t anything more frustrating then to get setup and realize that the cable doesn’t reach)
- A large bungee cord, large enough to hang over the sides and bottom of the cabinet.
- Oh, and don’t forget a beverage cooler, some music and other things of solace
Equipment needed:
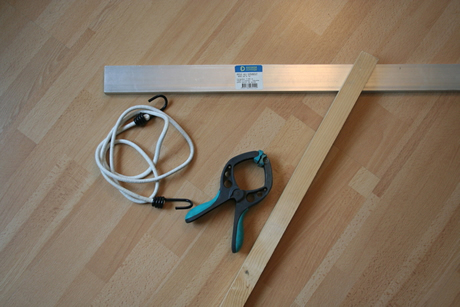
Here is the minimum equipment you need for this tutorial (see supporting photos above);
Not necessary equipment, but it makes life easier
Why even scan your arcade sideart?
You ask, why would I even bother scanning my cabinet artwork? Before you start scanning, here are some reasons why you might want to venture down the arcade artwork reproduction path;
- Your arcade cabinet has heavily worn sides, scratches, gouges and you would like to restore the sides altogether by running off some repro sideart from your stitched together scans.
- Your arcade game machine is already minty, so much so that the light from heaven shines upon it, but your friend is not so lucky and has the same arcade cabinet that you do but the sides are devastated. You say, “Well, that sucks for him”. Definitely not. You propose to do scans of your artwork to help him restore his cabinet to its former glory. (Don’t worry, yours will still be the better of the pair)
- You think that you will to make some easy pocket money while selling some reproduction artwork (Think twice about this reason, the reproduction process is a major undertaking, the potential buyers are far and few between and those collectors are particularly demanding about the details and quality)
- You are like the author of this article :), a bit utopian, and you think that any artwork scanned is a saved artwork for the future and will one day serve a purpose to someone else.
What is the best resolution for scanning arcade sideart?
I would say that it depends on the type of arcade artwork that you want to scan and what you want to do with said art. A piece of artwork that is simple in nature, composed of only a few colors, you would want to scan at 300 DPI. For a piece of true artwork that is hyper complex, full of color and shading – more along the lines of an illustration – you will want to use 400 or 660 DPI.
Basically, as a general rule of thumb, you never want to scan artwork below 300-400 DPI. This amount of resolution will make large files and can be difficult to work with without a good computer. But as technology keeps advancing, working with these scans becomes less and less problematic. Moreover, remember that you will be sending these files on some sort of disc, either a CD or DVD. It is a lot easier to just burn a disc and bring it to the printer than take the tremendous amount of time to upload and host the file online, only to have the printer take his time to download it again. There is no urgency in reproducing the artwork, so why even host the huge sideart file online?
What file format should I use for my scanned artwork?
These are formats that I recommend to use for your saved scans; PNG, TIFF, and Photoshop (PSD) For pity’s sake, no JPG!
My favorite format, and the one I prefer is PNG which is a format that supports a good compression without loss.
To color correct or not to color correct
I would not trust the built in color correction utilities with the scanning software, it’s hard to know what is going on in the background or how the software is choosing what to correct. Just turn color correction off when scanning. You can use PMS color chip books to do color matching and correction.
How long will it take to scan cabinet artwork?
Frankly, scanning a full side of a cabinet takes a very long time.
Here is a quick calculation to estimate the minimum scanning time. On average, an arcade game is 30 – 36 in. deep, by 72 in. tall. A scan using a standard 8.5 x 11 scanner bed (A4) (an actual area of about 8 inches by 10.5 inches) will take at least three scans to cover the depth (left to right) of the cabinet.
To calculate the total amount of scans, take the 72 inches, divide it by 8 inches tall, multiply by 3 for each 8 inch pass and you have a total of 27 scans. So, rounding up for re-scans, differences in cabinet sizes and other unforeseen troubles (maybe this is your first try, you won’t be perfect) you can count on about 30 artwork scans. You now need to take 30 scans times the amount of time it takes to make one scan.
Finally, don’t forget the time you will need to adjust the dowel, the cords and other setup.
So basically, do not start scanning a piece of arcade cabinet artwork right before you have to go off for a really important meeting with your friend Robert. Expect to set aside a couple of hours of un-interrupted time to scan one side of your arcade game.
One encouraging thing is that you don’t have to scan the cabinet artwork in one setting. Just leave the dowel in place to mark your place so that you can come back to finish the scanning later.
Let’s get start scanning that game!
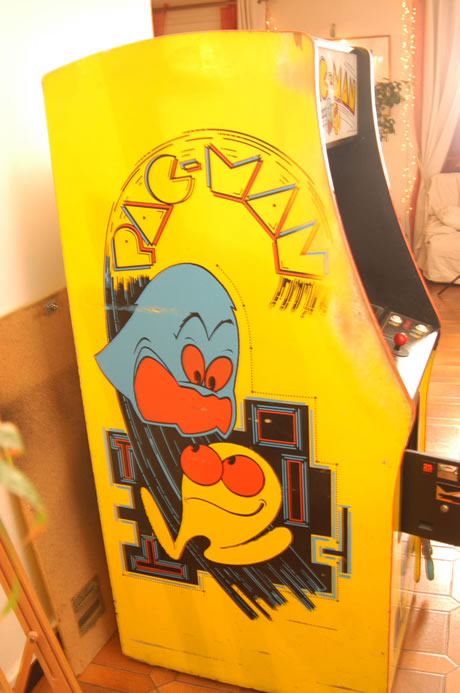
Now that we have reviewed all of the considerations prior to scanning, we are still crazy enough to take on this project. For this tutorial, we have chosen to scan a true classic – Pac-man.
The victim 😉
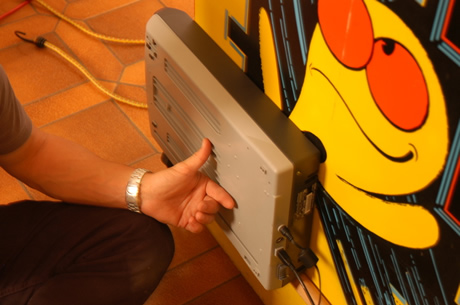
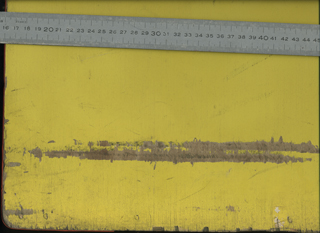
Here is an easy way to have scanned artwork that will include the edges of the cabinet. Put the scanner on the side and use your finger to be be sure that the scanner is set up few millimeters from the edge, this way you are sure to include the edge of the cab. Looks really scientific doesn’t it?
Here are some screenshots of the details for your scan, your resolution and other miscellaneous settings. (Click the scanner settings photo for a larger version)

Make sure you properly choose your settings and position for your first scan using the preview function if necessary. Once you scan the first piece, the first thing you want to do is save the scan (you’re never safe from a crash, so don’t leave the scan unsaved because you will loose the scan and your hard work). You will find that you will have and want a certain area of overlap between the previous scan and your new scan. This will help you later for alignment.
After you get four sections or so scanned, don’t forget to check the quality. It’s simple, reduce the display size of your images and superimpose them. This gives you a visual example of what I am talking about.
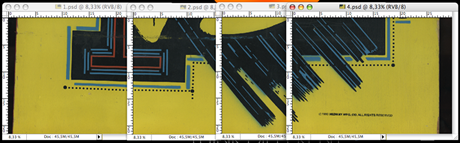
Here I made one 8 inch ‘slice’ of the cabinet artwork – 4 scans.
The edge of the cabinet is really important, so make sure to hang your scanner over the back of the cabinet. The edge gives you a straight line in your artwork to help position and overlay all of the artwork.

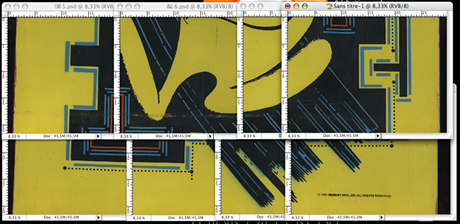
Repeat the process of scanning, moving up to the next section of sideart. You will now have something like this;
We are now going to start incorporating the equipment mentioned previously.
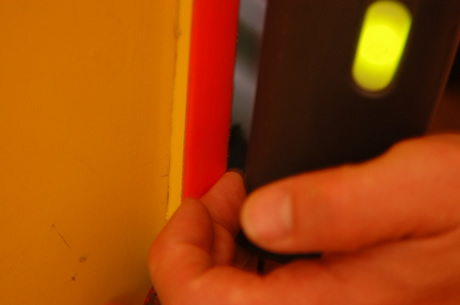
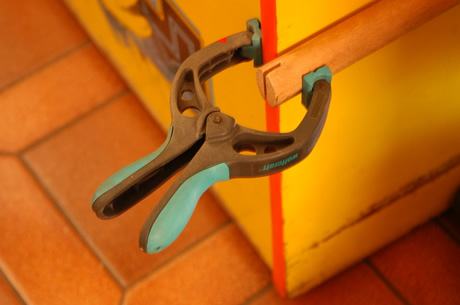
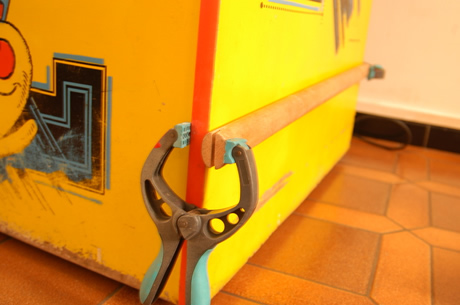
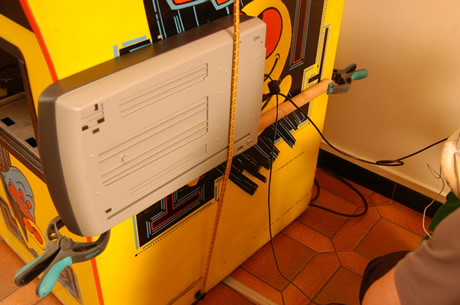
To make your life easier, and not have to keep hand scanning through the duration of the project, we are going to affix a dowel to the side of the cabinet about a foot off the base of the machine. (A foot is specific to Pac-man because the artwork starts about a foot off the ground. Results may vary if you are scanning an Atari machine with full length cabinet artwork – edge to edge) Fix the dowel to the sides of the cabinet using the clamps, using the opened up back and the front edge on this Pac-man cabinet to secure the clamps.
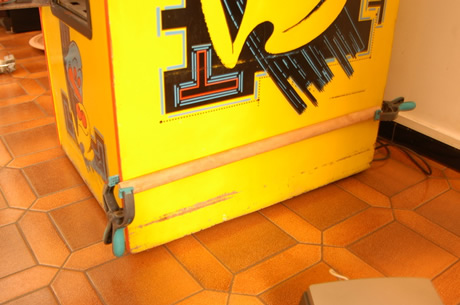
I recommend using plastic clamps with the padded grips. They are easier and faster to change, and unlike most metal clamps, you won’t damage and dent your cabinet.
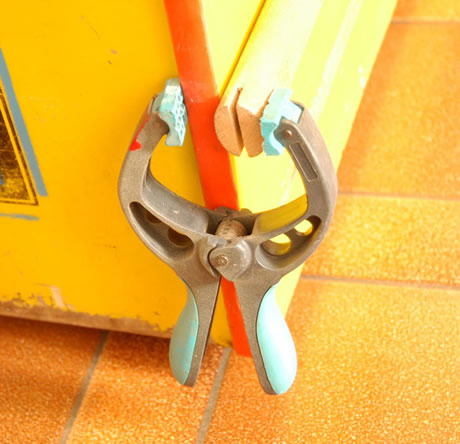
A couple of close up shots on clamping.
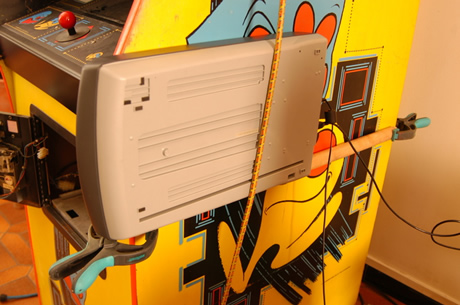
If you don’t have a Pac-man cabinet, and cannot easily clamp the backside of the dowel onto the cabinet, there is an alternative to using the dowels. Use your bungee cords, wrap them around the cabinet horizontally and this will help secure your scanner as you slide it around, left to right and up and down.
Each time you scan a ‘slice’ of the cabinet, move the dowel up 6.5 inches. Why 6.5 inches and not 8 inches? Because, again, you want some overlay to help align your scans.
Scanning arcade artwork is a lot of work
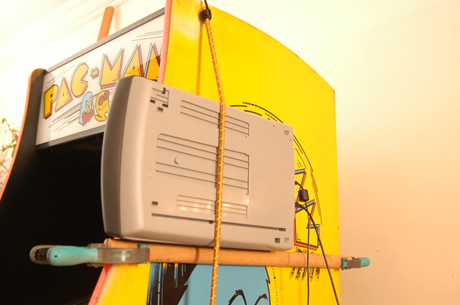
I know some of your are thinking, “I can’t balance my scanner on a 3 inch dowel, or the thickest dowel for that matter. This doesn’t really help me automate the process.” Well, I will break down your options again for scanning the arcade artwork with corresponding photos below;
- The basic method where you use the dowel to balance the scanner and move and hold the scanner by hand.
- You can find a friend that will help you move the scanner around and manipulate your equipment, saving some time.
- You can use your bungee cords, tie them around the height of the cabinet to secure the scanner against the side of the cabinet.
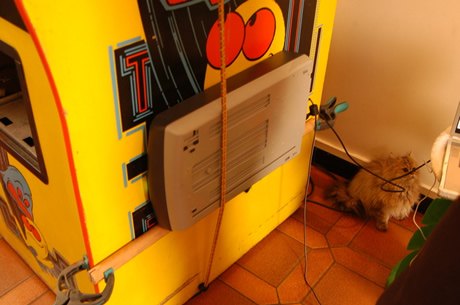
Each person will choose the cabinet scanning technique that suits them best, personally I choose the method of the bungee cord tied down as you see:)
Worth mentioning although obvious, you understand that at the end of each ‘slice’ of the cabinet artwork, you will have to go back and adjust the dowel. Here are some more photos showing that step from different angles and as I move upwards on the cabinet.
In the end, you’ll have accumulated a number of scans which will allow you to rebuild the artwork digitally in a mosaic form. It will look something like this.
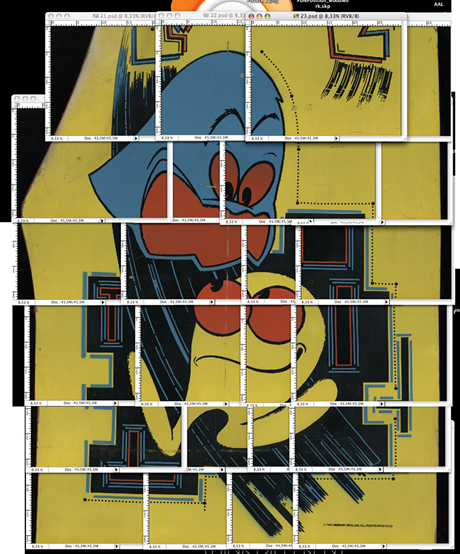
The assembly of all of these artwork scans (commonly called stitching) will be another tutorial. You will also need to possess some general knowledge of Photoshop if you are going to print directly from your scans instead of vectorizing the artwork first.
To finish up with your scanning project, don’t forget to take measurements of your cabinet (height, width) so that you can verify that when you do assemble your final piece of artwork that the scan is the correct dimensions.
Final related artwork tips
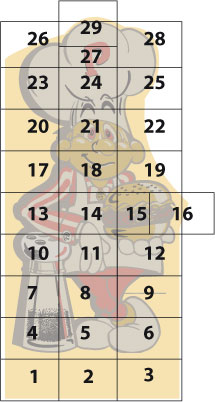
You can lightly draw one foot squares all over your cabinet using pencil (don’t worry, it comes off easily with a soapy sponge) to help you re-assemble your scans. If you use this process, it helps you choose your naming strategy.
Give each of the squares coordinates and name your scanned artwork files accordingly. It’s logical and simplifies your process of assembly, and should help remove potential errors.
If you are lucky that the sideart is symmetrical, you can just flip your scan. Otherwise, you will need to scan the other side.
That’s it. Scanning the artwork on an arcade game cabinet is hard work, but the more scanning we all do, the more we can bring back life to these games, preserve and bring them back to their original condition, and make reproductions available to everyone.
Here are some similar arcade posts
- Short update on the Cheyenne artwork project
- Started scanning Jr. Pac-man marquee
- Scans of Ms. Pac-man Sideart
- Star Castle Sideart Started
- Sizing Your Arcade Artwork Scan
If you enjoyed this post, please consider to leave a comment or subscribe to the feed and get future articles delivered to your feed reader.
Comments
Ryan,
I translated this tutorial from Eric D. over in France, he had done this writeup and let me publish it with permission. Since I haven’t done this myself, I can’t recommend areas to remedy it specifically with this arcade cabinet scanning technique.
I think he wrote it with the intention that, if you don’t have room or a soft safe area to lay an arcade game cabinet on it’s side, this is a solution. Plus, apparently some scanners don’t like being upside down.
I personally like to lay my cabinets on their side and scan artwork that way. As for fuzziness, on my original scanner before it died (after I did some cabinet scanning which the upside down thing might have broke it) I haven’t had any issues with my new scanner which is an Epson V200 photo.
What a comment!! Very informative… Looking for more posts like this!! Keep you the goodwork!
Anyway thank you for this info.
Jeff –
Thanks so much for all of these tutorials. I am a graphic design student who has been commissioned to restore some vintage arcade graphics for a collector. Is it a terrible crime to work from a photo or do you highly recommend finding myself one of these scanners?
Thanks!
Bre
Leave a comment
Your email address is never displayed and cannot be spammed. If your comments are excessively self-promotional you will be banned from commenting. Read our comment privacy policy.


March 26, 2009
Thanks for the tutorial Jeff! I tried this with my scanner but the artwork came out slightly fuzzy .. I am assuming this is because of the very slight gap between the glass and the plastic. Did you run into this problem? If so, is there anything special you did to remedy it? What model scanner are you using? I am trying to scan Cheyenne side art. Cheers, Ryan