
Agent X
Slow and steady builds the bomb factory
What do the first Transformers movie, a 2,100 year old melon, and Daimler minus Chrysler all have in common with a certain game named Agent X? They all happened, or started, in 2007. Sometimes, the best things are worth waiting for – let’s hope that is the case with this reproduction artwork. Today, we finally have a progress update. (more…)
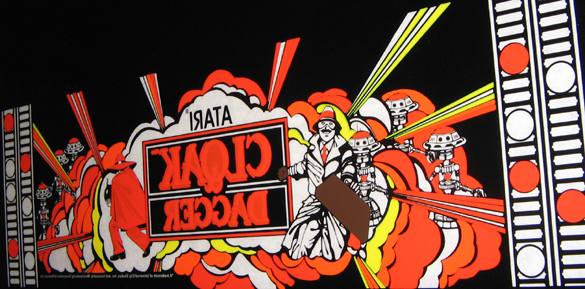
Agent X / Cloak & Dagger Kickplate Artwork Film Updates
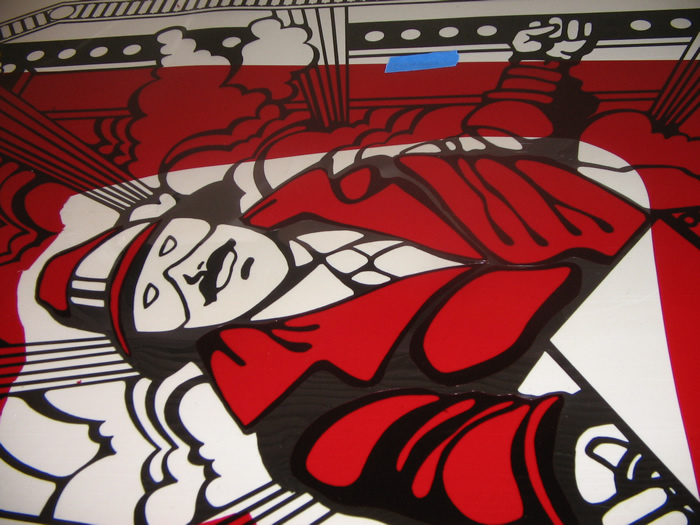
Got a nice surprise sitting in my email when I got in last night to check. Rich just got the films back for the Agent X kickplate artwork for the complete package he is printing for Rick Ford. It was tremendous to see a final printed piece of arcade artwork in the Professor Pacman control panels, but to see this artwork is even more exciting.
Agent X Color Screens
This week, Rich at This Old Game gave me a few moments of his time and sent me some photos of the screen printing process of the in progress Atari Agent X sideart. A short history here, back in September of 2007, This Old Game announced that they would be producing a full kit of artwork including cabinet plans to build authentic artwork covered Atari Agent X cabinets. Well known arcade enthusiast Rick Ford was the catalyst, wanting a cabinet for himself, and making arrangements with both Scott Evans to get the original Atari films and me to remake the kickplate as a vector artwork file.
Fast forward to today, February 2008. Rich is in the process of printing the sideart, paying close attention to costing. Side art is challenging to reproduce and still be competitive in the small industry that is the arcade reproduction artwork business. There are a number of reasons why reproduction artwork is costly, mostly dealing with demand in relation to cost of production and cost of technology to print oversize films.
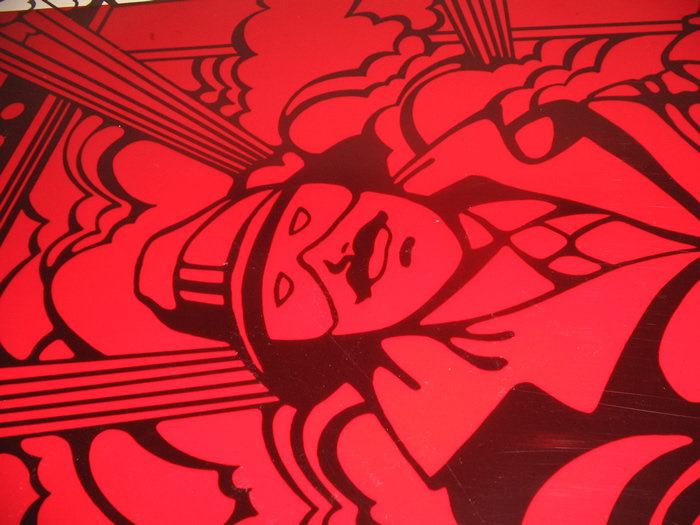
Here we see a couple of photos of the detailed Agent X side artwork. (Click on the photos for larger views)
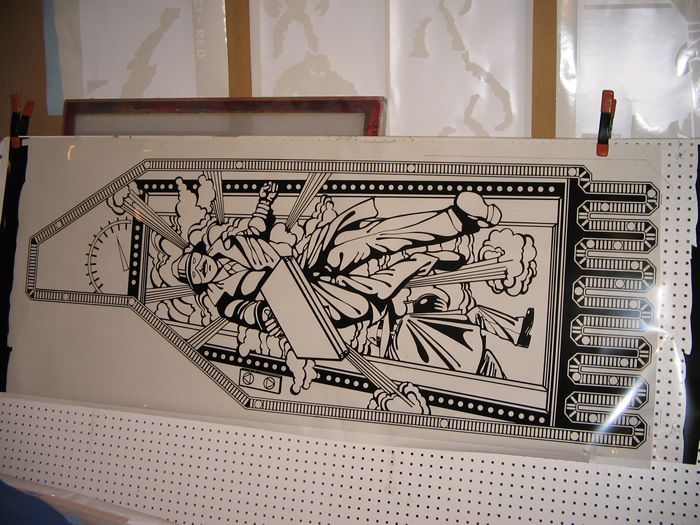
The first is a photo of the Agent X sideart film from Scott Evans, you can see the blacks look like they are printed on a clear acetate. This negative image film will be used to burn screens to print the different colors. Now, keep in mind, there are six colors in total (green, orange, blue, yellow, grey & of course black) that would be printed on a white vinyl. The films here are scaled down to 11 x 17, effectively one fourth the actual size. They will then be blown up to full size sideart at a height of six feet.
Each of the five Agent X films would have cost at least $100 to burn at those dimensions, not to mention, there are some discrepancies between the original film and the final artwork that was printed on the limited existing Agent X machines. Here is a PDF demonstrating some of those inconsistencies in color, and here is the topic on Klov with some of the members talking about whether to leave the film original or correct the color errors. The final machines indicated that Atari would have had made adjustments to the film to change the colors midway through production.
In an effort to keep the artwork more affordable, the two Rich’s decided to not burn individual films and instead implement some masking with Rubylith. What is Rubylith you ask? Well, I actually asked that myself.
Rubylith was started originally as a brand of masking film, invented and trademarked by Ulano Corporation. But over time the brand became so generalized it became synonymous with masking, much like Kleenex are to tissues. Here is how Wikipedia explains Rubylith;
Rubylith consists of two films sandwiched together. The bottom layer is a clear polyester backing sheet. The top layer is a translucent, red coloured, self adhesive, emulsion. It is designed to be both easy to cut with a knife and light safe for use with orthochromatic films.
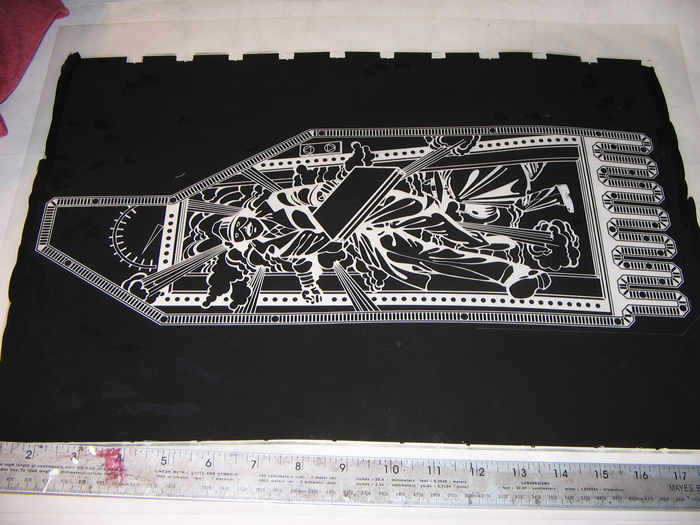
Instead of making films for each color, Rich will apply each color individually, masking off the one full size film for each run of the six colors. Take a look at the two photos below for a demonstration.
First he covers the whole film in the Rubylith, and then he uses a pattern to identify which sections to retain for the color he is printing and which sections to cut and remove. In this case, he is making the film for the green. (This is a test piece, if it was the real film, could you identify a incorrectly cut away piece of rubylith based on the sideart colors?) The film with the clear acetate is then placed on a screen, covered in light sensitive emulsion and any area that is not covered in rubylith is exposed and burned into the screen. The areas with Rubylith are blocked and the emulsion just washes away.
All of the pre-ordered artwork will be printed in this way. One color is printed on all of the vinyl pieces, then clean off the film and start all over again with a full covering of rubylith, remove and retain pieces of mask to achieve each of the other four colors other than black.
Rubylith can also be implemented for spot fixes and spot colors. Using it’s masking abilities and sensitivities to particular spectrums of light (Red, Green, and Blue), you can go back to already printed artwork and add back in missing colors or fix errors in the print. Here are a couple of examples.
Here we see the speaker grill rubylith cutout with the Atari logo. Neither the rubylith or the black will be exposed on the screen. This is the screen for the middle red of the speaker grill overlay.
Here is the exposed film. Cut by hand, you can see the little bump in the lower left corner that can be easily fixed with a liquid filler or even a piece of tape to get a straight – but angled edge.
Again, thanks to Rich for an insight into the printing process. Hopefully he’ll continue to have a few minutes here and there to provide more information to those of us that are interested about the progress of all of his printing jobs.
So, remember, if you don’t have a printer yet for your arcade reproductions, you will want to look up Rich at Thisoldgame.com
You got it here first, exclusive content about the Atari Agent X / Cloak and Dagger artwork films and printing progress at Rotheblog.com.
Atari Agent X / Cloak Dagger Reproduction Artwork Update
This Old Game hadn’t updated progress on the Atari Agent X reproductions, so I thought I would email Rich and find out what was new. I heard back, and it sounds like things are progressing.
If you haven’t read anything about this set of Agent X reproductions before now, here is a short run down. Rick Ford has coordinated a project to get all of the artwork reproduced to build a complete Agent X machine. The Agent X artwork includes the marquee, speaker grill overlays, control panel overlay, kickplate, and sideart.
Originally the reproductions were going to be a very limited run, but there was some increased interest on the arcade forums when Rick made his announcement. Rich had made great progress getting each of the pieces printed, the marquee, the speaker grills, etc. But with the increased interest, he had to go back and print some more of that Agent X artwork. The films for these pieces of art are on loan from Scott Evans, so the quicker those pieces of Atari art can be finished, the better.
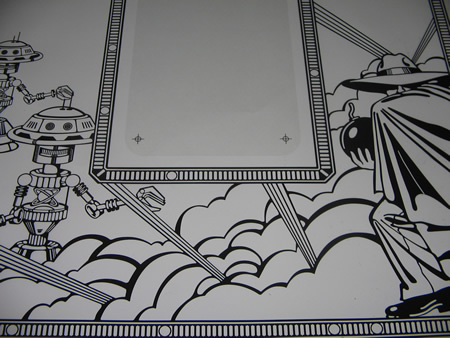
Once the catchup is finished, all of the final details can be worked out on the Agent X kickplate and sideart. That is exciting news, I can’t wait to finally see the Agent X kickplate artwork that I did get reproduced. The kickplate was pretty complex, and here is what Rich had to say about the Agent X sideart;
The films for the Agent X sideart were in small negative form, which I then had blown up to a full sized camera positive. I’ve also had a custom screen made to accomodate this big of a piece of artwork.
It turned out the guy I went through to make the screen worked in Atari’s production deptartment from 1979-1984. Kind of a cool story, and he had lots of insight too in regards to materials and production runs of the artwork.
The films are made for the sideart, all he needs to do is lay down the colors for the print. After the holidays are done, it would seem as the Agent X artwork could be finished sometime in January of 2008.
Here are a few of the images from ThisOldGame.com showing the screens that have been made, three images of the screen printing process of the Agent X marquees, and one photo of the speaker grill overlays.

This Old Game has started Agent X artwork kit
After a month of not hearing anything on how this project was going for Rick, over the past week Rich at This Old Game posted on both KLOV and BYOAC with an announcement about producing an Agent X kit.
Here is Rich’s post along with the included image;

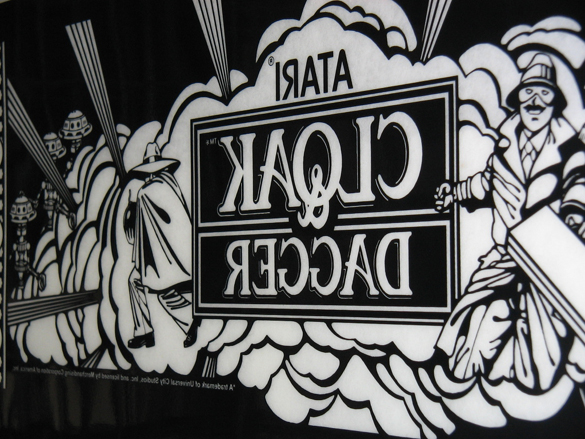
ThisOldGame.com is pleased to announce are Biggest and rarest project.A Full art package for Atari’s Agent X and Cloak & Dagger!
Special thanks to *removed* @ KLOV for bring this to light and to Scott Evans for providing the orginal Atari Art films for the screenprinting. Only 25 original dedicated cabinets were mfg by Atari with the rest being conversions.
I will also be posting up cnc router files and cab plans for this orginal cabinet. There will also be art ran designed by Atari but never released – the agent X marquee and an alt speaker overlay, that was most likly changed for the Cloak & Dagger release. I will be posting the entire production run with pics of the orginal art, pantone color matching, and the screenprinting process.
Anyone interrested in this art package should PM *removed* on KLOV for more info as this is a private, onetime limited run.
The colors are off from my kickplate from the original films, but they said they were going to take care of the color matching process and I didn’t have to worry about it.
Watching the threads is pretty exciting, Rich is going to keep an online blog of progress. There is going to be a ton in this kit, and I am sure that everyone is really excited. I was happy to be a part of the Agent X project, and excited that it will actually be produced. I got an acknowledgement from Rich, so that was great too.
It took a lot of time to do the kickplate, and I am glad he has the art for everything else. It was worthwhile this time around.
Scott Evans, and getting Agent X ready to print
Talked with Rick last night. Sounds like his contact Scott Evans has the films for Agent X, for most of the artwork. He has the sideart and marquee for sure, and I think everything else (which would include the control panel) except for the kickplate. That worked out really great. Rick said it, and I agreed with him, it really would have sucked if he had the kickplate and that work had gone to waste….in a sense. It isn’t really ever wasted work, but would be better to see it put into use.
He is not going to send me Cloak and Dagger artwork to color match. The Agent X films should have the color specs on them. Now, being 20 years old, I know Pantone may have been around then, I just don’t know for sure, and even then how accurate it would be. We will have to just wait and see.
Rick saw the Agent X kickplate finalized
Rick and I finally caught up last night, and he got to see the kickplate art for the first time. He was really impressed, which is great. I talked to him about the circles at the top and how they were right at the dimension edge for the top. He said he didn’t feel like it was that big of a detail to sweat about. He originally said to leave them and depending on sizing they may not be cut at all. He asked what I would do, and to me, even if you lined up this art side by side with the original you might notice the circle placement off a little, I would just move them down a hair so you knew they would fit within the dimensions.
He trusted my judgement and told me to go ahead. That is what I like, when someone trusts my opinion, because I do a good job and I try to make the best decision for the person who wants it. But he also made a good point that every cab could vary in size, placement, etc. etc., so not every cab is alike anyway even in color because of fading and whatnot.
So, next step, he is sending over a sample of the Cloak and Dagger art so I can color match and we’ll go from there.

