Pengo
Removing Masking Tape Residue on Arcade Games
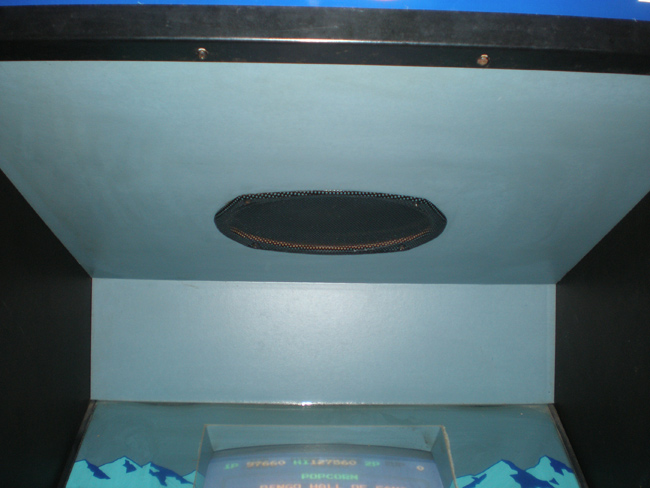
On my long to do list of small arcade maintenance activites, here is a photo of my Pengo.
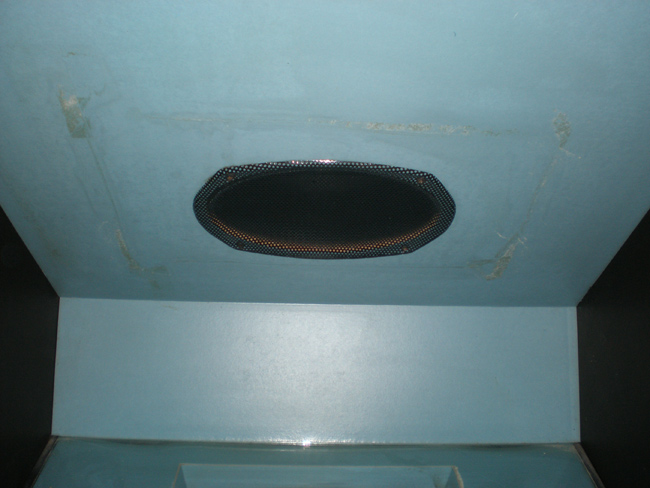
I think the previous owner of this Sega Pengo also couldn’t figure out how to tone down the sound on the game, so they tapes something over the speaker and left it for quite some time. You can see the thick resilient masking tape residue.
Here is what you will need, pretty simple actually.


I started out with a rag and soaked it with Goo Gone, dabbing it on the residue. But I wasn’t able to apply it as thick as I wanted.
Then I figured out to soak the Scotch Brite pad and then apply it to the underside of the cabinet to start to break down the masking tape remnants.
Then, carefully after a few minutes, I scrubbed carefully in a circular motion (not pressing too hard so I didn’t make tiny scratches in the paint) until most of the residue was gone. Here is the underside of the Pengo cabinet under the marquee after I was finished. It isn’t perfect, but it is a lot better and satisfactory for me.
Artwork Bleed for Screen Printing Reproduction Arcade Artwork
If you have been following my blog, I have slowly been working on vectorizing every piece of the original Pengo artwork to have reproductions made for sale. I have another contact that is doing some vectorizing of a couple pieces of artwork, and he asked me if the Illustrator artwork pieces had to have any bleed on them for registration coverage when taking the pieces to the Screen Printing stage. I knew from working with Brian at Oleszak, that there needed to be some offset bleed on the shapes when making stencils, but I figured this was more for the home arcade game collector, who generally wouldn’t know much about registration for different colors of artwork. A “CYOA” kind of nicety.
So, I emailed Rich at This Old Game. I asked how much of a bleed he would add to individual shapes. 1/8″ bleed seemed too much to me for finer details, but for the larger details, only adding 1/16″ – 1/32″ didn’t seem hardly enough to make a difference. This is what he said;
Basically, to allow the color laps about center of the Black detail that it would cover. Also white is usually full coverage on the back of 2nd surface prints. On fine detail, I go in and just split the difference in specific spots where the thickness of the black may vary. But to answer your question, I do tend to add approx 1/8″ bleed unless that bleed doesn’t fit the artwork then I have to manually go in and split that difference. Any text I usually outline 5 to 10 pts.
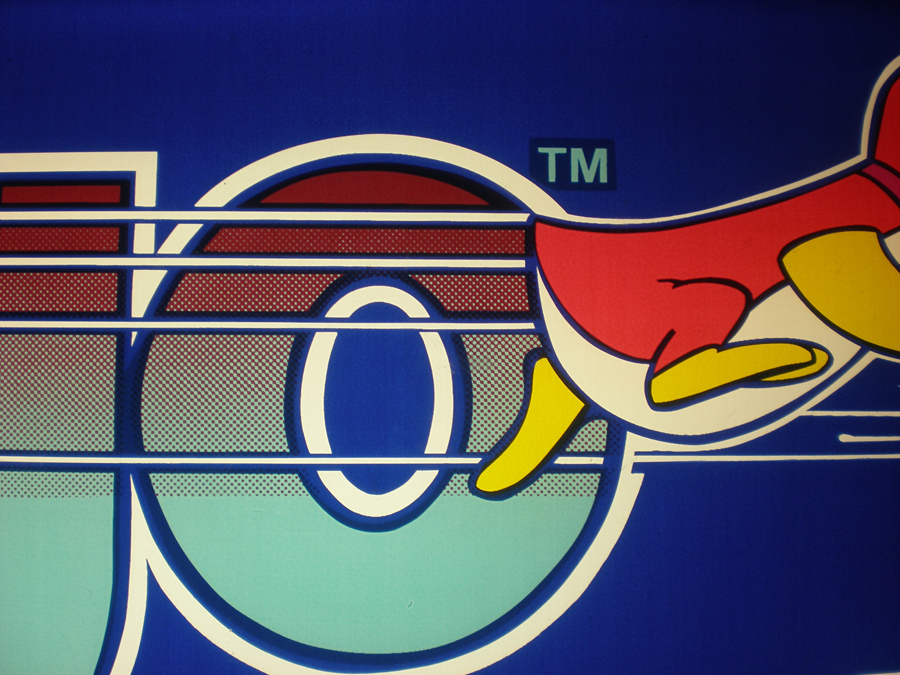
I got a file from him, demonstrating some of this, but I don’t completely understand all of the concepts for screen printing reproductions yet. If you don’t have any idea what I am talking about, here is a photo of my Pengo marquee. You can see the bleed for the “TM” text showing through, as well as some of the halftone patterns and other pieces of artwork that overlap to make sure there is enough coverage.
The main idea I got from the information he sent was, yes, add bleed to the artwork to help with registration of colors, and it is a judgement call based on the detail of the artwork. The finer details of the reproduction arcade artwork add 1/16″ to 1/32″ of an inch bleed, and on some of the bigger, thicker details add 1/8″. (Not to mention, even though I didn’t ask this, I am sure that I need to start separating my artwork in colored layers) I know that both Brian and Darin read what I write here when they have time, and I figured they could lend their expertise in the information, or even Rich if he stops by. My main question remaining is what Rich said above;
Also white is usually full coverage on the back of 2nd surface prints.
Rich is the absolute best in terms of response time, although his emails are sometimes hard to understand because of the way they are worded. Here is a tight crop of the final prepped file he used reproduce the Professor Pac-man overlays from my vector artwork.

This looks exactly like the “TM” above, except, if the text is yellow, why have the color “white”. Wouldn’t that bled color be yellow there, showing really fat lettering?
So, there is a lot of work to do, added work to the final vectorizing Pengo files that I thought I had finished. But, they need to be right. I haven’t added bleed to any of them, so I will have to go back through and do that. Here are some close up details of my start to adding bleed to the Pengo artwork. There is a before vector trace (Purple Outline), and an after vector trace with the additional bleed (Light Blue Outline). (And after I got into the file and tried it for myself, I found that even 1/32″ bleed would overlay some of the surrounding pieces of artwork, and that I had to go down as small as 1/64″ (.016 of an inch rounded) bleed to prevent overlap.)


Pengo Locked Up During Gameplay
I had never had this happen before today, but today it happened twice when I was playing my Pengo arcade game.
The first time, a sno-bee got stuck at the top of the screen between two ice blocks, and just kept bouncing there. I didn’t mind, because that meant I could go around the playing field and match up the diamond blocks for my bonus points. I was able to break one of the ice blocks that Sno-Bee was wedged against, and then I smashed him with another block.
But the second time in less than 10 minutes, I was trying to match up the diamond blocks, so I decided I would guide Pengo up next to the dormant Sno-Bee. Well, some of the game code stick executed, Pengo died when he touched the Sno-Bee, but then, the game just sat there, playing the music. Check it out;
I had to turn the upright machine off and back on again. I hadn’t even seen this error in Pengo that causes it to lock up, or freeze. I know sometimes I can run through some of the ghosts in Ms. Pac-man, and even in Pengo, it seems like I get lucky either touching a Sno-Bee without dying or running through one. But not in this case.
Anyone else have this issue with their Pengo PCB board? Is it just mine? If you have issues, does the Sno-Bee only get stuck at the upper right of the play field? Or is it only one board configuration? Or maybe this is just this revision of the PCB, since I know there are a couple. Voice your thoughts.
Got my Pengo High-Score Saver and Enhancement Pack
Pretty excited to come home last night after a long day and see that my Pengo High-Score Saver and Enhancement Pack from jrok had arrived.
This kit for Sega’s Pengo has a ton of goodies in it, if you are interested in buying one, here is the enhancement pack’s homepage. The main options that I wanted were;
- High Score Save – Even when game is turned off, of course I had to have this:)
- Change Music Type – Popcorn Pengo – I can’t stand the original music, Popcorn is what I have always played in Mame
- Freeplay – So I don’t have to coin up every time and increment that counter
I played Pengo last night in between studying. I had to set those high scores:) The Pengo enhancement pack is so simple,fast, and easy to install, as the instructions say (It’s also really affordable at under $50!);
- Step 1: Remove the CPU from the socket (Z-80 Processor)
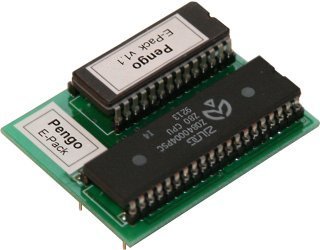
- Step 2: With the CPU removed insert the Pengo e-pack board into the socket. Take note of the orientation and location of pin 1!
- Step 3: Insert the Pengo e-pack into the Processor Socket (Kit Fully Installed)
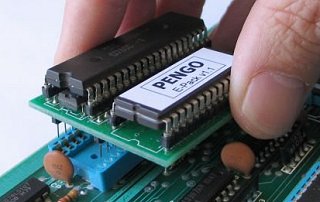
I always get nervous when working with these classic arcade games, mostly for the unknown. In the case of this enhancement install, there wasn’t a lot to double check. Make sure the direction of the board is correct (Just double check the direction of the half moon cutout on the Z-80 processor) and make sure it is pressed and secure and that none of the pins were bent on install. Reattach the harness connection in the right direction, and turn on the game. I watched the Pengo PCB in back just in case something happened and I could cut power as needed.
I wanted to see my Pengo scores come back up after I turned the game off. I was running out the door, so I didn’t have a lot of time. I waited about 30 seconds after my last game, turned the game off, waited 30 seconds, and turned Pengo back on. All I got was a flashing message saying something toe extent “Eprom reading high score tables”. The same message you get after each Pengo score is saved. I said a little prayer that it was new, or overheated, or I just did everything too quick, and hoped when I returned that my Pengo high score kit wasn’t broken already. When I got back, the game played fine, so I don’t know what the problem was, maybe I didn’t wait long enough for the next screen. Whatever.
Tonight I will be looking at the enhancement pack options more, to turn off “Game Select” and turn on Freeplay.
Thanks Jrok for making this Pengo high score saver enhancement kit, it really adds a lot of value to my game.
Sega Pengo finally working!
Today a fellow Indianapolis coin-op collector came over to help me take a look at my Pengo. Sitting in my basement now for over a year, and not working for about 15 months, Pengo has been the bane of my existence. The last thing I did on my Pengo, was I installed a switching power supply. I made a rookie mistake, however, and forgot to check my voltages before plugging my Pengo PCB in. After I turned the game off because the game reset and went to a screen of yellow bars, only then did I find that my +5v was at +5.83.
Convinced I had friend my pcb, I was distraught at potentially costing myself more money and unsure how to check for sure if the board was the problem.
So, today, my friend Robert took a look at the game with his accumulated knowledge. He first looked over the pcb, to see if there was any visible damage, fried parts, etc. He didn’t see anything that seemed problematic on the Pengo pcb. He noted on the backside that there had been some touchup at one point, because there was a dark discoloration on some of the solder points. He said that was flux, which I didn’t know until today. He also reminded me that the components on the pcb were meant to withstand higher voltages, just not for any extent of time. So, he was thinking that since I had only powered up my Pengo with the high / wrong voltages for a couple of minutes or less, that the board might still be ok. The newer boards were a little less sensitive, he said, to being damaged by incorrect voltages.
He plugged the harness connection onto the board, unplugged the coin door, and powered Pengo up. It appeared to work fine. So, we powered Pengo down, plugged the coin door back in, and tried again. Still, no issues. I wasn’t seeing the yellow bars when I had last used the game or anything.
It was like Robert had magical powers. I drilled out the bottom coin door, because there were some wires that we assumed went to the counter. Sure enough, there was a counter in the coin door, with about 9,100 plays. Not too bad, but I think that this Pengo was Home User Only (HUO) for most of it’s life. Robert also messed with the sound, adjusting the sound control on the board and finding that it was the base control and that the sound control inside the coin door would adjust the sound louder or softer from there. Another thing, that I know I tried and it didn’t do anything.

So, I played Pengo. We both had some beer, played a number of games. The game had no issue. It was like it was never broken. The coin up didn’t reset the game like it had for me, nothing. I left the game on periodically played it over the next 10 hours, and there were no issues at all. Well, I noticed that Pengo wasn’t keeping high scores after a little while, but you know what? I was just so happy I had my third working game that I didn’t care.
Thanks so much Robert, what a great guy to come down and check things out. I feel bad that it seemed like the Pengo problems that plauged me didn’t exist at all, but I was just happy that it works. The most important part.
Installed a switcher in the Pengo
That was over a week ago already, last weekend to be exact. I was talking with Richard, and looking inside the cabinet, and then I figured out how the switcher had to be wired. I had an extra two pronged plug that was some sort of AC power source. All I needed to do was snip that connector, tie that positive and negative into the switcher position and negative, and I knew the other voltages that I needed to supply for the PCB, so I went ahead and did it.
I was nervous about clipping connectors, but I kept telling myself that I could always put it back if I needed. I would have done this earlier, but I had it in my mind that the power was coming out from the linear power supply and going to the isolation transformer. But I wasn’t looking at the wiring. The power comes in from one main source and through the isolation transformer. the transformer then powers the monitor and the linear power supply. The linear power supply takes the AC voltages and changes them into DC voltages so the board and sound can use them.
Here are the photos of what I did. I even made a little harness out of different molex connectors for the power supply connection.
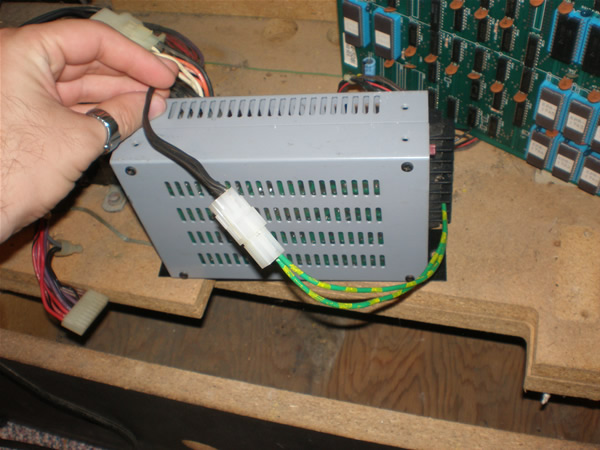
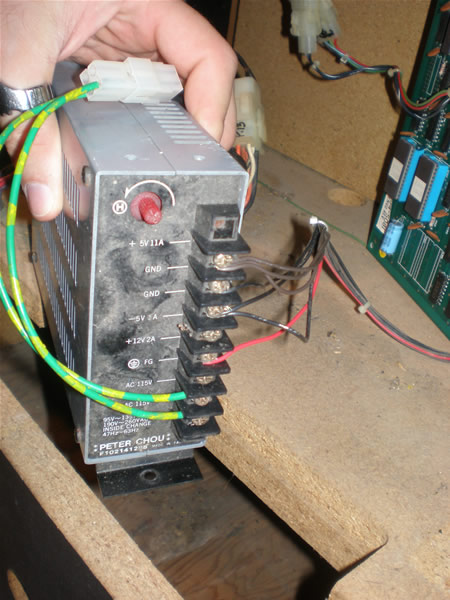
I double checked my pinouts before plugging everything in. At first, the game came up, but it did it’s typical thing. I put in a ton of credits, it started resetting, and then when I pressed player 1, I got one character on screen and everything froze. I heard some clicking noises in the coin box area, and that was it.
On Sunday, I stopped and got some clips to put on my wire connections just to make sure that I had good connections. I emailed Richard about what I did, everything sounded right to him, and I explained it with intricate little questions down to if it matter how many wires you had tied to one 5v connection head.
Well, the lesson I learned, you always have to test voltages coming from the power supply again. Come to find out, I was supplying around 5.83 V instead of 5V, so I probably just toasted my board. I didn’t have it on for long, but I know it doesn’t take much. But, the funny thing is, I thought with a switcher I would be able to get very exact voltages. But you only have one knob to adjust, and I am only able to get the same voltages to the Pengo PCB as I was with the linear power supply. I have to do about 5.1 V and that gives me about 11.9 V for the sound.
I don’t know. I am extremely frustrated, don’t know if my board works anymore, and out of options again.
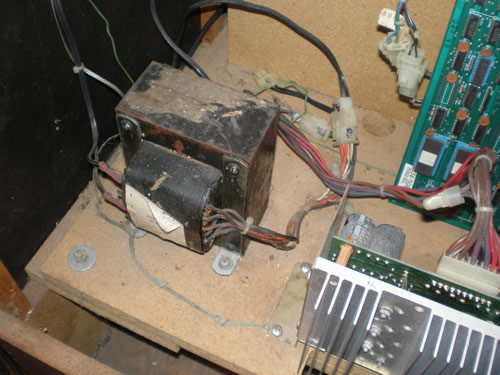
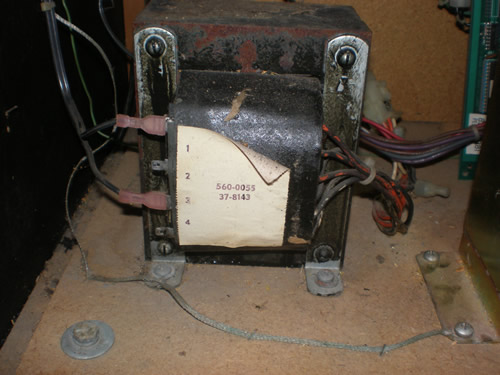
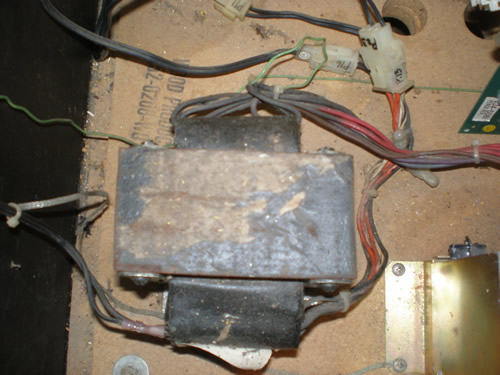
Photos of Sega Pengo Isolation Transformer
Photos of the isolation transformer. Pretty old and crappy looking like most of these from the 80’s, but how it looks isn’t an indication of how it works. I just need to figure out what voltages are going in these wires from the Power Supply so I can tie in a switching power supply instead.