
Dig Dug
Wizard of Wor, Dig Dug and Tetris Sold!
For a month or so I had been responding to the common Craigslist ad looking to “buy” games. Usually people put out these ads looking for freebies, but I knew it couldn’t harm me any to try to sell some of my non working games. I wanted to try to reduce as many distractions as possible to focus on studying, and fixing up the Midway Wizard of Wor, Atari Dig Dug, and Dynamo cabinet Tetris were time suckers to say the least.
The Tetris was the only one I was seriously considering keeping in my game room, but the black cabinet was so ugly. The original intention was to resell these once they were working to help pay for gas, or take down the paid cost on one of my other games. But the motivation for selling a game to make a small amount of money waned for me. I got my holy grail, the Jr. Pac-man. I had originally wanted to use the money I made to help pay for my trip out to PA to pick it up. But thanks to DanOfEarth, that wasn’t an issue anymore.
Finally, last Tuesday I found some people who weren’t looking for free games, and were interested in the three I had to sell. I just wanted my itemized costs back in total for the games, and the price was more than fair, great if you intended to keep one of the games. Dig Dug is too slow of a pace for me, Wizard of Wor holds no interest for me other than the fact that it is a two player game, and Tetris, again, ugly cabinet with no sideart.
Here are some photos of the games being taken away.
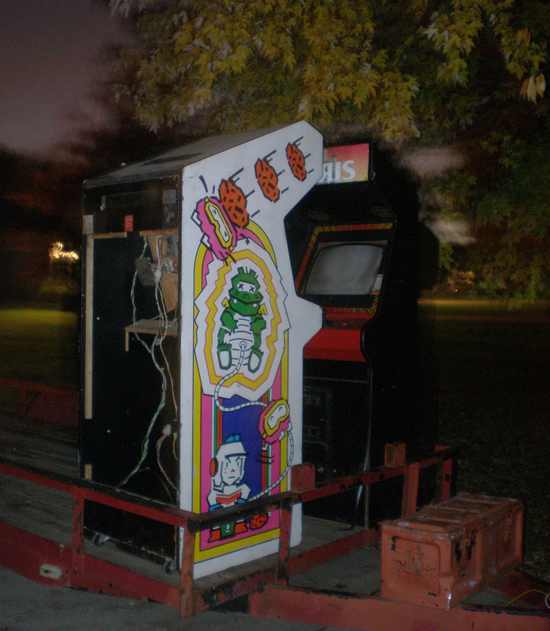

I made a whopping $10 on my sale after all of my costs were added up, but I learned a lot. I originally bought the Dig Dug as a Land Sea and Air Squad, painted solid black on the sides. It was my first game that I brought back from the brink of oblivion, and restored in some sense of the word. It was a lot of fun, bargaining for the deals, but it was a lot of work, and without knowing much about electronics, it was hard work for me to constantly figure out all of the problems I was having with any given game.
In the end things worked out great. I didn’t lose anything but time, and that is debatable when compared to what I learned and the contacts I made hunting down the arcade parts. The games found a good home where they should be reused in a family fun center, and I can park in my garage again:) Just in time for winter. Not to mention I can keep the other two cabs in case I need a fix, my empty Atari Food Fight and Atari Xevious.
Figuring out OL, OH Dig Dug PCB error
I have gotten a little motivation back, and took a little time to investigate this further.
I had been going back and forth with Bob Roberts on this chip, and without even looking at my board I was able to kind of figure out with his help that this chip was plug in play, which meant it should be socketed and no soldering necessary. Plus, since it was PnP, that meant I didn’t have to burn anything to it either. He said the chips are very sensitive and this is fairly common.
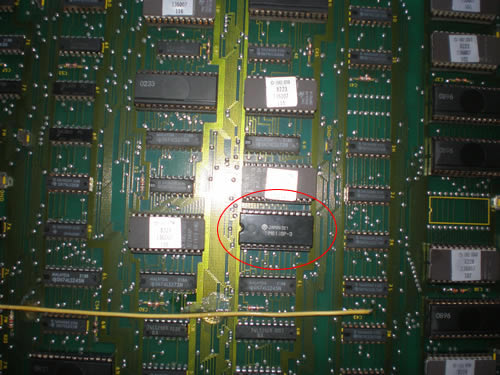
In the Dig Dug manuals, it says that a OL and/or OH error are due to a bad RAM. It just depends on what version of the Dig Dug PCB you have to find the location on the board. If you have Revision A, the position is 9M, and if you have Revision B of the PCB, then it is position 4K.
I thought for sure these positions would be printed in the manual, but they weren’t. I pulled the board out and did a comparison of component side elements on the board to the two drawings in the manuals. I have a Revision B Dig Dug PCB, so that meant my bad RAM was at 4k.
Here are some photos of the PCB. I circled the 4k labeling, it might be hard to see. Also a photo of the bent RAM and the RAM in the socket.

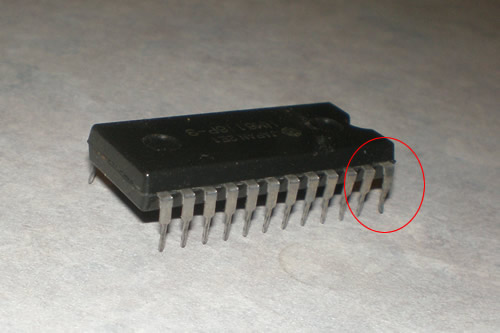
I took a look, and it was obvious. There my RAM set, with the front leg bent and barely in the socket. I was floored, how had it worked up until now? It might be as simple as taking that chip out, bending the leg back, and the game might work. Well, I did just that, and it didn’t work. So I am guessing that after so much time of it being almost bad corrupted the chip.
I am checking with Bob to see if he has that chip. The number on the top of the Chip says JAPAN 2E1 HM6116P-3. Would like to get a larger order of stuff to bring down the total cost for the one part, but if it means getting the game sold, I may not wait.
Dig Dug PCB went to garbage
Well. It has been another month.
Last month right after my brother in law and I looked at the Dig Dug, I listed it on ebay. I did some small final touches, screwed the audio board into the inside of the cabinet to secure it and glued the broken cone button back together.
Someone local to Indy won the game, and was going to pick it up on a Saturday. It worked fine on Thursday, but then about a half hour before the guy was to come by to pickup the game, I turned it on to get it warmed up to show him. Well, I got garbage on the screen. I about crapped my pants. So, I had to tell the guy how sorry I was, and that it really did work a couple of days ago, but hoped he would understand that I couldn’t sell it to him.
So, finally last night, after a long frustrating month, I decided to take a look again at the RAM error I was getting on the Dig Dug PCB to start researching the problem. I get garbage on the monitor, and then after a while it flashes RAM OL & OH.
I am hoping that there is something wrong with the audio board / power supply that is something easy to fix, or maybe it is this legendary big blue cap on the power supply that always causes weird problems. I don’t know yet, but I just know that if I have to get this board repaired, or find a new one, I might have this game until the end of the year.
Fortunately, the guy was really great about it all. He said he would still be interested if I got it working again.
Re-attached harness connector to Dig Dug
Since my brother in law was down this weekend, I took the initiative to have him help me look at the edge connector for the Dig Dug in the garage.
I had unplugged the Dig Dug harness to solder on that new finger and forgotten which was the connector went back on. I knew that if I put it on wrong I could fry the board, so I had delayed figuring it out. But I had an idea. I should be able to test voltages in the connector, and compare them to a pinout to check and see which direction it should go.
Like the other Dig Dug, the pinouts seemed to be very inaccurate and we were having problems pinpointing a direction. Then, we noticed that printed very tiny on the connectors, were the letters and the numbers for solder and component sides of the board. I had no idea. If you look very close to the connector on the back where the wires go in, you can see the raised printing. Fortunately the Dig Dug PCB had letter and number markings on it as well.
So, even though I had solder the finger board replacement upside down, I was able to easily figure out which way the harness was supposed to go. We powered it up, crossed our fingers….
And it worked fine. So, the plan is to list it on ebay. I have my costs, they were higher than I wanted, and I worked really hard to keep them down.
I just need to wait to make sure the demand is still there. I may wait a month or so before listing it.
Forgot Dig Dug connector orientation
Well, forgot the orientation of the edge connector the board. I hooked everything else back up, got to that and had a brainfart, so I will have to look up the pinout again.
New Dig Dug PCB edge connector
Got outside tonight and soldered on the new edge connector for the Dig Dug. I was glad I had did one once already with the Ms. Pac-man machine, so I knew how to attach it properly. Or, so I hope. I haven’t tested it yet, I actually had a drop of sweat hit the board, so I thought to be safe I should let it dry for a day. Here’s hoping it works without issue and I can get it on ebay.
Listed Dig Dug (Second machine) on ebay
Well, even though I hadn’t mentioned it here because it is a different machine, I thought it made sense to now. I listed my other, nicer Dig Dug machine on ebay last week. Well, it didn’t turn on. So after a lot of stress and troubleshooting I figured out why. I knew the game board was not getting power, but I was sure that the main power supply was fine. Maybe the audio / power supply went bad. I swapped the audio board I had for this project into the now non working Dig Dug inside. Well, a resistor caught fire, what a fun little surprise.
Come to find out with some major help from a friend, that a bad connection can put too much stress on the resistors on that board and cause them to burn up. Sure enough, my main PCB looks great, except one finger on the main connector is fried over half way down. This probably caused the issue, I don’t know yet. I just know I took the working PCB and Audio board from this project, put it into the cab in the house and everything works fine.
So, now, I am back to a non working game in the garage. What I am going to have to do is buy a new edge connector from Bob Roberts and solder it on. I want to finish this up still, but it probably won’t be this next week. We shall see. Bums me out, but I had to sell the other Dig Dug game and I think this all worked out how it was supposed to.

