
Ms. Pac-man
Second stenciled Ms. Pac-man has left the building
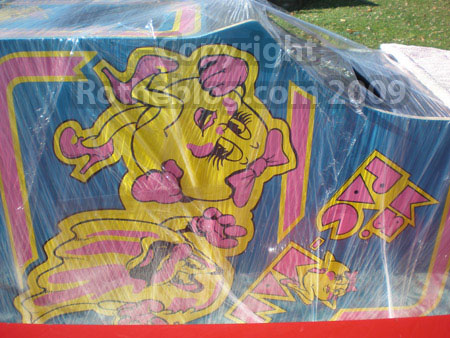
Back in July I got to talking with Rich S. about re-stenciling his Ms. Pac-man. I got the painting finished just in time, on our last warm day last Sunday and Rich came to pick it back up today. Click in to see the final product.
Stenciling a Ms. Pac-man – Part 8
Finally, part 8 to the tutorial on how to re-stencil your Ms. Pac-man arcade game. Last time we sprayed the yellow on your Ms. Pac-man. This part is going to cover the piece of artwork that is missing from the joymonkey artwork file and the update I have made to the stencil file itself to make sure your Ms. Pac-man is as accurate as possible. (more…)
Stenciling a Ms. Pac-man – Part 7
It’s finally time. All the cabinet prepping, spraying down solid coats of primer and blue, your Ms. Pac-man cabinet is ready for the fun part, appling the artwork. It’s time to add the yellow, the largest artwork stencil and the most crucial as this will set the tone for the other two colors. We’ll also talk about what not to do, which yours truly managed to discover by experience 😉 (more…)
Stenciling a Ms. Pac-man – Part 6
In the last part of the Ms. Pac-man tutorial we taped up the stencil, positioned it and then removed the backing and smoothed the stencil to the cabinet. You can repeat this step for the other two sides, I will try to show photos of this later. Today, we’re going to look at removing the pre-mask on the sideart stencil and then taping up your cabinet for the yellow coat, finally! (more…)
Stenciling a Ms. Pac-man – Part 5
In part 5 of the tutorial showing you how to re-stencil artwork on your own Ms. Pac-man, we talked through some of the misconceptions for those of you who have never done stenciled artwork before (like me). Now that we are through that text heavy portion, let’s move onto the photos showing how my taped up artwork looked following Brian Jones cabinet stenciling instructions. (more…)
Stenciling a Ms. Pac-man – Part 4
Finally! Part 4, it’s a miracle! Part 1-3 of the stencil a Ms. Pac-man tutorial was based on the work by a arcade game collector out West by the name of Donnie. However, from here on out the how-to’s will be written using the progress I have made on restoring my own Ms. Pac-man.
I am going to try to break the tutorials into smaller pieces, so let’s get started. At this point you have stripped, sanded, primed and painted the Glidden Blue on your Ms. Pac-man. The next step is to start to apply the vinyl stencils. It’s more time consuming than you might think. (more…)
Ms. Pac-man Copyright in Stencil File
I have had some questions about the copyright text in the Ms. Pac-man color separated stencil file. If you take a look really close, zoomed in to ant sized detail, the letters look like they were autotraced. and jagged. I don’t know how these were constructed, and not inferring anything at all with this information, just being informative.

(If you are one of the ill-informed individuals that wants to use an autotrace vector program of any sorts, this gives you a visual on the results no matter what you do.) So the question posed is, should I tape over the copyrights when I stencil and leave them out? Or leave the lettering in? Here is a photo comparison of what I got, you make your own decision. (more…)

