Pengo
Sega Pengo Pushing Marquee Vectors Complete
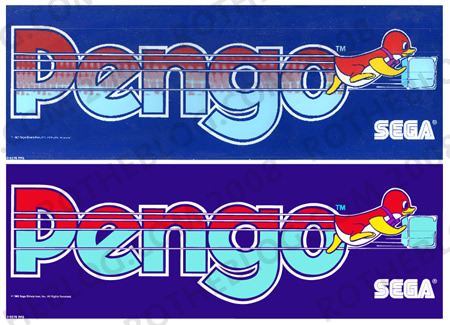
This is actually old, old news. Just before Christmas of last year I had finished scanning both versions of the Pengo marquee and posted them on Rotheblog. Around that time I had met and teamed up with another collector interested in seeing this artwork reproduced. I sent him the marquee scan and in about two weeks he sent me a completed vector file in Illustrator!
Pengo Sideart Color Separations
I was in the mood, and I had some time, so last night I did the color separations and bleeds for the Pengo sideart. Here are some smaller images so you can see how the different color breakdown – Red, Purple, Yellow, Light Blue, Dark Blue and Blue Outlines. (more…)
Pengo Artwork Pantone Colors
Today I took my Pengo bezel to a local print shop and make an attempt at matching the colors. I feel like I am lucky, because my bezel doesn’t look like it has much fading at all. The vibrant colors in Pengo and the Sno Bees were a little easier to match, the blues were a little more difficult.
These are the pantone colors I ended up with from the pantone coated palette book. (more…)
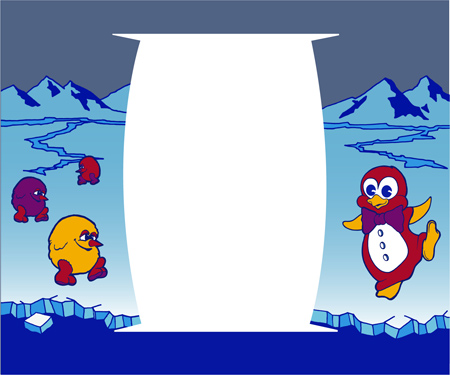
Pengo Bezel Artwork Update
It’s been awhile. There is still a lot to do on the Pengo artwork package before it can be printed, lots of small details.
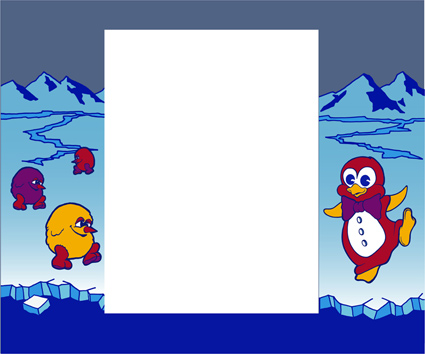
The first of those details I wanted to tackle tonight was the inside flaps of the cardboard Pengo bezel. On Mr. Do!’s Pengo Bezel scan that I am using to base my vector artwork, the inside flaps were left pointing backwards. This makes sense, the bezel was going to be cleaned up and used for Mame purposes. But to reproduce proper bezel artwork, we need every little piece and don’t want to make any part of those ice mountains up.
So, in four pieces, I scanned my Pengo bezel flap corners. Here is the original bezel scan;
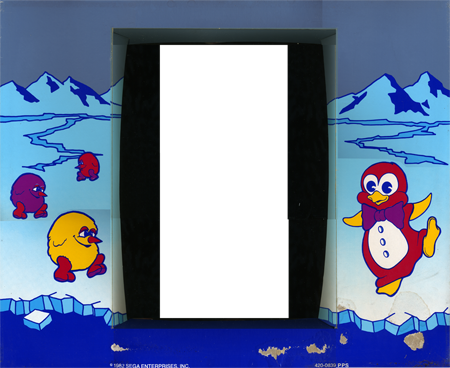
And here is the original Pengo bezel with those scanned corners added;
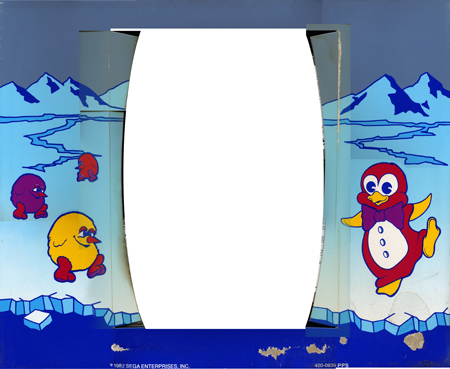
It took me another little bit to adjust the artwork and add those pieces in. Here is the Pengo bezel looking more finalized all the time;
What’s next on the Pengo Bezel?
I need to renew my conversation with Rich about how to achieve the half tone pattern / gradient in on the cardboard print. How do I prep that for print? Do I make up the dot pattern myself, or is there some sort of specific process?
I also need to try some color matching. I will take the Pengo bezel into work next week and see if I can use the Pantone book next door to approximate those colors. Here are the PMS (Pantone) colors I came up with after I finished color matching the Pengo Bezel.
In December, I wasn’t aware that each piece of vector artwork needed to have a small amount of bleed added. I need to go back and add a bleed to this piece of artwork, and every other piece I have done, including the marquees, control panel overlays, and sideart. Part of the reason why I haven’t done anything:) Lots of little witty sno bitty details to finalize.
Thanks all for the continued interest. Taking Graduate classes makes vectorizing and taking on reproduction projects difficult. Especially ones done for love and not money.
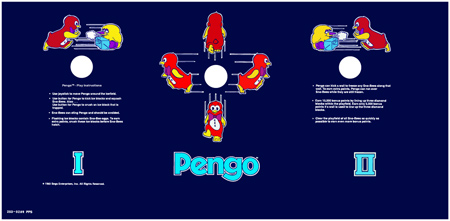
Pengo Numerals CPO Vectorized!
I got an email about a week ago (January 8th) from Chris. I knew that he had been working on the other Pengo CPO and it was a nice surprise to see that he had finished the final vector details.
Chris had a scan of the Pengo numerals control panel overlay, and he had completely vectorized the artwork in Paint Shop Pro awhile back. I had tried to convert that artwork, to bring it into Illustrator (A couple small things needed to be done, like the lettering and dot gradient and I don’t know PSP), but after a ton of hours searching I had no luck.
Well, in the meantime, Chris went out and taught himself Illustrator and did a bang up job tracing the Pengo CPO in one of his first vectorizing jobs. but he’s a small cookie anyway, he is a MIT grad! Here is a small image of it.
I am going to email him with some of my thoughts and opinions about some of the accuracy of the details. It might come down to a matter of preference between one artist and another, who knows, but we have had some good theological conversations about arcade reproduction artwork and everything will probably work out alright. Each arcade vector artist will trace something a little differently.
Having most of the Pengo artwork is a great start. We have a vector Illustrator file of Sega’s Pengo numerals CPO finished, sans color matching. As always, continue to follow Rotheblog for Pengo reproduction updates.
Standing Sega Pengo Marquee
Since 2005, there has been a vector file version of the standing Sega Pengo marquee on Arcade Art Library (localarcade.com). The author is “rockworm”, and I don’t recognize that name on any other forum. Right away, I question the accuracy of the file. “Rockworm” hasn’t added another file over the last two years, so it is hard to know if he just printed out a copy on an inkjet and therefore the Pengo artwork didn’t have to be exact, or what the final use was. So before I assumed I could use the artwork in my Pengo reproductions, I decided that I should do some close up comparisons of the Pengo artwork to the original marquee scan. Here is what I found;
You can see some differences in the line shapes in the Pengo marquee vector drawing detail (first image) vs. the Pengo marquee scan. Some lines have been smoothed out and some angles aren’t the same. And let’s not forget, the most important idea is the attention to detail. If you look closely, there is a piece missing completely. What else is wrong with this vector Pengo marquee file? It is hard to trust the integrity when there are pieces of the Pengo artwork missing. The accuracy is close, don’t get me wrong, but it isn’t perfect.
So, at the very least, I have already redrawn the standing Pengo character on this marquee. I will check the lettering for accuracy, maybe I can reuse that artwork. I will post progress hopefully in the next day or two since the Pengo bezel is complete.
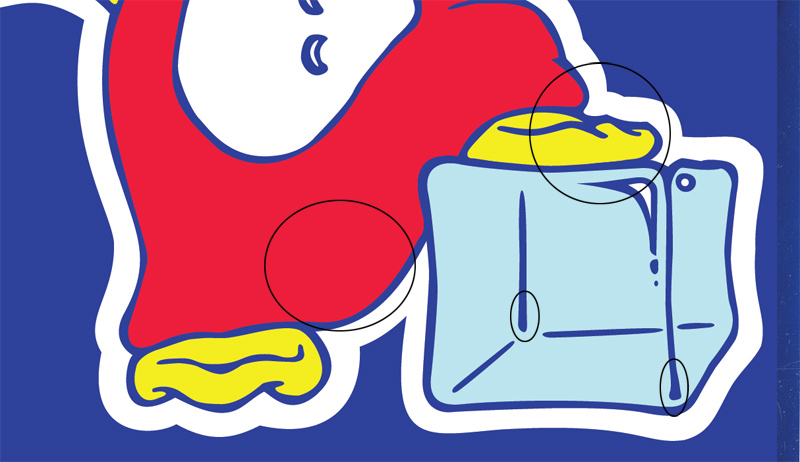
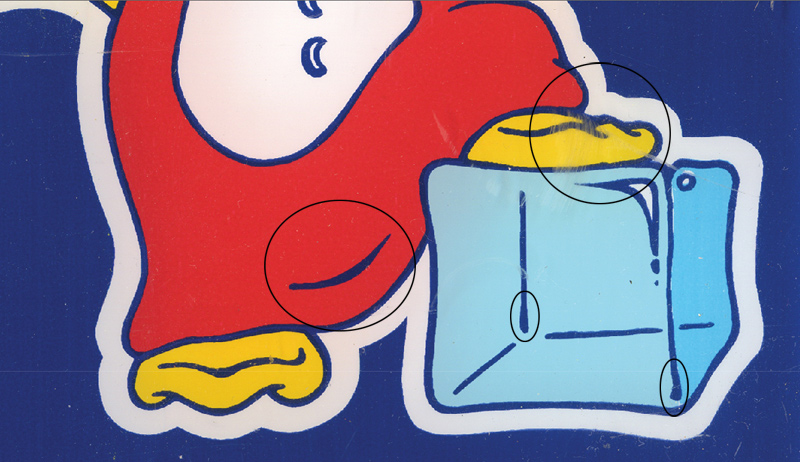
Back to the shapes of the original lines. When I think about restoring this old artwork, I try to think about the original process the art director at Sega would have gone through. To make this artwork into a screen to print onto different materials he would have had to have drawn it, and then transferred it to film. In my mind, the original Pengo artwork shouldn’t have the most crisp lines, there would be some variances in line thickness because it was a hand drawn line, not computer generated. So, when looking at a small zoomed in portion of the original Arcade Art Library artwork;

I see the vector lines resolved and reduced. The accuracy of the original Pengo shapes is off, and even though the details will be so small when printed only a true expert would know the difference, I like to detail it out here because these Pengo reproductions are for everyone, not just me. Not to mention, some portions look like they could have been run through an auto trace function because of how sharp some of the edges are.
Here is that same portion that I redrew. Note that the detail here is the side of the ice block Pengo is resting on, and in my drawing the side is a darker blue just like the original artwork. The file on AAL doesn’t have this.

When looking at the original artwork, I don’t trace every jagged edge, I make a judgement call. If the Pengo artwork seems like it should have a smooth line, then I add it in, but sometimes, the bumpiness of the line is what makes the artwork more authentic in my mind.
Agree? Know a little bit more about the original game manufacturer’s art making process? Know who “rockworm” is? Leave a comment and give us your insights.
Sega Pengo Bezel Vectoring Finished!
I thought for sure over Christmas break I would be able to crank through vectorizing one piece of Pengo artwork per day, and by the end I would have every single piece of Pengo artwork in a nice Illustrator file ready for reproductions. Time for working on classic arcade artwork was not easy to come by however.
I did manage to finish vectorizing the Pengo bezel….for now. I haven’t included the dot pattern, and I also still need to scan in the inner portions of the bezel that fold into the monitor and add those vector pieces to the complete artwork. But here is a small image of the finished piece, Sno-Bees and all.