
Where on an Electrohome G07 is R1?
I spent..a stupid amount of time trying to figure this out, and am going to bed without a true solution. So, if you have used Randy Fromm’s flowcharts for troubleshooting an Electrohome G07 monitor and can help me out, that would be awesome. (more…)
Dynamo Cabinet 19″ Monitor Mount Board Dimensions
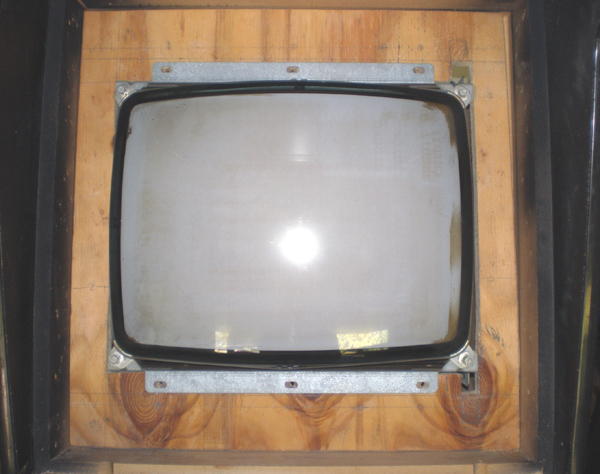
Last Saturday I mounted a 19″ monitor in my Tetris Dynamo cabinet. The cabinet is 25.5″ wide, so I don’t think it was meant to fit a 25″ monitor originally, the monitor opening is 22.25″ x 22.25″ square. Maybe it was meant for a 21″ monitor?
Either way, the opening was way too large for me to mount my 19″ monitor without some customization. A JAMMA cabinet, they are meant to be universal cabinet for any game. Probably an easy job for most guys with power tools. But I didn’t have any, so I called in a friend.
The night before I measured out the board we were cutting, and I thought I would share those dimensions here in case someone else could use the information.
I had a 3/4″ thick piece of plywood scrap that I got for free that I worked with. I think the thicker the better since the monitor is so heavy.
Here are photos of the monitor mounted in the cabinet;

And here is the dimensions for cutting a board to fit your dynamo cabinet and mount a smaller monitor.
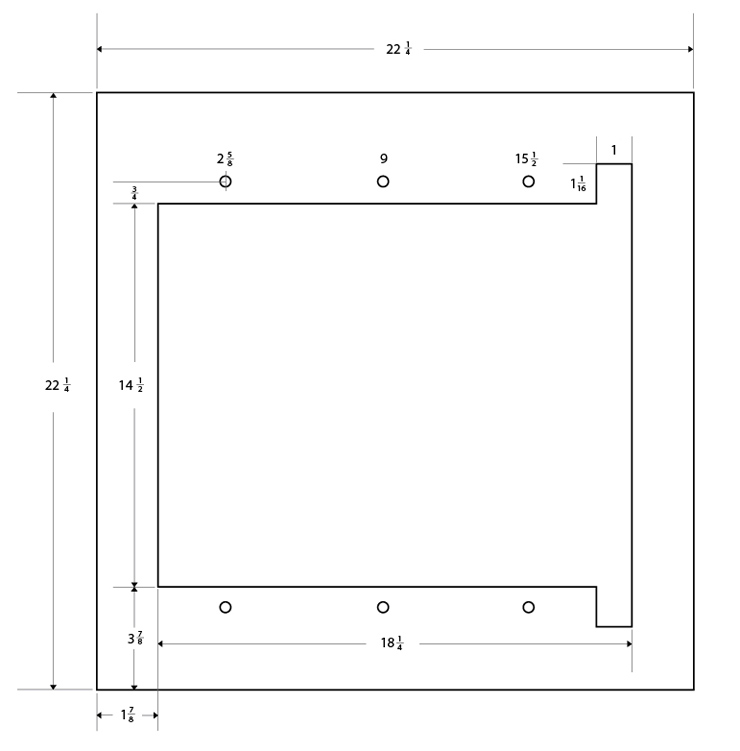
Notes: The holes that I drilled were 1/4″ for the mounting bolts. I made this drawing for a horizontally framed monitor. You will notice the slots to the side for the frame flaps to slide through.
The dimensions are as following (Converted to the decimal);
- Total Board Size – 22.25″ x 22.25″
- Inner Square Total Size – 14.5″ H x 18.25″ W
- Monitor Flap Slots – 1″ H x 1.0625″ W
- Space Horizontally around cutout – 1.875″
- Space Vertically around cutout – 3.875″
- Bolt Placement From The Left of Board (Top and Bottom) – 2.625″, 9″, 15.5″
- Space to center of holes – 75″
Hope I described that clearly. Like I said above, I had to make the opening a little taller than 14.5″ to fit the 19″ Electrohome monitor screws.
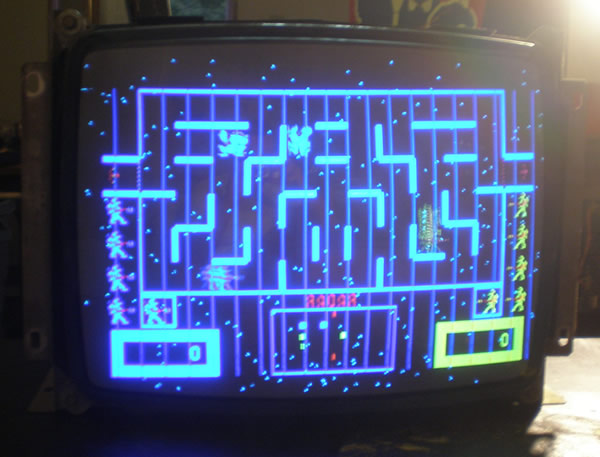
Jr. Pac-man finished!
It took me another four days of jockeying around, but I finally finished the Jr. Pac-man late late tonight.
Here is what I ended up doing…
I had some short white power coating shelf brackets from Lowe’s.

Wizard of Wor problem was a sync issue
I couldn’t believe it a little bit myself, for how bad those lines were, but that is exactly what it was. Once I started messing around with both vertical and horizontal sync, I got the picture back square and almost stationary. Except, no matter how fine of an adjustment I make, the screen still rolls. The lines are gone, so Mark’s fix worked just fine, but I can’t fix the vertical sync.
I made sure the card was seated, and adjusted everything but it still slowly rolls. I just replace the caps in that, what, a month ago, so those shouldn’t be an issue. I suppose the connection could be bad. Not sure what to do, need to have time to research a solution, but I suppose I could finalize one of my other two almost working monitors and swap them in. But then, I would still have this one that I would have to fix at some point….
Or I could just sell it. It mostly works and would just need a touch of tlc. I don’t know how desirable a 19K4600 Wells Gardner monitor is…
Missing Monitor hookup for Jr. Pac-man
Sent payment for the Jr. Pac yesterday, so I felt comfortable asking Rick how to hook up the monitor. After a series of emails, it came out that the monitor hooks into the top of the PCB on the right side. There is another connection on the left side as well that attachs right into the harness. There was no connector on the right side, and I looked inside the game in case it came loose, wasn’t there either. So it sounds like he is going to send it to me in the mail today so I have it by Wednesday or Thursday of this week. I was really hoping to play it sometime before Friday for sure.
Plus, I had forgotten about the monitor brackets. He had mentioned that original Jr. Pac owner had taken them out with the monitor before Rick bought it. The Pac-man ones I have won’t work, just a little too short. I am going to try to go to Home Depot this week and try to find something that will match, I have read in the forums that people have found things. I also need some tinted plexi, but I am less worried about that right now…
Other info about the game…The swelling that I mistook for water damage towards the back of the cab can just be caused from heat he said. He said he sealed it off, hopefully preventing any more swelling. That makes me glad it is sitting in the garage now that it is a little cooler out. I also identified the serial no. #333, it’s stamped on the back of the cab above the back door. The Mappy serial is stamped there too. The Serial is in the cab still too on a piece of paper, A29-00333, and you can see where the old Mappy tag was on the harness.
Rick also said that the tracks that are in the bottom where the new switcher supply is are for the old linear power supply board that almost always fails in these games.
Finished putting Wells Gardner Monitor back together
I went out and got a new ratchet so I could more easily put the Wells Gardner monitor parts back together and get the monitor plugged back up to the Wizard Of Wor game. I was glad that I had the extra arcade game cabs so that they could serve as a work bench.
The Wells Gardner monitor was a difficult cap kit replacement to work on, so I was glad that everything powered up just fine when I turned the Wizard of Wor game on. But, unfortunately when the monitor lit up, it still had the lines going through the opening screen and gameplay. The cap kit didn’t fix my game issue, and now I have to go back to the drawing board.
19K4635 Wells Gardner Monitor – Difficult to do a cap kit
It was cool outside last night, and I was feeling motivated, so I started the cap kit on the Wells Gardner 19K4600 model monitor.
Let me tell you, I thought doing a cap kit on this monitor was for an advanced user, not for the faint of heart.
I had the hardest time figuring out how to get at the bottom of the chassis board. I finally figured out that you need to unscrew the cross beams from both sides of the frame. Then, pull the sides apart and get the chassis out. There are a number of different connectors that you need to unplug, one or two from the neckboard, and a couple from the 19K4635 chassis. But even unplugging them all doesn’t matter.
Underneath the chassis board is a metal plate, held on by four screws. You have to take those screws off and then you have the plate hanging off the chassis board. There is some sort of discharge? copper spool that is soldered from the plate to the chassis board that unless you want to solder it all, you can’t take it off.
So, it was on big balancing act. Most of the caps are on the cards that plug into the chassis. One large cap, a 1000 u 35V? on the one card, and a ton of caps on the other card.
I found that on this monitor, most of the time, the size of the caps were downgraded significantly. I don’t know if this indicates how long it has been since a cap kit has been done or not, but there was a ton of dust on the chassis so I don’t think it has been for awhile.
I had found my cap kit list for this 19K4635 Wells Gardner monitor at Ionpool, and chose the Zanen Kit #201A. I don’t know why I chose this one over the WICO, I don’t know the difference. But I am glad I did, the Zanen version had more caps.
But I did find that I needed three other caps that I will have to go back for. Those three are;
- 1000u 35V
- 4.7u 25V
- 22u 16V

