
Archive for March, 2008
Arcade Links for 2008-03-21
- Arcade Game scoring tournament, Bloomington IL. Sounds fun. If they included Pengo, I’d try to go. #
- Tournament Link – http://www.classicarcadegaming.com/contests/CAGDCT2008/ #
- Games starting at $25, sold by Namco? Well, that is a gimmick. Some games in Indy, not cheap. #
- Namco Arcade Link – Search for yourself – http://www.namcoarcade.com/gamesearch.asp #
- Amateur attempting to remake Metroid 2 on Gameboy? #
- I love Metroid – Link – http://tinyurl.com/29cell #
- Debate rages on, restoring or mame’ing a classic arcade game? http://tinyurl.com/36635o #
Dedicated Jr. Pac-man on Craigslist in AZ
Finding a dedicated Jr. Pac-man is a difficult proposition, but a couple of times a year you will see one come up for sale on one of the many typical gaming outlets, either RGVAC, Klov or BYOAC, or the more traditional outlets like Craigslist or ebay. Jr. Pac-man’s come up for sale so in-frequently, and it is my favorite game, that I get excited anytime I see one for sale anywhere in the US.
Friday a listing came out on Craigslist in Phoenix Arizona for a “dedicated” Jr. Pac-man. It’s hard to tell by the photo in the listing if the Jr. Pac-man is a converted Mappy, or a factory original. The sideart is hidden, but on one side at least either part or all of the Mappy sideart is showing. This machine is definitely a converted Mappy, unless the Jr. Pac-man sideart was meticulously pulled away with the Mappy artwork in tact underneath. You can tell that it is Mappy artwork because of the red border.
Three freestanding arcade games two needs repaired, one working. Pac-man Jr. and kick boxing and ? Asking or $600 (Will not seperate, must pick up) Leave a message if you call and someone will call you back at 623/566-4503. Thank you.
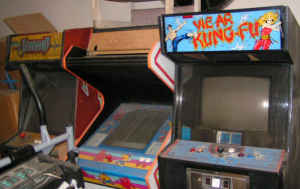
$600 for the lot of games, may or may not be a good deal. It kind of depends on whether you value the other two games or not. The Kung Fu game isn’t worth crap, looks like it is in a painted over Williams Defender cabinet. Is that a Tutankam to the left? That has some value so the lot of them are probably worth about $500 seeing as the Jr. Pac-man even in a Mappy cabinet is probably worth about $300 plus.
Here’s hoping I can get the serial number for my Jr. Pac-man registry if it is a dedicated unit and not a Mappy conversion.
Update July 30th, 2008
I figured that this Mappy / Jr. Pac-man in Arizona was long gone. But lo and behold, the ad for the three arcade game lot comes back up on Craigslist, and funny enough, the guy is now asking for $625.00, more money than in March. Ha.
Arcade Links for 2008-03-20
- Funny Nintendo Motivational Image / Poster – http://www.dumpt.com/img/files/e9rkqv5egu1i1v1ysqlc.jpg #
- More Indiana Jones 4 Pinball photos – Me #
- Pinball Link – http://tinyurl.com/32tn3j #
- More Indiana Jones 4 Pinball photos – http://tinyurl.com/32tn3j #
- Guy who found nice Defender on the side of the street – http://tinyurl.com/3ygr6q #
- "Etch A Sketch" Food Fight:) Check out the cpanel. Funny, nod to Ataricade #
- Food Fight Link – http://www.pinballrebel.com/arcade/atari/foodfight/foodfight.htm #
Arcade Links for 2008-03-19
- Tron cycle driver tshirt, many styles and colors. #
- Tron shirt link – http://lowrez.spreadshirt.net/en/DE/Shop/Index/index/search/cycle #
- Hear a little insight from the creator of Donkey Kong 2, Jeff Kulczycki on this podcast #
- DK 2 forum post link – http://tinyurl.com/36olj6 #
- Subscribe directly to Video Game Outsiders Podcasts (DK 2 link) at their website – http://videogameoutsiders.com/index.php #
Arcade Links for 2008-03-18
- A completely translucent Mame cabinet? http://www.officialgamehaven.com/crystalcade.html #
- Not arcade: Reporter Flipped by Sledder. Funny. http://tinyurl.com/2ktnu7 #
- Big Street Fighter 2 fan. Video about HD Capcom online gaming including 1942! #
- http://tinyurl.com/38kuwz #
- Capcom Video Link : http://tinyurl.com/38kuwz #
- Cool Classic Retro Arcade Shirts, site usability is lacking #
- Retro Shirts Link : http://lowrez.spreadshirt.com/us/US/Shop/ #
Arcade Links for 2008-03-17
- As of Friday afternoon, Localarcade.com is back online after being offline for at least 3 days #
- Extremely modded jukebox, crazy mix of classic wood and modern tech http://tinyurl.com/3x7rwa #
- Crazy "Steampunk" keyboard http://steampunkworkshop.com/keyboard.shtml #
- Another mame machine blog, but the logo caught my eye http://www.northernarmy.com/arcade/ #
- Mario themed corset on Geekologie http://tinyurl.com/ynuku7 #
- Cabinets on CL in KC, worth calling? Probably only if you are local http://kansascity.craigslist.org/ele/608706641.html #
- Indiana Jones 4 Pinball photos? http://tinyurl.com/2w5v9x #
- Craiglist Defender deal in Detroit #
- Defender Post : defender game counsel….its a stand up unit. i have no clue if it works….was in the garage when i bought the house…..best offer you … #
Installing the 96 in 1 Multi Pac – Part 1
One of the most popular and rich arcade game kits for most collectors is Dave Widel / Mike Doyle’s 96 in 1 Multi Pac-man kit. With just a few simple changes in the chips on your Ms. Pac-man PCB you can play 96 different games, including many different mazes for Pac-man, Ms. Pac-man, and Pac-man Plus as well as Pengo, Space Invaders, Eyes and more!
I found that purchasing the Multi Pac kit was an awesome experience. I emailed Mike Doyle, sent him money via paypal, and in a couple of days my kit arrived at my house, ready to roll. I had special circumstances because I wanted to have the kit at my house by Thursday night because I was having a party where I wanted to be able to show off my newly upgraded Ms. Pac-man machine. I ordered the kit on a Monday and I had it by that Thursday, on time to the T. Mike gave excellent communication throughout the short transaction.
Here is what you get;
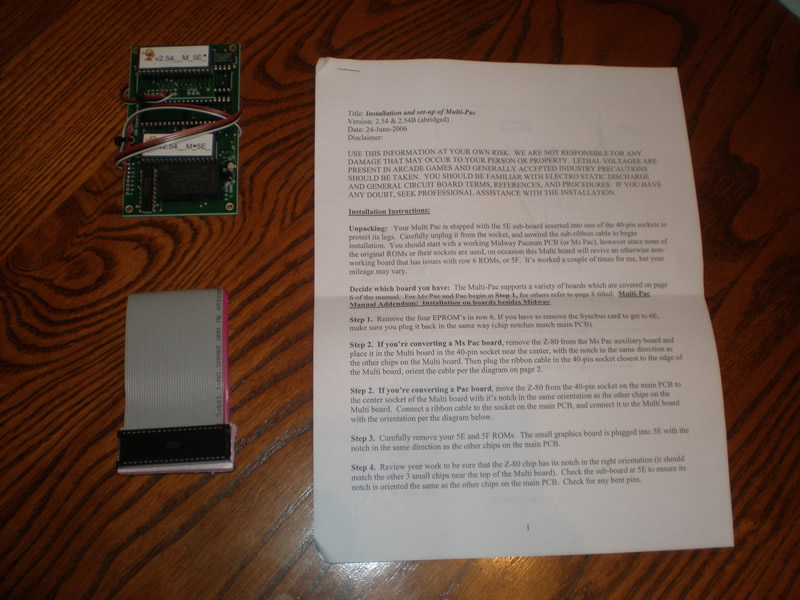
A set of printed instructions (PDF), a small pcb and a ribbon cable.
The instructions are written simply, and to the point. I am going to include snippets of them here to help explain the installation. Here are the general installation instructions;
Installation Instructions
Unpacking: Your Multi Pac is shipped with the 5E sub-board inserted into one of the 40-pin sockets to protect its legs. Carefully unplug it from the socket, and unwind the sub-ribbon cable to begin installation. You should start with a working Midway pacman PCB (or Ms Pac), however since none of the original ROMs or their sockets are used, on occasion this Multi board will revive an otherwise non-working board that has issues with row 6 ROMSs, or 5f. It’s worked a couple of times for me, but your mileage may vary.
Decide which board you have: The Multi-Pac supports a variety of boards which are covered on page 6 of the manual. For Ms Pac and Pac begin at Step 1, for others refer to page 8 titled: Multi-Pac Manual Addendum: Installation on boards besides Midway.
I will be upgrading my Ms. Pac-man board, so that is the PCB I will be using for this photorial. If you are still bootleggin’ like it’s nineteen eighty three, Shaft say you be outta luck in dis tutorial. But seriously, I am sure making the swap on most any PCB is pretty easy. Back to the instructions provided;
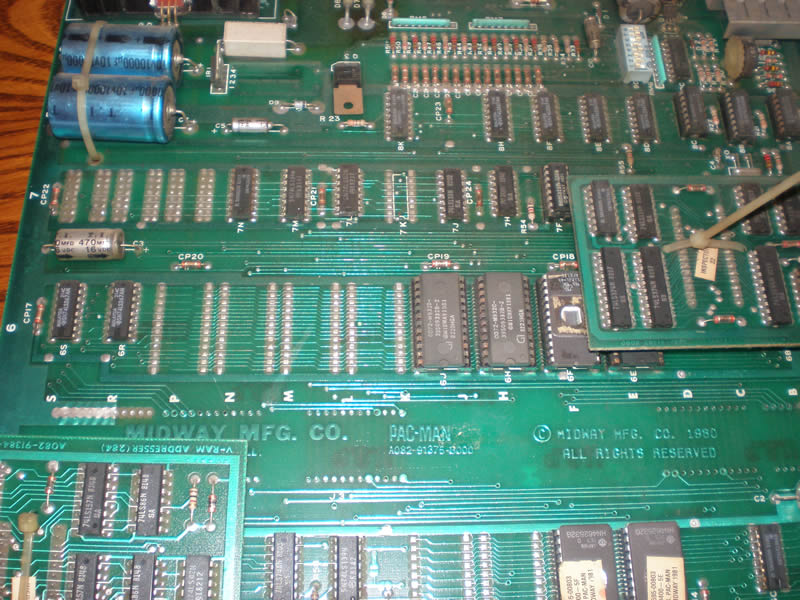
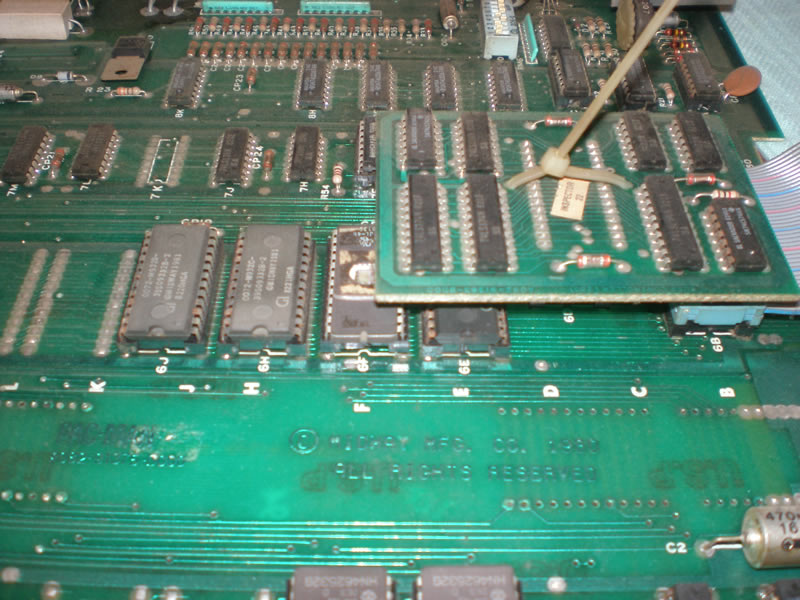
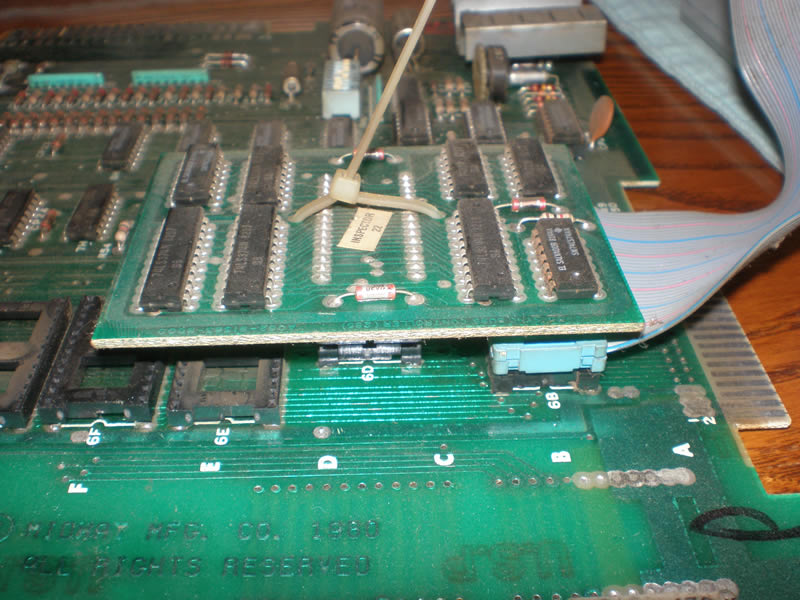
Step 1: Remove the four EPROM’s in row 6. If you have to remove the Syncbus card to get to 6E, make sure you plug it back in the same way (chip notches match main PCB).
Here are some photos showing the section of the PCB that the instructions are referring to. In the first two photos you can see the EPROMs at 6J, 6H, 6F, 6E. The Syncbus card is the elevated mini PCB with the dusty 20 year old zip tie:)
Here is a photo showing those four EPROM’s removed from the Ms. pac-man board. Removing chips is really easy, and this is something you’ll want to do a lot. Even your grandma approves, she says practicing this activity won’t make you go blind. So do a little less of that “other thing” you do in the dark and more playing with your circuit board.
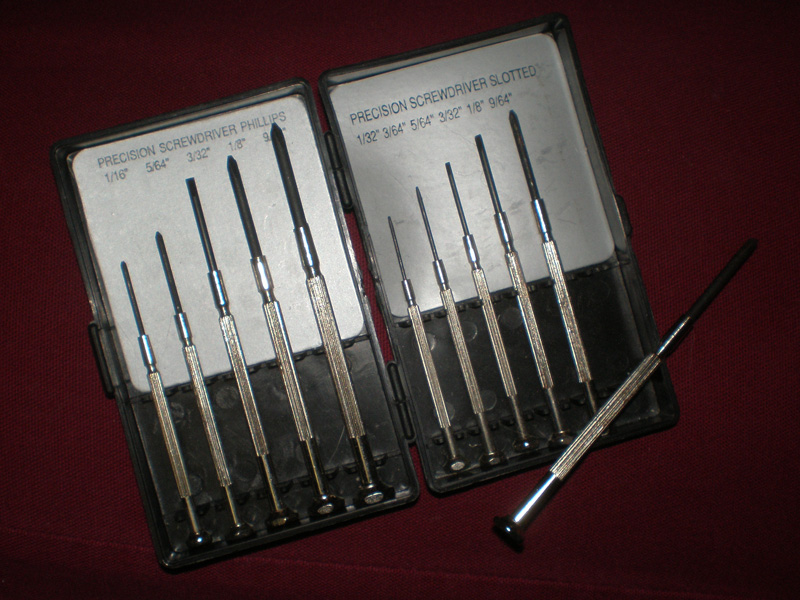
There are chip pullers you can try and can purchase one at most any major arcade dealer like HAPP, or probably even from Bob Roberts. The main idea is to make sure you remove the EPROM, processor, or whatever else without bending the legs. A small screwdriver will usually do the trick and a little Patience, yeah, yeaaaahhhh. Just a little Patience. Here is the set of mini screwdrivers I use constantly.
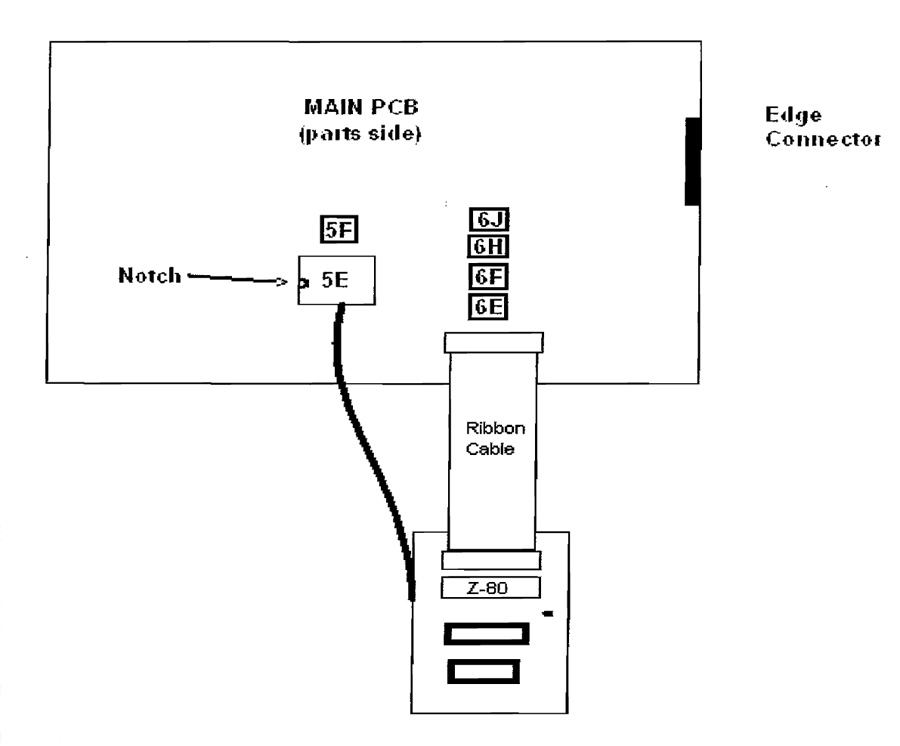
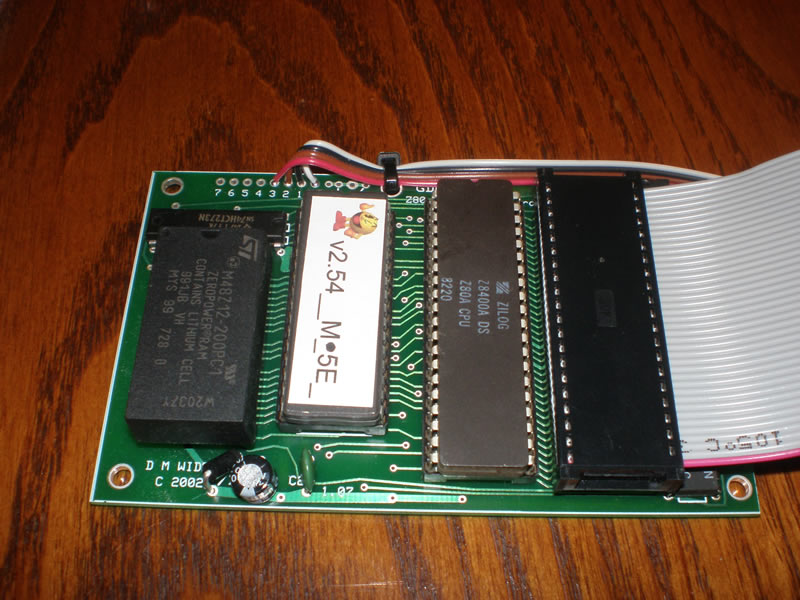
Step 2: If you’re converting a Ms Pac board, remove the Z-80 from the Ms Pac auxiliary board and place it in the Multi board in the 40-pin socket near the center, with the notch in the same direction as the other chips on the Multi board. Then plug the ribbon cable in the 40-pin socket closest to the edge of the Multi board, orient the cable per the diagram on page 2.
Here’s that diagram showing where you plug in the ribbon cable straight from the multi pac kit instructions;
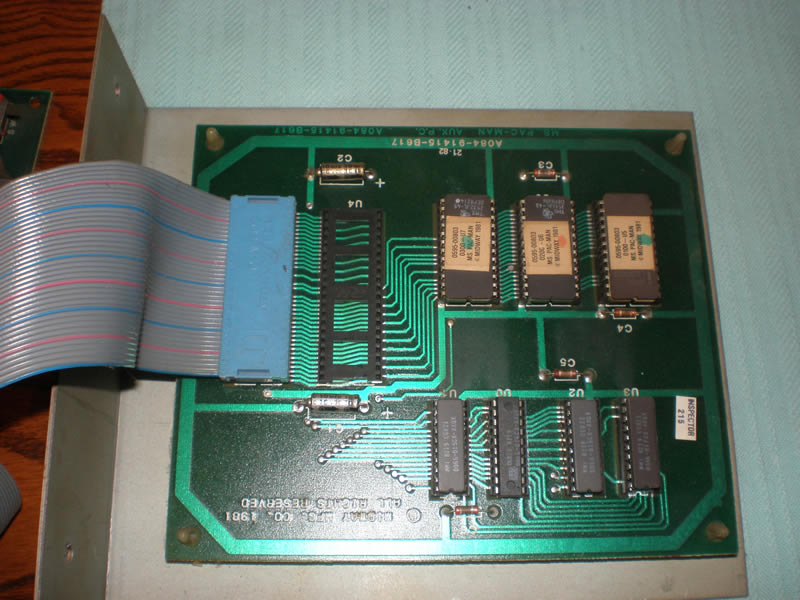
I apparently didn’t get a photo of the Ms. Pac-man auxiliary board with the Z-80 processor still secured but here’s a photo after I removed the processor. Just like the chips, you will need a very small flat head screw driver and gently work the chip upwards, twisting the driver back and forth until the chip comes out.
Now put that Z-80 processor in the Multi Pac-man board in the open socket. Make sure to orient the chips correctly as the instructions warn. You can destroy your Z-80 processor if you power it up with the chip incorrectly socketed. But fortunately, you would just destroy the processor and not the board, and if the angels shine highly on you, you may not even trash the processor. I personally don’t like electronic risk, but if that does it for ya. Go right ahead. Just look at the half moon inset on the chip to make sure you line those moons up with the socket in the right direction. As a general rule of thumb, you can look at the direction of the half moons on the chips around the one you are pulling, but that is not a hard and fast rule. Take note of the direction when pulling an EPROM and just make sure you put it back where you found it.
Ok. We’re pretty far along here, there aren’t too many steps left before you have your Multi-Pac kit up and running. Check back for Installing the 96 in 1 Multi Pac – Part 2 where we’ll pull 5E and 5F and finish up installing the small graphics board and mounting the multi kit in your cabinet. And of course, enjoying your 96 different versions of Pac-man, you yellow pizza freak!
Go to Installing the 96 in 1 Multi Pac – Part 2

