
Reproducing Control Panel Artwork – Measurements
I wrote about how to measure / figure out the placement of the controls on your game control panel, now let’s talk about how to get the correct measurements for your artwork, and how to set up your Illustrator canvas to match. It’s pretty easy, but if you haven’t sat down and thought about it then getting the correct measurements on your artwork may be difficult.
Most artwork on control panels is fairly basic
Let’s note this first. 90%+ of control panels out there don’t have artwork that wraps on the bend, or at least not crucial artwork. Maybe some solid band of color, maybe a reproducible pattern, but hardly ever character or a logo. A couple of Taito control panels do, hooray for them.
As a reminder, this is the scenario where you need to measure your own control panel. Your printer is remote enough that you won’t be able to visit them on site / don’t want to send them your control panel for fear of it never returning and you don’t own an NOS piece of artwork for this control panel reproduction.
Adding up the dimensions
Everyone is tired of this I am sure, but once again I am going to use my Pengo control panel artwork to demonstrate since I already have done this work anyway.
As I mentioned, a lot of control panels will have a bend where the artwork will curve and you may be asking yourself how to measure that. It’s simple, get yourself a tape measure, secure the one end and firmly wrap the tape around the bend to the bottom portion of the artwork. See the photo below.
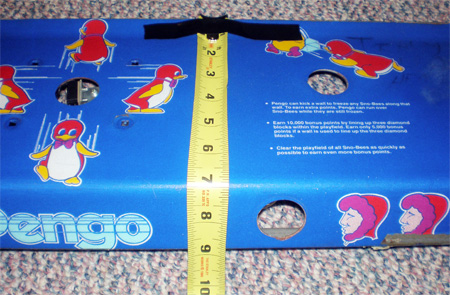
Most control panels will have about an 1/8″ radius, so either you can measure the control panel in this manner, or you can measure each major flat face and then add in the extra material for the bend in the end.
Next, measure each of the section that wrap underneath your control panel. On Pengo there were a couple ridges that I needed to measure individually. Here are the illustrations I made using Fireworks;
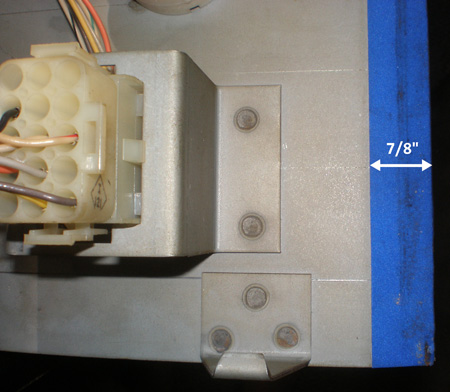
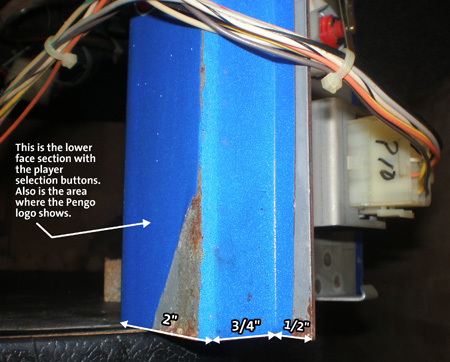
If you have the capabilities to draw out these measurements on top of photos using a graphics program and make them look nice, then I highly encourage that. Otherwise, you can always make a paper and pencil drawing and mail it out as well.
These dimensions are necessary to help your cause along and to communicate properly with the printer if you don’t have an NOS version of the artwork to start with.
Set up your Illustrator Document
Another note. I saw yet again someone on the forums posturing about ‘Hey, want to be a cheap-o? Get Inkscape and you don’t even have to use Illustrator”. Before you start tracing your artwork, inform yourself. Inform yourself about the process of reproducing artwork, and what software the printer uses. You might be able to export a nice, working, converted file out of your freebie program, but other times inferior software doesn’t cut it, and you’ll have wasted 20 plus hours of work. Just look at what I found out about exporting vector files out of Paint Shop Pro.
Ok, so like I said, you’re using Illustrator like a well informed collector. Say the dimensions on your control panel are 24 x 12.5. Make a new document and set your dimensions to be 24.25 x 12.75 like so;
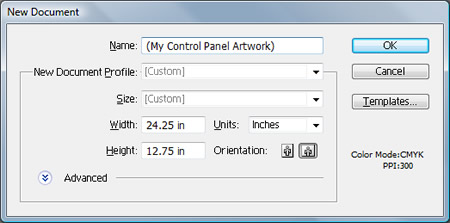
Why the extra amount? This is the bleed, 1.8″ on each side. (1/8″ + 1/8″ = 1/4″ or .25) Officially you can add ‘bleed’ in the print menu in Illustrator, but we are looking for some visual cues on the drawing board.
Setting up the bleed guides – Step by Step
- Show Your Rules – View > Rules or Ctrl + R (Windows)
- Make a new layer – Do this in your layers palette
- Name that layer ‘Guides’
- Zero out your canvas – Drag from blank square in upper right to top left corner of canvas to make that the 0,0 coordinate
- Drag rulers to 1.8″ – Do this for every side
- Reposition rulers as necessary – If you weren’t zoomed in, or you missed the mark, make sure you have picked the ‘Selection Tool’ from your tools menu and make sure the rulers are unlocked – Ctrl + Alt + ; and drag the ruler to the correct spot
I didn’t do screen shots of all of this stuff, some of these tips are in my other posts. Check out my post on checking sizes for arcade sideart featuring Crystal Castles artwork for some additional help. In the end, your canvas should look something like this (The faint blue lines are your rulers very close to the edges);
And you are ready to place your artwork and start tracing.
Questions?
If you have any, leave a comment. The scanning is the hardest part, so if you have made it through that good for you. The rest is just spending some time in Illustrator to figure out how it works.
Here are some similar arcade posts
- Check arcade artwork dimensions
- Reproducing Control Panel Artwork – Control Placement
- How do I create a rectangle by entering in specific dimensions?
- Double checking Professor Pac-man measurements
- How do I crop something in Illustrator? How do I use Clipping Masks?
If you enjoyed this post, please consider to leave a comment or subscribe to the feed and get future articles delivered to your feed reader.


Comments
No comments yet.
Leave a comment
Your email address is never displayed and cannot be spammed. If your comments are excessively self-promotional you will be banned from commenting. Read our comment privacy policy.