
My Ms. Pac-man Stenciling Progress – 2nd Coat of Glidden Blue
Last night I talked a little bit about my priming experiences with my Ms. Pac-man cabinet. I had mentioned I had put down a pretty ugly first coat of Glidden blue.
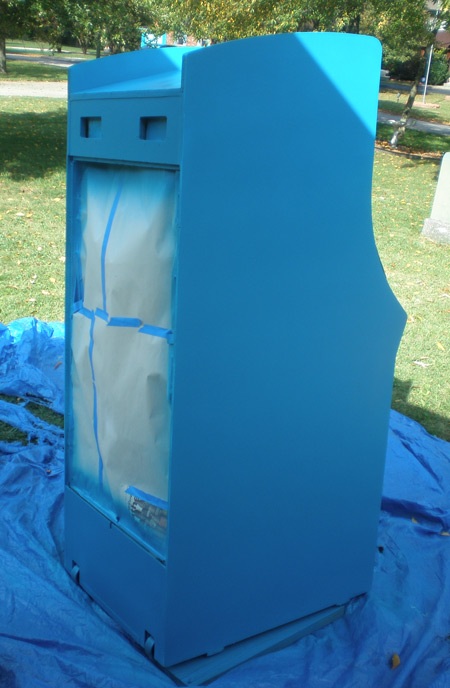
I am proud enough of this second coat of blue on my Ms. Pac-man to show it off here today. Just got finished and really happy with a couple of things, mostly how well the second coat covered up my first thick streaky coat of the Glidden Rhapsody.
Spray Guns – Distance is everything
In my first coat of blue I was laying down the paint with my Harbor Freight spray gun about 5 inches from the cabinet. Now, I was trying my best to go over lines to smooth them, but no matter what I did (I experienced this some with the Bulls Eye primer as well) I got horizontal streaks.
On the Ms. Pac kickplate I laid down a second coat right away, switching the spray orientation of the gun nozzle and moving vertically. The Kickplate looked good, so I resolved that today I would do the same thing on the sides of the cab.
However. I spoke with Chris again tonight, and he told me something that made a huge difference. I really needed to be spraying 8-12 inches away from the cabinet. That distance was everything, check out my work now.
Now, I could have probably done a ton of research on proper spray gun techniques but I didn’t. The Harbor Freight instructions suck, and I was definitely learning as I went. I had seen Donnie lay down the blue in Part 3 of the Ms. Pac-man stenciling tutorial and didn’t understand why the spray was so light.
I thought to myself ‘That will take forever, how many coats would you need at that spray thickness?” If the paint isn’t running, why can’t the blue be sprayed with a little more density? Well, it isn’t just about the potential for running paint, it is all about the fan of the spray, which Donnie did mention a numerous times.
But, like my tutorial says, practice so you know the proper spray quantity and distance. Well, unless you have some frame of reference, what should that be? I know I sprayed on cardboard, the paint came out, I was able to lay it down evenly with a controlled pace and I said “Looks like I’m good” I knew nothing about distance.
So, nearly a foot. That is the important distance to be at when spraying paint onto your arcade cabinet. Speed might not matter. 5 seconds the horizontal width, 10 seconds the horizontal width, I think that may be a matter of preference. As long as you aren’t getting streaks of paint on the wood, you’re good. And even that is correctable.
I wasn’t sure I could paint over my first coat without the streaks showing through on my Ms. Pac-man cabinet from there on out. I was about a step away from going back to Home Depot for some foam rollers. I have painted many many rooms in houses for summer jobs and know the proper amount of pressure, paint and the type of technique to get an even roll. But I didn’t need to, and I am happy.
More Ms. Pac-man Blue – Sunday the Yellow
That is my guess right now. One more coat of blue, and Sunday I will attempt to do the yellow if possible.
My cabinet doesn’t look nearly as smooth in terms of condition / holes etc. as Donnie’s does. But I think that for my first time I am finding this project very fulfilling and happy with what I have been able to do since I am so dense at this sort of stuff. I have my areas of expertise, this is definitely not it.
If I was smart, I would have figured out a way to still use the rolling wheels on my Ms. Pac while covering them up and not laying paint down on them. What should I have done for that? I didn’t want to have to use my rolling cart and risk scratching the cab. Or should I have used the rolling cart? Suggestions?
Here are some similar arcade posts
- Stencil a Ms. Pac-man Cabinet – Part 2
- Ms. Pac-man Pink Finished
- Stenciling a Ms. Pac-man – Part 7
- Fixing stenciled overspray on arcade artwork – What is working for me
- Ms. Pac-man black artwork – Live & in progress
If you enjoyed this post, please consider to leave a comment or subscribe to the feed and get future articles delivered to your feed reader.
Comments
@Jamie:
A dolly, that should have been obvious. Just planks and wheels.
I know if I had thought about using one / buying one, I would have been unsure about the stability and how to get the cabinet up on one. I suppose a wooden dolly would be small enough such that it wouldn’t stick out underneath the cabinet. But would it really matter if the dolly got painted? Probably not. And if it is too small that would also decrease the stability.
I was nervous about what would happen to the overspray, so I didn’t paint in the garage obviously. In terms of bugs, maybe the late season choice helped me with that. I did have some gnats flying about, and one or two landed in the paint. but so far I have been sanding between coats so if the gnats didn’t fall out, they were sanded out.
But dirt, bugs, and other stuff is definitely a consideration in warm weather. I think this was a sticking point for Donnie. He kept talking about making a spraying area that was contained, but it sounded like he wanted something outside.
So definitely a consideration. What is the best strategy for keeping the work area setup permanently, outside, and keep your arcade cabinet free from grime and other stuff? Anyone that can setup something like that might have a unique set of circumstances and be lucky.
Looks good. I sprayed in the garage and just used lots of plastic tarps. Covered the floor and walls in the area I was spraying. The amount of overspray was much less than I expected, but I wanted to be safe and covered everything. When done, just fold it up and reuse next time.
@Spyridon:
Welcome from Klov, and thanks for the comment.
Overspray by my house was one of my many unknown fears when I started this stenciling project. Over the course of each coat I have gradually moved closer to the house because my air compressor hose can only reach 25 feet. I haven’t noticed the overspray getting on much of anything, which is a relief since I’ll probably have to finish the black, clear coat and touchup inside the garage now. Sounds like between you and Jamie, you’ve both done this with success in the garage without issue of everything being painted.
When you uncovered your cabs, did you notice any dust / residue from the sprayer? Do I need to cover my three cabs in the garage if I am 25 feet away?
Hey,
When I painted my Moon Patrol in my garage, I covered the couple of games that were in there with old sheets and that protected them well. As for overspray in the garage itself I didn’t care too much because my garage walls are unfinished sheetrock. Part of the wall is covered quite a bit by Moon Patrol blue and yellow. I actually tacked a board on the wall to use as a test for the gun for each coat, before I sprayed the cabinet:
http://www.flickr.com/photos/17948214@N00/2976708380/
I covered the floor and two walls in the garage. It’s a two car garage and I painted on one side of the garage. You do get residue on the plastic, but for me it was really contained around the cab area itself. You can pick up thin plastic sheets for about $2.50 each, so it doesn’t cost much to cover your entire garage if you needed to. Cover everything and paint the cab. You’ll determine how much coverage you really need and the next cab you can cut back.
See the picture on the link below. The blue on the tarp on the wall (was taped up but fell) is from my Gorf painting.
I thought to myself ‘That will take forever, how many coats would you need at that spray thickness?” If the paint isn’t running, why can’t the blue be sprayed with a little more density? Well, it isn’t just about the potential for running paint, it is all about the fan of the spray, which Donnie did mention a numerous times.
@Ida
When you say ‘Donnie did mention’, I wrote the post based on what was relayed to me by Donnie. I didn’t get from him why a larger fan of spray was needed. So, I should have asked that, but the way I explained it as best I knew in the post, he just mentions ‘testing’ the spray fan, not, ‘It should be X big because otherwise if it is less than X your paint will be too thick.’
@Spry
I think I got sick of running to the hardware store. Didn’t guess the plastic sheets would be that cheap, but so good to know for future reference. Thanks for the info.
I got lucky and didn’t end up having any problem with overspray from the spray paint itself.
Leave a comment
Your email address is never displayed and cannot be spammed. If your comments are excessively self-promotional you will be banned from commenting. Read our comment privacy policy.


October 17, 2008
Looks good. Not sure about the wheels. Maybe you could have taped them up, and used a small dolly under the game?
I made a couple of small dollies that will fit under most of my games. I think I used 2′ x 2′ precut plywood from Homeless Depot and screwed some wheels to them.
When I painted my Moon Patrol, I had it on a crappy dolly that was a little wobbly. It tipped over on me in the garage after it was dry. I went in there and found it tipped over. 🙁
I painted my cabinet inside my garage. I was afraid to do it outside because I figured bugs would get in the paint, and possibly dirt/leaves/whatever from wind. Was that a problem at all for you? Outside is definitely better from a fume and mess perspective. The inside of my garage has a lot of Moon Patrol blue decorating it.