
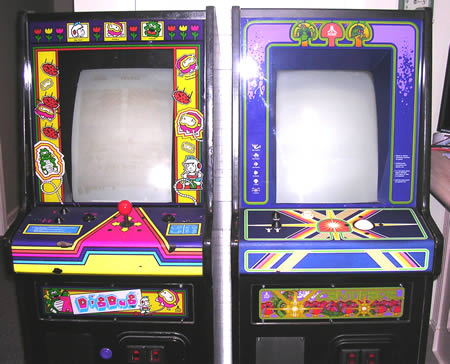
Dig Dug Cabaret Control Panel Overlay Artwork
Here’s a pretty niche little reproduction project that is going to happen, a small run of Dig dug cabaret (mini) control panel overlays. My guess is that probably around 25 pieces will be made, and pre orders for the Dig Dug overlays have already begun – Dig Dug overlays at RGVAC – Dig Dug overlays at Klov. Well, now the artwork is done so the artwork is in the hands of Rich Lint to make the prints actually happen.
Pretty quick little piece of arcade artwork
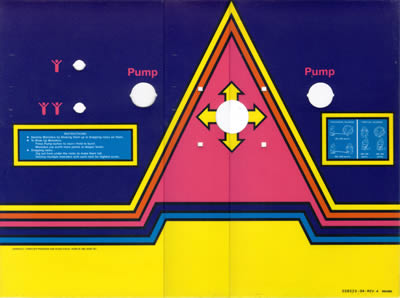
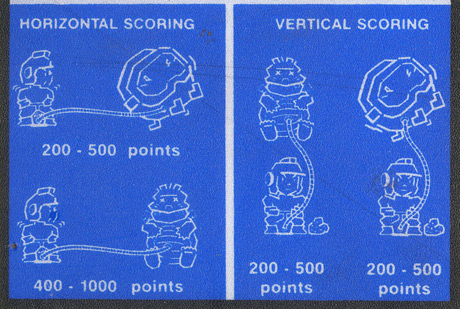
Or so I thought. I looked at the piece of artwork that was sent to me, and the only place that was concerning was the character detail on the right hand side that shows the point values for blowing up the Dig Dug enemies.
After seeing the detail I thought I had an idea of how long the artwork would take. Jim had started the Illustrator file and sent me what he had, and it wasn’t a bad start. He had traced the simple solid fills of color and had enough fore sight to overdraw the fills underneath the black line work which ended up being the basis for my bleeds.
The only piece of the Dig Dug artwork that was difficult
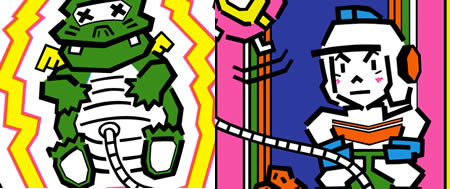
When I took a really close look at Dig Dug and Fygar I noticed that there seemed to be some faint details that got lost in the print. Take a look at what I mean;


From Dig Dug’s eyes to the lines on Fygar’s belly to some of the pumping motion lines on Dig Dug’s shoulders, there were a number of faint details that seemed as if they were intended to be printed, but were such fine details that they barely were. This scan came from an NOS piece, which may have had some minor fade and wear, but my guess is that these lines weren’t much more distinct even after this piece was ‘hot’ off the press.
What do I base my intention off of? Look at these sideart details; (Screens from local arcade.com sideart, they may not be 100% accurate, but give you a general idea)
Here you can clearly see those black lines on Fygar’s belly, and some motion lines that were generally used throughout the artwork in that blocked Deco influenced style.
The decision – Put the lines in
If it was my piece, no doubt would I put those lines in. But I asked Jim to see what he thought anyway, and he agreed. So those blocky delineations made the cut.
Finalize Dig Dug CPO’s – Separations and Bleed
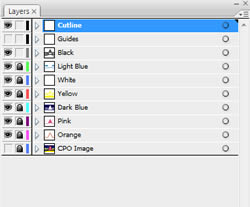 Like always, each color got it’s own separation layer with some sort of proper stacking order taken into consideration. (See screen on right of layers palette in Illustrator) I don’t know for sure if any of these colors could be printed on top of one another to give another color, my guess is that you can’t print the pink and the yellow together to get that deep orange, but who knows.
So I left each color on it’s own layer making for a Black, Light Blue, Yellow, Dark Blue, Pink, and Orange layer. Additionally I added a general ‘cutline’ layer as a suggestion to where the holes for the controls and the bolts may be.
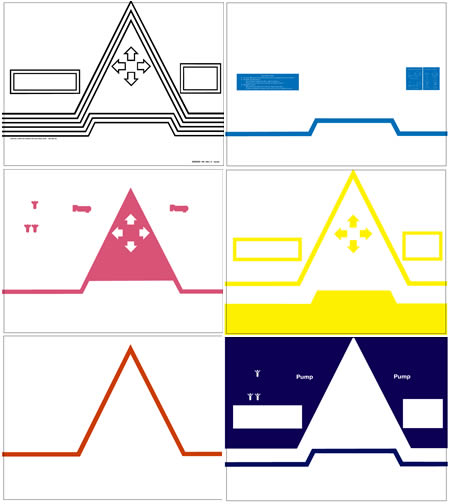
I added bleeds to each piece, did the punching where needed, and expanded the edges to add the 1/8″ bleed all the way around. If you notice above, you see what each individual color layer looks like, where in the past I think I have left the black turned on when I have shown each individual separation like when I demonstrated the Pengo Sideart seps.
I had Jim do the measurements for the control panel control placements based off of my tutorial and that drawing as well as this artwork file got sent off to Rich to start printing this piece of artwork. The only thing left is color matching, and my assumption is that these colors are fairly standard and should be easy to guess as a start to match.
Getting the Dig Dug CPOs printed faster
Jim may have to send his control panel off to Rich to expedite the process for the color matching. A couple of other options to reduce the time it takes back and forth to get the colors right are;
- I know Scott Caldwell mentioned in one of the above posts that he has an NOS Dig Dug Cabaret overlay, may be the one Jim had originally that he sold off. He could send that out to Rich.
- Jim could take his Dig Dug control panel to a local print shop and ask to borrow their Pantone chip book, just like I did with my Pengo artwork. He could then send base color numbers to start with off to Rich.
- If anyone has one of the Arcade Renovations Dig Dug Upright overlay reproductions, they could send that off to Rich for color matching. I doubt that Felipe still has the color codes for that project.
- Or any old NOS Dig Dug CPO would do as well
You can help those timeframes if you want to see this project done if you can help with the color matching listed out above. Jim has come out and made a statement that these Dig Dug cabaret control panel overlays should be printed by November of 2008. Nothing is for sure, but this is a good possibility now that the artwork is finished.
If you are interested in an overlay, and haven’t let Jim know yet, email him at arcaderehab@verizon.net. Limited run with little possibility of reprint since there were 500 or less of these cabarets ever made. Snap up yours today.
Update October 8, 2008
I got a scan of the instruction piece of the control panel artwork from a Dig Dug upright. You can see the details that were lost when the original films were scaled down and adjusted to fit the cabaret. Looks like the judgement to include the eyes on Dig Dug and other miscellaneous lines was a good decision.
Here are some similar arcade posts
- Dig Dug cabaret CPOs have started printing
- Request for photos of Two-Bits Pac-man artwork
- Atari Football XO Separations Finished
- Bally’s Rally-X Control Panel Artwork Vectorized
- Pengo Control Panel Color Separations
If you enjoyed this post, please consider to leave a comment or subscribe to the feed and get future articles delivered to your feed reader.
Comments
Do you have access to the Dig Dug cabaret bezel? That’s one that’s needed for the MAME artwork project.
@Jim:
I may be able to get a scan of the Dig Dug cabaret bezel for you. I’ll get back to you when I can.
I think the guy who has this cabaret cabinet will probably want a copy of the vector file when you are done. Will that be a problem?
@Rich:
Oh, awesome, you already have the pantone colors for the Dig Dug artwork. So right now, all you need information wise from Jim are the measurement(s) for any part of the overlay that wrap underneath the metal control panel.
Interesting note on the films, never would have thought they would have used the original upright films would have been used as a base since the two overlays are pretty different, the upright has a balanced overlay doesn’t it? The cabaret’s overlay looks just like the UR doesn’t it, only cut off on one side?
Leave a comment
Your email address is never displayed and cannot be spammed. If your comments are excessively self-promotional you will be banned from commenting. Read our comment privacy policy.


September 30, 2008
I believe that these colors are identical to the upright which I have in my collection so color matching shouldnt be an issue. on the detail. Ill have to double check but I think its a little more visible on the larger upright cpos
but my guess when they were reduce in size for the new films the detail was too small to hold and burn to the screen for the smaller cabarets.
a common printing problem.